Tantalus Scarf & MMM ’18

I seem to have been quite productive in the past few weeks and have managed to churn out four finished projects and one knit sweater that only needs half a sleeve and a hem. So prepare for the onslaught of posts in the coming few days.

To start. the most boring one: another circle scarf. This one has cats and birds. So it is a in a Tantalus state, never catching the bird and never getting truly away from the cat. As usual, these types of scarves are quite a quick little project, so after finishing this I actually started to go through all my pattern magazines in search of tops and pants. I made notes, copied patterns onto pattern paper and then called it a day.

I’ve also decided to participate in Me-Made-May ’18 again.

While I may have forgotten that May started yesterday, I did actually wear something me-made. Namely the straight sports-skort, which definitely fits into the ‘keep & wear’ pile. Today it was the eighties revival sweater with polka-dot scarf, also keep & wear. Only 29 more days with potentially a lot more non-pants items since I tend to not wear the dresses and skirts nearly as much.

Rock You!

Oh goodie, another stupid circle scarf thing…

It’s because they are so easy to churn out and so very nice to wear, even in summer. It’s also because the market stall currently sells a lot of fabric super suitable for circle scarves and I cannot help myself. So if you feel like the first sentence may be true, you had better ehm, ignore some future posts? Cause I’m not quiting any time soon!

IMG_20170711_214342470

This one has a thin bit of the left over white dots and a very wide bit of ‘rock you’ fabric.

IMG_20170711_214351972

It takes me about 1 to 2 hours to make one of these and then I wear them for hours and hours and days and days so it’s all worth it. This one may be a bit thick though, so there is a lot of fabric around my neck. It it also quite neutral, so it should see use in the cold of winter when I don’t now what to combine with some knit sweater.

IMG_20170711_214115489

Getting Ready to Ref

I may have mentioned before that I am part of a roller derby team. We haven’t played any games yet, but we are starting to get there. It’s very enjoyable to practice the skills and do things on 8 wheels, but I am not yet sure whether I like getting bruised. Next to that, I generally find rules very interesting and the rules of roller derby are no exception. I voluntarily read all the rules before it was even necessary and I tend to remember them too. Only one logical conclusion could be found, exploring refereeing was the way to go.

Part of refereeing is the outfit. You need to have a shirt with about 1 inch (2.5 cm) wide white and black vertical stripes. Officially it also needs to be professionally made, but for practising I think home-made would also be fine.

IMG_20170711_221241955

Fabric was really hard to find! I haven’t been able to find black & white stripes of 2.5 cm wide in the vicinity. At some point I found a top at a local shop with the correct width but then the stripes were horizontal. I bought two of those shirts in the largest size and decided to harvest the fabric from those. This means that there is a seam across the bust and back, but it does not bother me. The pattern is my standard shirt pattern, with sleeves. I chose a v-neck, because it makes it easier to get over the head (with helmet). The bands from the tops were also reused for the neckline and sleeves. The project was a long time in the making, since about January, but I finally finished it!

The sleeve bands have a small opening, I wanted to see if that would work. It does, and I like it. The hem was done with a stretch twin needle, I was very happy that that worked too! I haven’t worn it on skates yet, but so far, I am happy with it!


Wearable Tester Pants, take 2!

So… I just found out that I’d lost my Wearable Tester Pants blog post from February 22 2015 completely. I wanted to put the finished project up on my Finished Projects page, but the link was broken. I managed to find the text hiding in a revision of my Laundry Bag Post, so I copied that here now, since I still want to link back to this awesome finished object! Now on to the original post..

—–

I’ve had this piece of pinstriped navy linen-type fabric in my stash for a while now. I’ve always wanted to make semi-formal pants from them. But I’ve never really found a pattern that I had enough faith in to cut into my nice fabric. At some point (2 weeks ago) I decided it had to be done. I had found a pattern that I liked, that also came in a ‘shorts’ version. Since the crotch is usually the biggest problem area for me, I decided to try it out in the shorts version first, I have enough fabric to make a long version later.

I decided to cut it out single layer, in order to do some attempt at stripe matching. What I did not know at first was that this fabric is mighty shifty.. Those stripes have to be manipulated to be straight. This is a problem when attempting line up things. Second, the distance between the stripes seems to differ along the fabric.. So in the middle they may be closer together than at the sides. This makes pattern matching even more challenging. You can also hardly see the first cut piece, see example below.

OLYMPUS DIGITAL CAMERA

In the end I did manage to cut all the pieces I needed. So I sewed it up, I did decide to put in a side zipper and not a center front zipper, mainly because I thought it would be easier. Tried it on and I was actually happy with the fit. The fabric flows so that might help too. After I’d sewn it up, I decided that I wouldn’t just dump it, but make it wearable so I serged the insides, as far as possible. And since the stripes are white I decided not to bother with changing the serger thread.

OLYMPUS DIGITAL CAMERA OLYMPUS DIGITAL CAMERA

I now wear these once a week during my new activity. I’ve started the fresh meat course of roller derby at the local group. It currently still involves learning how (and how not) to fall over, go forwards and backwards and stop. If, after 12 weeks I manage to pass the exam, I might have to start doing scarier stuff, but lets not think about that. Roller skating is really very active, and having long pants is not nice when wearing knee pads, that’s why I’m using these shorts over my leggings for some coverage. It works and I like it.

OLYMPUS DIGITAL CAMERA OLYMPUS DIGITAL CAMERA

I did stripe matching along the front seam and it worked! Sadly the side with the zipper rides up more than the other side, but as I’m only wearing them once a week, I do not really care. They also have belt loops and pockets!

OLYMPUS DIGITAL CAMERA OLYMPUS DIGITAL CAMERA

So these were finished last Sunday, a minute before setting of for the first derby practice. They have since been in the wash and on the laundry rack, that’s why I forgot about them. Tomorrow you can enjoy my new laundry pin bag, made from Peruvian fabric!

—–

Ps. I managed to pass my derby exam yesterday! I’m now a Lamb Chop and not Fresh Meat anymore!

Ducks part 2

So, here are the details of the duck’n’lizard skirt. I scoured the web comic looking for nice pictures of the duck and lizard that I could crop and enlarge to be the same size (250 pixels either wide or high). I found quite a lot of them, and subsequently printed them out on tissue paper. I cut them out, and taped them to a strip of white fabric. Then I embroidered them.

Took a while, but I managed to get them all done. Here are the strips in full, with my feet for scale (and because I couldn’t not take a picture of my feet).

Ducks full

Here are the ducks and lizards in a bit more detail, oh and a stuffed rabbit. I think they are wonderful! When I wear the skirt, it doesn’t seem too childish, so that’s good! I really like it! Ducks forever! 

Ducks 1 Ducks 2 Ducks 3 Ducks 4

So thanks Dave for making such a fantastic web comic! I’ll enjoy the ducks!

Ducks Part 1

Ducks, funny creatures those. I’m reading a web comic called Sheldon (http://www.sheldoncomics.com/), which is awesome and is about a billionaire boy who invented (or something) a talking duck and who also has a lizard type thing. Anyways, I really like the style of art and the creatures are so funny. So I wanted to used them in a something. It took me quite a while to think of said something, but I figured something out.

I first e-mailed the author to see if I could use his drawings, and he said:
“For personal stuff, of course! Just nothing that can be sold, etc.
Thanks for asking!
Dave”

I may have squealed when I actually got an e-mail back. He’s like.. famous (in my head), even if it may have been an assistant or something, but probably not. Anyways, I do not intent to sell it. “What is .. it?” you may be asking. It is a skirt with a duck/lizard border. I first embroidered the ducks and lizards, which you will see in a later post in more detail. Then I sewed the bands onto black linen, of which the entire piece was used and therefore determined exactly what I could make (length and width wise).

I chose to make a skirt, with 5 pleats in the front and 5 in the back, in-seam pockets, a side seam zipper and a loop on the side for keys. It is two rectangles of approximately equal size, that were pleated to make it fit my .. below the waist. It’s built up from just rectangles. The top is finished with some of the biastape I made from the same fabric. The first two pictures are the front and back, it’s black, photographed in the bathroom, the detail is .. crap at best. Trust me when I say it looks really nice in real life, ok?

skirt Skirt 

Then we get to the pocket with the zipper next to it. Luckily the zipper and pockets are hidden in the pleats. So you can’t really see them. I like that, a lot. On the right is the loop on which I can hang my keys. The only annoying part is that it is on the left, when I usually have them on my right. Therefore, I don’t know if it’ll see much use, but at least I thought of it?

Pockets Loop 

Last but not least, the insides, nicely finished with a lining. I gathered the lining instead of pleating it. I think it probably works.

Lining

I’m very curious to find out how it ends up after a wash cycle. The reason being that I used some sort of starch on it, to make it shift less. Hopefully it will not fall to flat, but we’ll see. Tomorrow, I’ll show the details of the ducks and lizards. Hopefully!

Update

I’m still knitting, I’ve just turned the heel of the first white sock, and have ‘basted’ together my sweater and am thinking of how to best knit the collar, such that I don’t feel overly exposed and it still looks nice. It fits well, although the sleeves are made for a monkey, and I’m not a monkey. However, if I turn back the ribbing it fits fine (the lazy (wo)man’s solution).

Next to that I’ve been tracing two of my shirts, in order to make them again. Tracing is a cheap way to make a pattern and since you already know how the things fit, it’s easy to change what you want style wise. I’ve even started to figure out how to place the pattern on the bit of stretchy fabric I got a while ago. So I am trying to be productive ‘creatively’, but I find it difficult, to muster up the energy to work after being at school for 8 hours.

For the larp event I am part of I made a pair of enormous pants. I could fit in the one leg, and my friend could fit in the other (it was quite funny). So while I feel fairly useless, I may actually be doing more than I think. Let’s hope I can keep up with doing some work!

Fronts Fronts Fronts Fronts Fronts!

Sing the title and you’ll know what I mean. I have finally finished the fronts of my cardigan! Yay!

I know it’s the start of the new year and people tend to make ‘achievement’ lists of the past 366 days, but I refuse to do that. After all, nothing really changed between the 20th of December and now. The passing from the 3rd of January to the 4th is equally special as from the 31st of December to the 1st of January. Maybe I’m wrong. If you want to see what I did this year you can look in Finished projects, it should all be sorted there.

Back to the cardigan. I still need to make the collar thing, which involves picking up and knitting, something I’ve never done before, but youtube is very helpful in this. However, I think I should first iron or press or something, the side on which I need to pick up those stitches, because right now it’s impossible. It doesn’t help that the yarn is black, and I barely see the v’s that I should pick up. I tried and frogged (?) it about 4 times before I gave up and went to sleep. However, in theory I could now put it together and wear it. It should look something like this:

Cardigan

Although it should then be attached together, buttons added, with a collar and without all the loose threads. Still it’s starting to come together and I’m quite happy with it, it seems to fit without being overly enormous on me.

So now onto the collar, I can possibly wear this thing during this winter!

Cardigan 2

I’ve also started working on my cardigan again, the black with white stripes one. I’ve finished to sleeves a while ago although they are not sewn yet. (I tried them on by tying all the ends of the white bits together in little bows)

See, those are my sleeves, I still need to futz with getting them sewn up and stuff, and getting rid of all the loose ends, but I’m happy with them so far.

I have also started the fronts now, I’m knitting them in tandem so I know for sure that they’ll be symmetrical. I’ve also knitted my first buttonholes, ever! Ok, it may have taken several viewing and reviewings of youtube clips and ripping out (frogging I think it’s called?) and starting over but I did it. Admittedly, the bottom one is crap, but the two others I have finished so far actually are not too shabby, if you ask me. So now I just need to finish it, preferably in time for like.. January or February, you know, Winter.

Anyways, here are the buttonholes and fronts. The green thing is my monsterbag in which I currently store the whole knitting business.


Projects; always nice to see some progress!

New Project

I’ve got holiday right now, a break from school, which means that until I find a summer job, I’ve got a lot of free time on my hands. So I decided, it’s time for a new project! I was looking around the internets and found this. Another vintage, uploaded, free knitting pattern by the wonderful Liz of zilredloh.com. I decided that, taking into account the time it took me to finish the last one, I should start another cardigan now so I could possibly wear it this winter.

So on to the window pane cardigan, although I’ve made some changes. I fail to knit at the correct gauge thingy so I’m just knitting at my normal gauge and hope it fits, the last one I made was with more stitches and way to big, so I hope that this one with less stitches but the same yarn will fit better. Also, I’ve omitted the vertical lines and made the contrast colour two rows instead of one. I’m not sure what to do with the collar, I might omit it or modify it, but I don’t particularly like the one on the picture.

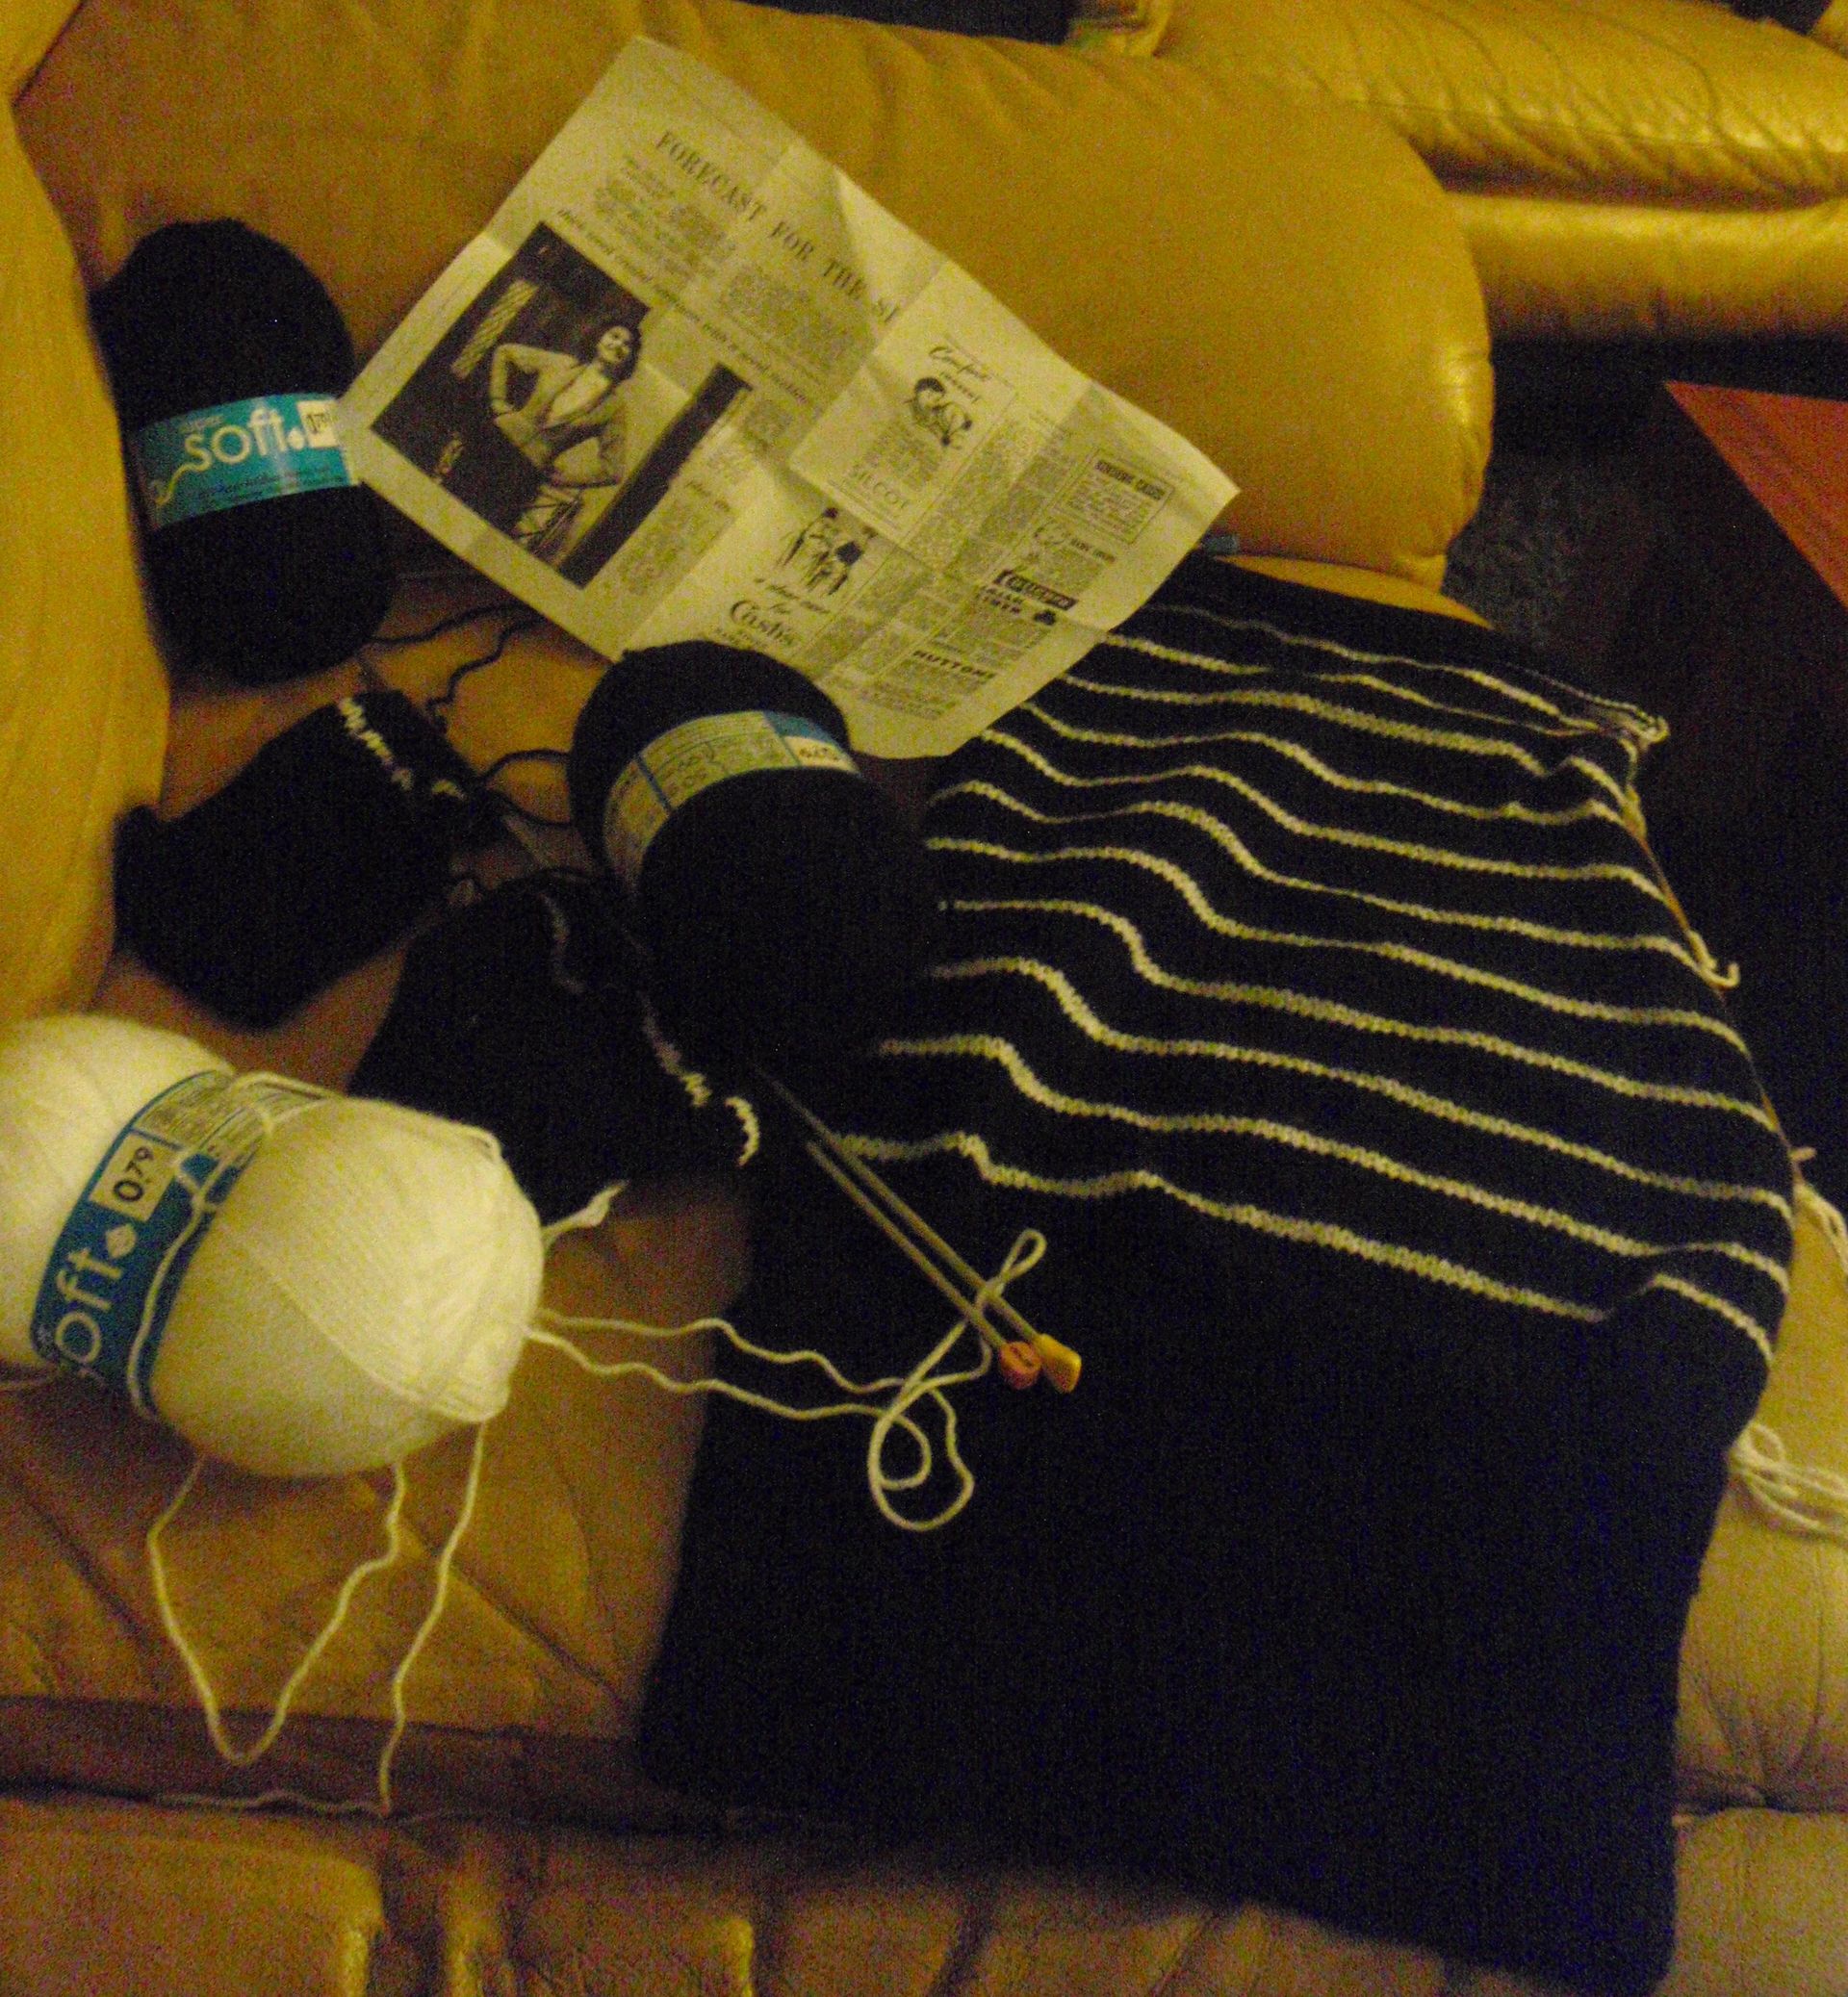
I have finished the complete back panel and the ribbing and one pattern on the sleeves since I started 2 or 3 weeks ago. I found during my last cardigan that I hate knitting sleeves last because I think that the thing is already almost wearable. This time I opted to do the back and then the sleeves and wait with the fronts, because they are the most exiting (I think). Anyway, this is my progress:

What you see is the yarn in the left top and bottom corner (a white and a black one); to the right in the middle, the sleeves to be, at the top the printed pattern and the second black yarn and to the right the completed back panel. I know it’s long enough, I’ll have to wait to find out if it is wide enough too.

So the only thing to do now is finish it. I think I should set a deadline .. eh .. what would be reasonable. October. I think I’ll try to finish this thing before October, that should be attainable, right? Right?

Well I’m off to knit me some more sleeve!