Activities Mug

Taking pen to mug!

I wanted to play around with ceramic markers again, so I bought out a mug (white), found an occasion (Mother’s Day) and got to work. The plan was to make a mug with activities that my mum likes to do. I googled my way through tons of line drawings and settled on a few. Practiced on paper for a bit and then got to work.

Can you guess what I’m trying to show?

I was going for:
Side 1 Red – jeu de boules/petanque, there is a tiny cochonnet on there too.
Side 1 Purple – skiing, because it’s the best sport to do in winter.
Side 1 Black – running, a hobby that I will never understand, but she seems to enjoy it.
Side 2 Red – relaxing, maybe with a book. I’m known to partake in this activity too.
Side 2 Purple – having some wine, because I couldn’t figure out how to draw a bar.
Side 2 Black – bicycling, without the helmet that does go with the race bike, but minimalism.
Side 2 Red – choir singing, wailing terrible Dutch songs with a bunch of locals.
Side 3 Purple – playing (bass) guitar, it might not look like a bass, but you get the idea.
Side 3 Black – hiking, following a path all through the Netherlands in different stages.

I did enjoy looking up all the images and making something out of it. The marker instructions said that if I baked it in the oven, the drawings should be permanent and dishwasher proof. So we’ll see how it holds up!

Bee Sign

A pretty excuse for laziness.

What do you do when you’ve completely given up on mowing your lawn? You plant a sign. Or at least that is what I did.

I’ve got an absolute hatred of mowing the tiny bit of garden that I have. Weeds grow really quickly, there’s barely any real grass to speak off, and it’s just misery. I also feel like the majority of the gardens that I can see from my house are very minimal and not particularly insect friendly. So I combined the two problems. I was going to not mow the yard but also indicate to people that this was a deliberate decision (pre-empting some peer pressure here). I chucked in some more flower seeds and got to work.

I found a nice font, wrote my message (Bee strip, deliberately unmowed), copied a picture of a bee on and then mangled the same picture of a bee to show it in a different orientation. The combination was resized to fit the piece of wood (a tiny bamboo cutting board) I bought for it. The collage was printed and then I used some carbon paper (the stash delivered) to get the image onto my wood. The wood burning tool came out of a box and was used to permanently mark the cutting board – only one finger burn! Once it was finished, I went outside and MacGyvered a stick to the back. It’s been up for a week now and still standing, even through a pretty decent storm. Until the stick breaks, I’m calling it a win!

Overenthusiastic Masks

Since I still had blue fabric left, I decided to make a few masks.

Sadly, I got carried away, and I now have 17 more masks for my one-person-household. They do all have wonderful images on them, which is the reason there are so many. I got trapped in a cute images hole on Pinterest and just wanted them all. Since I had the capability, I made them all.

From left to right and top to bottom: Up, Meow, Fish, Sheep, Not Today Cat, Cactus, Bear & Hedgehog, Combined Snow Globe, Rabbit, Triceratops, Free the Bird, Apatosaurus, Stegosaurus, Tea Rex, Sleepy Panda, Pterodactyl, Plesiosaur

They are effectively the same as the six I made previously, the only difference being that I eliminated the middle layer. Sewing the chin seam 35 times was enough – I accidentally made a lining to many, which is why there are 35 chin seams. I enjoyed locating my other fabric markers and playing around with them. The plesiosaur and the little triceratops are my favourites. Although Not Today Cat is a mood that happens a lot. I don’t think I’ll ever dare to wear the meow one, but the font was so funny that I had to use it too.

The pattern I used comes in different sizes, I made the size S for me. However, I’m unsure if people around me have the right amount of face if I ever wanted to gift one (or more) of these. As of today, they are mandatory in public transport in the Netherlands – not in everyday life though. But I’m sure I’ve got enough to see me through plenty a rail-journey.

Blue Masks – Two Ways

With the whole virus situation, the Dutch government has announced that people need to wear masks in public transport from June 1st onward. Since public transport is my only transport for distances greater than 10 km, I knew what I had to do.

So I got a cotton bed sheet, and cut out a few masks. The first iteration had a center seam and is a pattern from Burda. It’s quite quick and easy, the main problem is attaching the elastic and the main benefit is that it has a pocket for an additional filter.

Yesterday, I decided to put another pattern to use, promoted by Male Pattern Boldness. The ‘Free Face Mask Pattern and Tutorial’ by Dhurata Davies. Benefits of this is that it has three layers and that the bottom and top strap are one long one so its easier to adjust.

I also decided to add some fun images to these ones. If I need to wash them after use, I need to make sure that I know which one I actually used. So I looked over my pinterest boards and chose some images, I’ve listed the pins below. I printed those, traced them on my window and then traced these traces onto the fabric. I don’t know how the fabric marker will hold up, but at least I tried, right?

From left to right and top to bottom. Fox, Paper Plane, Plesiosaur, Cactus, Waves & Boat, Mouse with Mushroom

I do not enjoy wearing masks, but I guess I’m going to have to suck it up and do it.

Christmas 2019

As always, I have sent out Christmas cards. The process this year started very late. I’d been thinking about it a little, but couldn’t really figure it out. I knew it needed to involve the following:

  • Have a RAWR-ing 2020!
  • A dinosaur, to make the above make a little more sense
  • And something Christmas

The first idea involved a dinosaur with a Christmas hat, the second was to create a snowglobe type affair with a dinosaur in it. In the end, I settled on something much simpler. Just a dinosaur, with the text above it, in a circle with a cut out star; to represent Christmas ornaments. The ball would then be attached to a very Christmassy piece of card for me to write a message on the back.

I set out by looking for inspiration for my dinosaur. Parameters included: cute, mouth open (for RAWR!), possible to be re-drawn by my with my very limited skills. I tried a few dinosaurs from pinterest, see efforts above (the fox was just because it was adorable). In the end, I settled on a very lovely dinosaur in the public domain here. I drew my dinosaur facing right, since that made more sense to me. He’s also got spikier spikes, different hands, his tail flows from his body and his eyes are the same size. As such, there is still resemblance to the original but it is clearly not a complete copy.

Once the dinosaur was drawn, I needed to get him onto paper. So I traced the drawing with a black pen, took a picture of that and vectorised it. Then he was put into word with a circle around him and the text above. He was first printed in a 10 cm circle (since he still needs to fit in an envelope), but by then I had figured out that white paper was a bit.. sad looking. Then I printed him on some A5 pearl linen card stock. When I touched the ink, it smeared horribly, so that wasn’t really an option either. So I looked around and found some paper with somewhat sweet prints and used that. Since I wanted to get more dinosaurs out of my paper, I reduced them to around 7 cm, so four could fit on one 15×15 page. I printed those out and then used a super handy circle cutter to cut out the circles. Lastly, my trusty star hole punch was employed to make a hole in the top.

After that, I grabbed the very Christmassy 30×15 cm card stock that I’d bought earlier. Those sheets were cut into threes to become a nice 10x15cm card. Punched another star in the top and then had to attach the dinocircles to the card. I wanted something red, and I was lazy, so I repurposed a graduation tassle. Cut those little threads in half and attached the two bits of card together. The circles can now also swing, which I think is cute.

I combined different prints of circle and paper, so the above are not the only options. However, I do think they are very cute, and I’m real happy with my Christmas dinosaur!

In any case, I wish you all a RAWR-ing 2020! May the crafting work out and joy spark in your life.

Wedding Gift

Yesterday’s now married friend and her now husband also deserved a present of course. They preferred to shop for things themselves, but I don’t really like simple envelopes. As such I fabricated something around it, since I couldn’t help myself.

My friend is a fan of bunnies and her go to word was carrots (or cookies), with a bunny themed wedding and bachelor party it had to involve rabbits, clearly. I pinterested some more for cute rabbits and settled on this pin as the ‘inspiration’ for my ‘artwork’ – read, I drew the bunnies, enlarged the ears and coloured them with felt tip pens. Then I arranged a number of coins into a heart shape and drew balloons under them, if the coins are removed, it should still look like a giant balloon heart.

Then, because I couldn’t find a way to really add my name to the picture in the frame, I made a card and wrote something on there. The card was also somewhat symbolic and bunnyish. At the bachelor party, we made bunny art, and I drew the same design. It’s a quarter Miffy head (the only thing I know how to draw without a reference). Based on an old card I had for years. I stuck the card in an envelope and put that over the money heart. The picture was taken before I added all kinds of words around that symbolized their lives to me. I hope they like it, and otherwise I had a good time making it. I hope they Live, Laugh and Love for a long time to come!

Present

A friend of mine is born on the first of January, which is a terrible day to be born if you ask me, or him. This has just passed but he wanted to celebrate his birthday at some point. I talk to him practically every day, so I figured he would need a present. Even if he wasn’t going to officially celebrate his birthday. So I started on quite a personal project: a pack of cards.

He finally celebrated his birthday yesterday, so although I finished the present a month ago or so, I’m only now allowed to post about it. Anyway, on to regular programming!

Now, you might think, cards, that’s quite boring.. no?

But over the past year he has been telling me what he wants for his birthday, this has included a baby jaguar, panda’s, a weird-looking spider thing, Afghan hedgehogs, a fox etc. I don’t think I can ever really ‘get’ those things for him, since some are endangered or illegal and more stuff like that.

He’s also a big fan of magic, card tricks and the like. He quite likes to play games and is always in need of a new deck of cards. I connected those two things and decided to come up with a deck of cards that had cute animals on them. Admittedly I didn’t check for copyright on all those images, but I figured, it’s for personal use and they will not really be used.

Anyways, I opened up Powerpoint and made 52 cards. In the left top corner I put the value of the card Ace to King, beneath that the category of animal and in the top right corner I put one of the four suits that cards have. The cards were coloured according to their category and a picture was put in the middle. Then the writing on top of the card was mirrored on the bottom, like so:

OLYMPUS DIGITAL CAMERA

The four categories are: Cats & Dogs (with the cheetah, fox and a variety of other cute catty and doggy pictures) these are also diamonds. The hearts are (Under)water, with a variety of water based creates (turtles, frogs, octopi, dolphins etc.). Spades are Wild (bears, giraffes, hippos, sloths etc.) and lastly clubs are Garden (with spiders, deer, hedgehogs, owls etc.). There are 13 cards in each suit, 2 additional jokers (with little children in respectively a dragon and a frog costume) and a name card.

I then got it all printed on matte photo paper, I have since figured out that this might not have been the best idea, but it’s done now. They are not very easy to shuffle, so card tricks may be problematic, but it’s the idea that counts right?

After I printed and cut all the cards (see the corners of the cards in the picture? I had to cut all of those out), I made the box. There was a leftover bit of photo paper and I printed a name card for the front. I measured the size of the cards and gave it a bit more space and tadaa, the present was born. This was a fun and easy way to create a personalised present. I might do it again some time!

Box

Costume(?) Plan

In May I’m going to go to a LARP with a friend of mine. For this I need an outfit. I have a plan, and it is quite costumey, and I don’t know if it’s going to work, but I hope so.

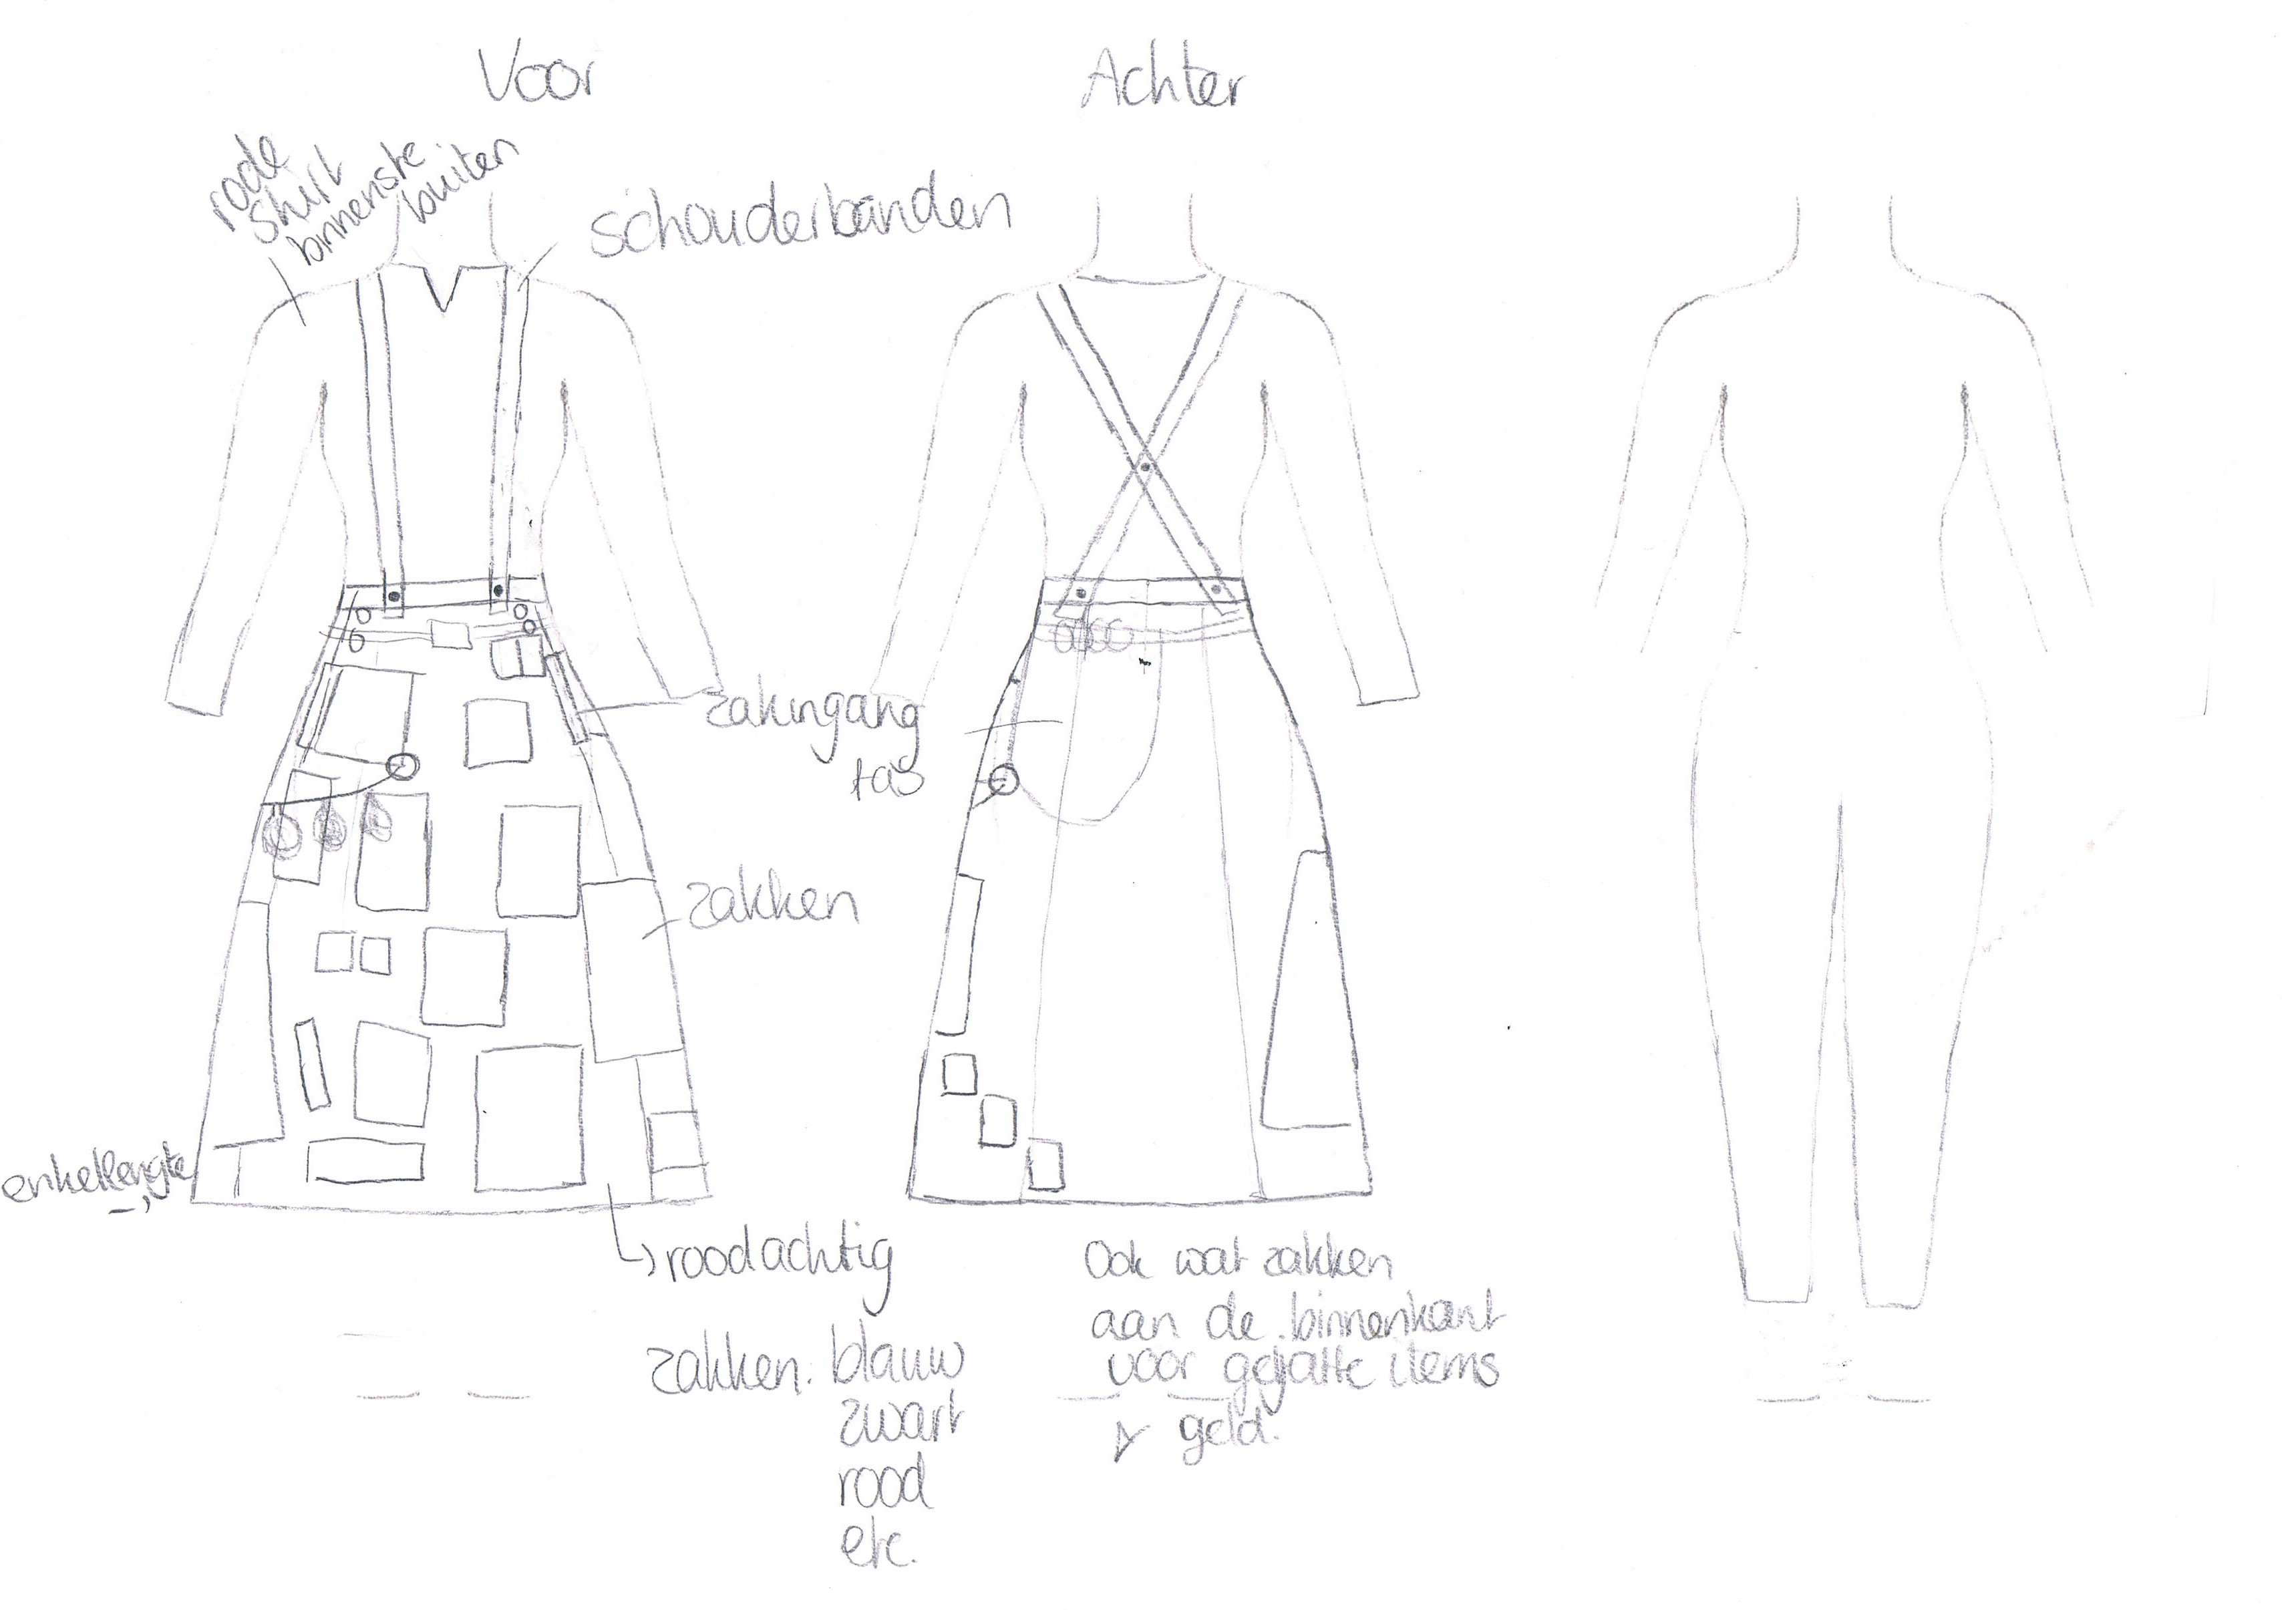
I’m envisioning myself in a skirt that has a lot of pockets. The character I want to play is somewhat like a magpie, always collecting shiny things. And not shiny things, and wanting to know everything (ok, maybe that’s not magpie, but it’s fun). So I want to be able to put all the stuff I ‘collect’ into something, in this case, a skirt. I want to make the skirt out of a red-ish linen that I’ve had for a larp purpose for years (it’s the only bit that is big enough for the skirt I want to make). Then I want to add pockets, a lot of pockets, in different kinds of fabrics. I found bits in blue, red, black, more blue and more red, so that should be fine. I also have some wool left over from my mantle. This could serve well as pouches I think. I have made a sketch (see below), I just haven’t really figured out what to do with the back. I can’t really put stuff in pockets, if I put pockets there. Since sitting comfortably is quite a priority for me, especially if I’m going to be running around the woods for days, I need to be able to sit if I’m tired.

Any ideas?

Here’s the sketch, the text is in Dutch, and also not very interesting:

Sketch

The third figure is empty, because it’s a template since I cannot draw freehand figures very well. I can draw one half of the figure, and than fail at reproducing it, so I scanned it and copied and pasted and voila!

Inspiration There, Energy Gone

I have so many ideas for fun things, and I haven’t finished any these past couple of weeks. It’s starting to be depressing. I started a purple pant suit, and gave up not very long after I started it. I think the pant bit is reasonably ok (although it sort of itches), but I cannot seem to figure out how to do the top bit. So I gave up. Giving up has been very easy. I’m just not feeling it, at all. And I don’t know why exactly. So that is annoying me too.

I also started on the dress from the vintage pattern. Completely messed up the instructions as usual (didn’t read them carefully) but eventually that worked out fine. Except.. I don’t have big enough boobs, or my waist is not small enough, I don’t know yet. And since I don’t have a dress form, I need to fit on myself, and with nobody around to help me I just don’t get around doing it. I just don’t feel like it at all.

I’ve even stopped baking things, there’s nobody here to eat them so why would I. They’d just go to waste. However, I did do some creative things over the past weeks. I tried to draw the same picture as a person from deviantart (phobs) in his -lady in the shawl- drawing. Here it is:

Lady in the Shawl

I know the head isn’t right, but I quite like the rest (ok I got fed up with the skirt wrinkles, so I just doodled). I cannot draw from inspiration, I can only draw from example. This is one of them, I don’t do it regularly but since my failure to do creative things at the moment is mostly concerning sewing, I thought drawing might be a good alternative.

Maybe I’ll try a little simple skirt in a minute. Just to get my ‘finish it’-mood back on again.