Cards for 2026

Embroidered cards for the new year.

This year, I really aimed to finish my best wishes cards before Christmas. The plan had four main parts:
1. Decide on a design
2. Finish the embroidery
3. Make the cards
4. Write and deliver the cards

Step 1 went well. I had found this super cute cross stitch kit from Bothy Threads called Christmas Quackers that I thought would be perfect. Living in the Netherlands, I’m not sure how many people know the English tradition of Christmas crackers, but the duck was too cute to pass up. So once I finished another embroidery, I set out to stitch this one.

Step 2 went decently. I messed up a few times (counting is hard!), but managed to fix the mistakes and ended up with the perfect duck. I really love the fly away feathers on the side. I prefer my cards to be not purely Christmas coded, so I replaced the Christmas Quackers text with Quacking 2026. It was stitched with a gold thread that was absolutely awful to work with, not worth it either since it barely shows up when I photographed it.

Step 3 only had minor mishaps. I made three kinds of cards this year. A small version for roller derby (6 per page), a medium version for work (4 per page) and a large version for sending (2 per page). The S was just printed and had a star cut out. The M was printed with two punched stars and a bit of ho ho ho fabric threaded through. The L was printed with two bits of ho ho ho fabric stuck on using a wax seal (in different colours) with stars. The printer was the main mishap machine, with random white lines appearing in the middle of the image sometimes. Luckily I had enough of the linnen paper to print some more.

Step 4 was done in installments but I managed it all before Christmas. I know some have already been delivered but some may still be on the way. So the only bit that was laid by the wayside was writing the blog post. So I hope all the best for you and your loved ones, and a Quacking 2026!

Happy 2025!
Happy new year!

As usual, the end of November meant some paper crafting time. This year for the cards, I settled on wanting to use (a) button(s) and have a terrible animal pun. The original plan centered on (s)nail it, but I couldn’t really get it to work. So I trawled pinterest and google for cards and found the use of ‘whaley’ as ‘really’ and thought that was a pretty decent idea. It’s also possible to make a little round whale that I could stick a button on.

For the actual design, I picked a new font: Edo SZ and wrote the text in a word file. Since I didn’t necessarily want to have a copyright problem, I built the whale fin shape and its firework fountain from word icons. Is that the designer way? It very much is not! But I did really enjoy playing with the stock images and manipulating them until it did what I wanted. The origin is fireworks, leaves, a moon shape and a circle.

To put them together, the files were printed on some paper I found in my stash. The buttons were attached using a short length of self-dyed thread. All the buttons also came from the stash. I didn’t have to buy anything new for this card. In the end, I also made a separate version for my roller derby team and wished everyone: ‘let’s have a whale of a time together in 2025!’. These were on some linen stock that was also from my stash.

So for now, happy holidays and may you all have a whale of a time in 2025!

Whale

Happy New Year

Wishing you all a Faunatastic 2024!

This year, there were two versions of the New Year’s Card; both variations on the same pun. The simple one had three animals cut out and a print of the new year’s wish in an animal paw font. Then I added a random assortment of stars from my stash (several old Christmas card ‘chads’). The first image was taken on a red background to show the stamped out fauna. The card itself is white linnen paper.

The second one used a cutting and embossing machine that I got myself in the lead up to Christmas. I’m not entirely sure how much I will be using it, but I have now purchased enough cutters to last a while (one would hope). This one is a round ‘tree scape’ cut from marble paper, and two or so different animals cut from either discarded marble paper or black paper. This is all glued onto some white linnen cardstock and cut into the shape of a drop. The hole is made with a snowflake punch, and the slogan was printed on some Christmas card stock and then had a raindrop punched in. They are attached using the strings of an old graduation tassel. I like these and the machine a lot, but after 25, I was sort of done. And I needed some more for work; hence the simple version above.

In any case, I wish you all a faunatastic 2024!

May you experience joy, stay (or become) healthy and continue to be hopefully creative!

Cards for 2023

Healthy & Happy 2023!

As with every year, I wanted to send some cards to celebrate the new year. It’s been a bit of a draining time with lots of stuff to do around work and personal life so inspiration was slow to flow. At some point I resorted to Pinteresting just to see if there could be some idea available. I found something that I liked in this pin. It’s the year turned sideways to create a Christmas tree and some well wishes below. I figured I could use my extensive word-art skills to achieve something like that.

I decided that I wanted to make the trunk of the tree out of other well wishes and that it of course needed an exclamation mark in the year. So I put those in and then tried just about every font in the Word catalogue, before settling on Rage Italic – not sure the name is very Christmassy, but ey. I chose healthy and happy because they fit in well with the angle of the first 2. And of course because everyone deserves health and happiness. The trunk needed to be brown and the year green, for optimal tree effect. A light coloured circle was put around it so I could cut them to shape on the off-white linnen paper. Once that was done, I punched a star hole at the top of the tree. Et voilà: card.

So to everyone, a healthy a happy 2023!

Happy Holidays!

Making others do the dirty work of designing the holiday card!

When the year has been somewhat challenging and normal procedures don’t always apply, I do still try to keep some traditions alive. While I didn’t start my card production until it was already December *shock* *horror*, I did manage to finish them. Since my personal creativity was a little stumped, I relied heavily on my printer and everyone else inspiration.

I had found some holographic paper, where there was a holographic design beneath a layer of black. You would use a pen to scratch out your own design. I decided it was perfect and set out to create an ornament type shape. Printed it on the white back and cut them out with scissors. I used my trusty star punch to make a hole for hanging and added a wooden stick with a star glued to the top as the scratch pen. I wrote personal messages with a red pen (to distinguish from the instructions) and put them in the mailboxes, pigeonholes or on desks.

Since they have been distributed, I’ve received some very cute pictures of people taking the pen to hand and making their own designs. I recommend this as a strategy to make others do the creative work. So hereby to you all:

I wish you a creative 2022!

Christmas Card 2020

Happy holidays and a top (hat) 2020!

This year was not the easiest. Working from home since March, while living alone and with some struggles in the family, did not make this the nicest year ever. I still wanted to make cards to celebrate the new year. However, the sadness of 2020 also meant that I didn’t get any inspiration until it was already November. Then I rediscovered an image on Pinterest of someone who made a snowman out of buttons. That sparked the inspiration. Then I needed a wish – because happy holidays is just not me. Because Christmas might not be everyone’s cup of tea, I focused on 2021. Based on the looks of the snowman, I came up with a fairly terrible pun and got to work.

I bought a themed 30x15cm paper block and picked those sheets that were more winter-y. I designed the slogan for the cards in word and chose a font from the internet: Anke Font. Then I made the mistake of cutting the paper to size (7.5x15cm) and attempting to get it through my printer. Lets just say that my printer and I were not friends, much yelling ensued. For a second batch, I just copied the slogan 4 times onto a larger word file and it printed it in one go and did the cutting afterwards. So much smoother, learn from my mistakes! I grabbed all the white buttons I bought on a Sunday when trying to get the buttons for the combinations and set to sorting. Each card would have a two-hole button for head, and a larger 4 hole button for a tummy. Stuck those to the bottom right corner (generally), and used a thin permanent marker to give my snow people a top hat (hence the pun) and two little stick arms. Folded the top corner with the slogan over and punched a star or a snowflake in it.

May you enjoy your holidays if you have/celebrate them and that the coming year brings much joy, happiness and good health.

I wish you all a top (hat) 2021!

Christmas 2019

As always, I have sent out Christmas cards. The process this year started very late. I’d been thinking about it a little, but couldn’t really figure it out. I knew it needed to involve the following:

  • Have a RAWR-ing 2020!
  • A dinosaur, to make the above make a little more sense
  • And something Christmas

The first idea involved a dinosaur with a Christmas hat, the second was to create a snowglobe type affair with a dinosaur in it. In the end, I settled on something much simpler. Just a dinosaur, with the text above it, in a circle with a cut out star; to represent Christmas ornaments. The ball would then be attached to a very Christmassy piece of card for me to write a message on the back.

I set out by looking for inspiration for my dinosaur. Parameters included: cute, mouth open (for RAWR!), possible to be re-drawn by my with my very limited skills. I tried a few dinosaurs from pinterest, see efforts above (the fox was just because it was adorable). In the end, I settled on a very lovely dinosaur in the public domain here. I drew my dinosaur facing right, since that made more sense to me. He’s also got spikier spikes, different hands, his tail flows from his body and his eyes are the same size. As such, there is still resemblance to the original but it is clearly not a complete copy.

Once the dinosaur was drawn, I needed to get him onto paper. So I traced the drawing with a black pen, took a picture of that and vectorised it. Then he was put into word with a circle around him and the text above. He was first printed in a 10 cm circle (since he still needs to fit in an envelope), but by then I had figured out that white paper was a bit.. sad looking. Then I printed him on some A5 pearl linen card stock. When I touched the ink, it smeared horribly, so that wasn’t really an option either. So I looked around and found some paper with somewhat sweet prints and used that. Since I wanted to get more dinosaurs out of my paper, I reduced them to around 7 cm, so four could fit on one 15×15 page. I printed those out and then used a super handy circle cutter to cut out the circles. Lastly, my trusty star hole punch was employed to make a hole in the top.

After that, I grabbed the very Christmassy 30×15 cm card stock that I’d bought earlier. Those sheets were cut into threes to become a nice 10x15cm card. Punched another star in the top and then had to attach the dinocircles to the card. I wanted something red, and I was lazy, so I repurposed a graduation tassle. Cut those little threads in half and attached the two bits of card together. The circles can now also swing, which I think is cute.

I combined different prints of circle and paper, so the above are not the only options. However, I do think they are very cute, and I’m real happy with my Christmas dinosaur!

In any case, I wish you all a RAWR-ing 2020! May the crafting work out and joy spark in your life.

Christmas 2017

So this year I endeavoured to make Christmas cards again. This time, there were three versions that ended up making the cut. The extended version, the ‘just the essentials’-version and the ‘I ran out of snowmen’-version. I cannot remember where I got the idea exactly, but it probably involved pinterest, snowmen and a written ‘super’ on a card somewhere. I also found a bunch of wooden Christmas trees that I figured I could incorporate a la this pin.

In any case, I figured I would make snowmen with capes, to signify the super I was going to use in the wording of the card. I bought some crepe paper in Christmas colours, and got to work by grabbing some coloured cardboard from some previous years cards.

Extended version

The extended version included a wooden Christmas tree behind a diagonally cut strip, a snowman with a cape, orange nose, broomstick arms and eyes and the text ‘wishing you 365 days with Super moments!’. The orange nose was a cardboard triangle, the broomstick arms and eyes drawn on with a felt tip pen. The snowman and his cape were made of crepe paper and a lot of glue was involved in the processes. I managed to ruin at least 5 cards by writing ‘whishing’ which I couldn’t sent, but some I cut op to only have the snowman and adding a new text.

‘Just the essentials’-version

For my colleagues at work I made a version with a smaller snowman on black paper. I also cut out a star with my special star-punch. These were received very positively. I must say I almost prefer these over the extended versions. I also think the text is better ‘Wishing you a Super 2018!’ and just completely ignoring Christmas itself.

‘I ran out of snowmen’-version

Right before Christmas I remembered that I was going to visit my family on Saturday, so had to make some cards for them too. I did not have enough of the other versions available, nor did I have enough snowmen to make another card. So this one got cute stars (i.e. the leftovers of other cards). I quite like these too, and I may incorporate something like this next year, perhaps.

So that was the paper crafts completed for 2017, most likely. In any case, I also hope you had good holidays and I wish you a Super 2018!

Christmas 2016

This year will end with one big change; I’m moving house today. This means that next to putting all my stuff into boxes, I needed to plan some things. So somewhere a long time ago I started working on my end-of-year-cards. This year they were going to have to do double duty. They’d have to be festive, for Christmas & New Year, and allow me to distribute my new address to all people on the list.

So the design process started with scouring through pinterest to find nice ideas for cards. In the end I found two pins that would be nice to combine this one and this one, all my card pins can be found here. Then I looked through a website filled with fonts. I have fairly crappy handwriting and decided that I’d wanted to have the address and text legible. Eventually I found it! Then I tried to print it and it made something hideous, so back to the fonts I went and I found my second it!

I have since managed to murder my laptop and have thus lost both the font, the Christmas list, the actual card and about 6 months worth of other data and pictures. That should teach me to backup more regularly.. [Cue 5 minutes of clicking through handwritten fonds on the internet] I’ve now rescoured the font website just for your pleasure and I can tell you that the font I used was Talking to the Moon.

img_20161213_115143253

Then I got paper and more paper and made all kinds of nice pastel cards with the green end sticking out of the right side. After I’d finished about 30, I figured out that it would be grammatically incorrect (the comma at the end of the sentence) and I got new paper, now more Chrismassy red and started all over again. I also added the ‘pull’ which wasn’t on the original. On the inside I printed my new address so I didn’t have to write it out 40 times. Now, the ‘fancy bit’ of this card is the activity you have to do to read it all. See my fantastic gif below!

christmas-2016

I’m now hoping that people ‘get’ them, and if not, well, it’s the idea that counts!

So, to all of you: Jolly Holidays and a Nifty New Year!!

Christmas Cards

Every year it is the same question, will I send out Christmas cards this year? Real ones, with paper and that (if I don’t hand them over to the recipient directly) go through the mail and stuff. This year, the choice was easy. I was in a shop, I saw a kit for making paper Christmas balls and decided I could use the idea for my cards this year.

The shop sold craft paper blocks which I got one of, bags of buttons in different sizes (120 in a pack), metal loops for ornaments and gardening wire. I had my card almost ready!

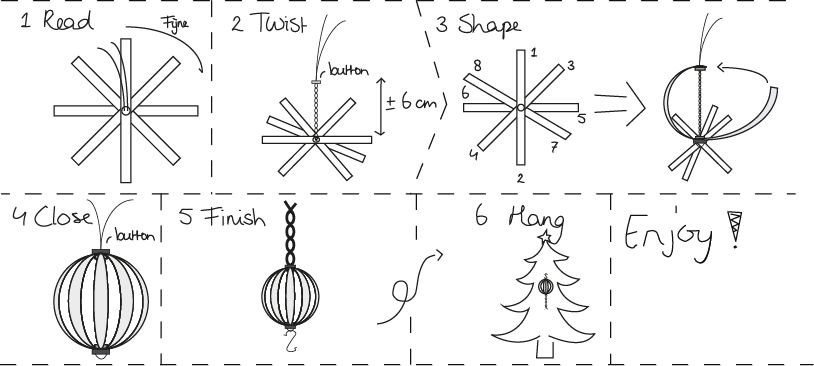
I’ll explain what I did, there are more pictures below. First, I’ll show you the ‘instructions’, I drew them and then created them in Photoshop (not very well, but still), I copied my own handwriting and printed 3 of them on 1 red A4 piece of paper. I then signed my name in the bottom right corner and added some metallic fireworks. The back was used for a personal message and the address.

Instructions

To put the kit together I cut strips of the paper using my paper-cutter machine thing. It can do straight lines, dashed lines or curved lines. I used the first and the last. Then I made holes in the ends of the strips using a hole punch. I noted the middle of the strips and punched a hole there (1). I wrote the text I wanted on the strips (2), the text is (translated) Happy Holidays and a Healthy, Cosy (untranslatable) and Happy 2014. It was written (mostly) on different coloured strips (3). I cut a bit of wire and added the first button (4).

Cards 1

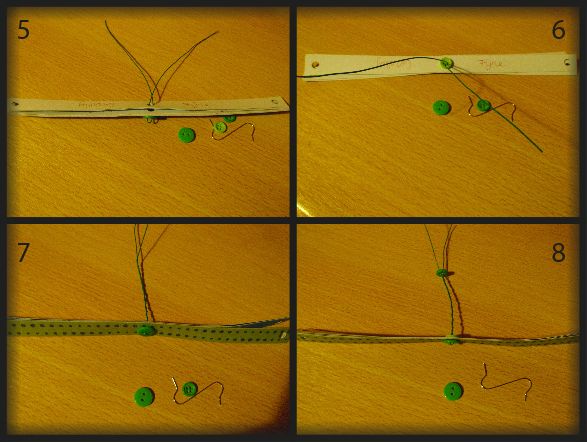
I put the strips on the buttoned wire (5) and added a button on top to keep it in place (6). This was placed with 2 other buttons, a hanger and the instruction in an envelope and sent. To make the ball, you twist the wire (7) and add another button (8).

Cards 2

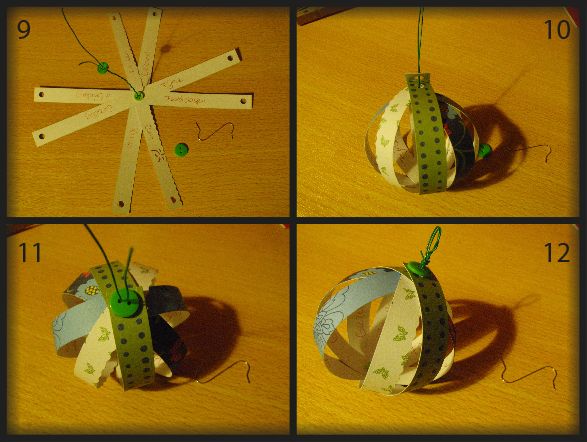
You can read the entire text in now if you turn the strips out (9). Then the ends of the strips are put on the wire (10) and the last button is added (11). Twist the wire a bit and add the hanging loop (12).

Cards 3

That’s it! Then you enjoy the pictures people send you of their balls in their trees. I enjoyed that the most. I had fun making them. Next year, I’m going for a new idea. I got some inspiration from a card we received during the holidays, so who knows…