Happy Holidays!

Making others do the dirty work of designing the holiday card!

When the year has been somewhat challenging and normal procedures don’t always apply, I do still try to keep some traditions alive. While I didn’t start my card production until it was already December *shock* *horror*, I did manage to finish them. Since my personal creativity was a little stumped, I relied heavily on my printer and everyone else inspiration.

I had found some holographic paper, where there was a holographic design beneath a layer of black. You would use a pen to scratch out your own design. I decided it was perfect and set out to create an ornament type shape. Printed it on the white back and cut them out with scissors. I used my trusty star punch to make a hole for hanging and added a wooden stick with a star glued to the top as the scratch pen. I wrote personal messages with a red pen (to distinguish from the instructions) and put them in the mailboxes, pigeonholes or on desks.

Since they have been distributed, I’ve received some very cute pictures of people taking the pen to hand and making their own designs. I recommend this as a strategy to make others do the creative work. So hereby to you all:

I wish you a creative 2022!

All The Ornaments

What do a Sprout, Cat, Dog, Snow Baby, Chicken and Bunny have in common? No clues…? They are all ornaments I crafted for my family when we celebrated Christmas this year. I’ll explain the idea behind them below but first.. They’ve all been put into my tiny tree, so I present the evolution of Christmas Tree!

It all started with an evening browsing Ravelry, as I’m wont to do. There, I found a very cute little sprout. As you may or may not know, sprouts seem to feature heavily in English Christmas dinners. My dad likes them quite a bit. I hate them a lot. Hence, I decided that I would make him a sprout, so that the real deal wouldn’t have to enter my home. So I set out knitting and made the sprout. I added a hanging loop and popped him in the Christmas tree. (Pattern Brussels Sprouts by Amanda Berry).

If you make one gift, you have to make one for everyone, so second came the girlfriend of my youngest brother. She has rabbits; easy choice, therefore, was to make a tiny bunny. So I set out to complete a purple rabbit. Also added a hanging loop and put it in the tree. (Pattern Catnip Bunny by Selina Kyle).

For my mother, I chose to do a snowbaby. It’s got a red hat and purple scarf to symbolize the red hat society and not giving an iota about clashing clothes. The snowbaby also has a hanging loop and no snowball and its hat is a little shorter. (Pattern Snow Baby Ornaments by Mary Beth Koskie)

My eldest brother has a whole range of pets, but I wasn’t going to knit an ant so I decided on a tiny chicken. I did add a tail and a hanging loop. (Pattern Tiny Chickens by Anna Hrachovec)

The partner of my eldest brother has a snowy white cat named after a certain snowy Disney Princess. Therefore I set out to create that little creature. The cat is not allowed to go out, so the chickens don’t get threatened, but in a tree they can be together at last! (Pattern Tiny Parlor Cat by Sara Elizabeth Kellner)

My youngest brother and his girlfriend recently got a dog, and since I could do the rabbit for her, he got the puppy. While their dog is not a Scottie, that was the pattern that I chose since it seemed the right sort of size. I attempted to emulate the colouring of their dog, it failed but I tried? (Pattern Tiny Scottie Dog by Sue Stratford)

I also gave the puppy a ball and the cat a little knit whale to play with. So everyone got a thing! I’m contributing to trees all over the country..

Christmas Ornament

Yes, I am aware of the fact that it is August, I haven’t skipped four months in my head. What I am aware of, though, is that fact that making things takes time. If you want to have a nice Christmas tree full of hand-made ornaments, it’s better to start in time right!

So what did I make? I knit a ball, in a yarn that varies between light silver and black, that’s why the colours aren’t even in the pictures. It’s supposed to be put in the tree, but it’s a little overly large I’m afraid. It’s bigger than my hand..

Ornament Ornament comparison

So for the next one I’m going to adapt the pattern to make it a little (lot) smaller. You’re supposed to knit it on 4 needles, but I’m incapable of doing that. I also don’t have four small needles anyway. So I decided to use a needle for knitting in the round, and this worked just as well. Started with 12 stitches in provisional cast on and in the middle it was 64 stitches, knit on 4.5mm needles. The next one will be more black, as that’s where the yarn’s at now.

Christmas Cards

Every year it is the same question, will I send out Christmas cards this year? Real ones, with paper and that (if I don’t hand them over to the recipient directly) go through the mail and stuff. This year, the choice was easy. I was in a shop, I saw a kit for making paper Christmas balls and decided I could use the idea for my cards this year.

The shop sold craft paper blocks which I got one of, bags of buttons in different sizes (120 in a pack), metal loops for ornaments and gardening wire. I had my card almost ready!

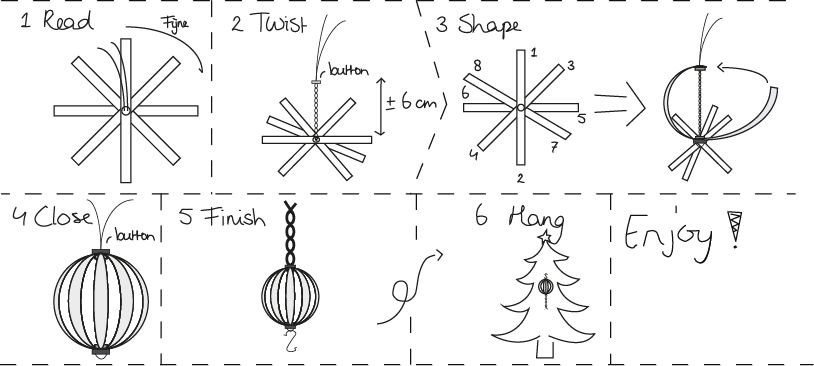
I’ll explain what I did, there are more pictures below. First, I’ll show you the ‘instructions’, I drew them and then created them in Photoshop (not very well, but still), I copied my own handwriting and printed 3 of them on 1 red A4 piece of paper. I then signed my name in the bottom right corner and added some metallic fireworks. The back was used for a personal message and the address.

Instructions

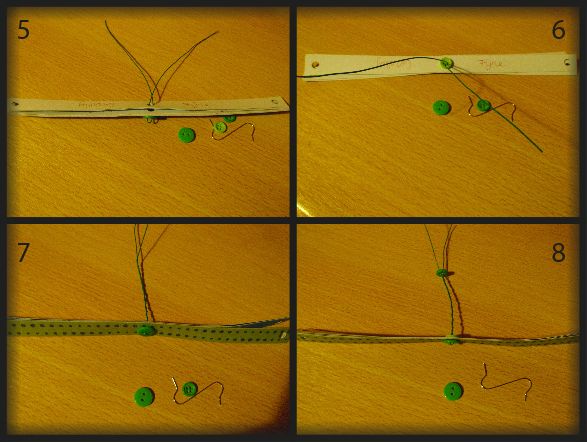
To put the kit together I cut strips of the paper using my paper-cutter machine thing. It can do straight lines, dashed lines or curved lines. I used the first and the last. Then I made holes in the ends of the strips using a hole punch. I noted the middle of the strips and punched a hole there (1). I wrote the text I wanted on the strips (2), the text is (translated) Happy Holidays and a Healthy, Cosy (untranslatable) and Happy 2014. It was written (mostly) on different coloured strips (3). I cut a bit of wire and added the first button (4).

Cards 1

I put the strips on the buttoned wire (5) and added a button on top to keep it in place (6). This was placed with 2 other buttons, a hanger and the instruction in an envelope and sent. To make the ball, you twist the wire (7) and add another button (8).

Cards 2

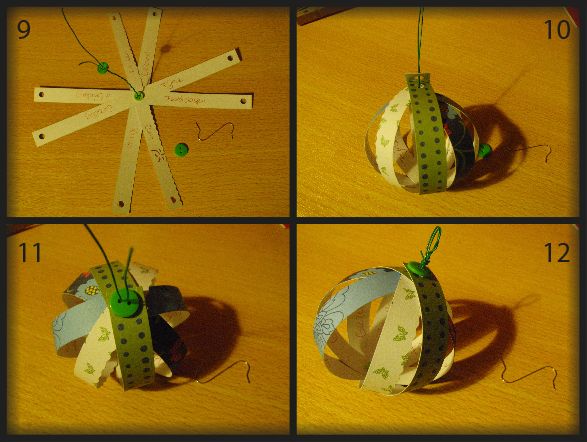
You can read the entire text in now if you turn the strips out (9). Then the ends of the strips are put on the wire (10) and the last button is added (11). Twist the wire a bit and add the hanging loop (12).

Cards 3

That’s it! Then you enjoy the pictures people send you of their balls in their trees. I enjoyed that the most. I had fun making them. Next year, I’m going for a new idea. I got some inspiration from a card we received during the holidays, so who knows…

KreaDoe 2013

Weird title, you may think.. Well, it sort of is, we spell crea(tief/tive) with a c usually, and the Doe (Do) is somewhat ambitious, but all in all, KreaDoe is quite a fun fair where you can find all kinds of stalls that sell things for creative hobbies.

One of my friends and I decided to go there to see what it was all about, and possibly buy some stuff. We were both on a budget but managed to keep to it. KreaDoe is filled with all kinds of stalls. Scrapbooking (pass quickly), Beading (stare at everything), Candle making (eeeh.. no), Embroidery (fun! Too expensive), Knitting/Crochet (fun colours but no), Felting (weird, but maybe when I’ve got residual time?) and some unique things.

There were also some stalls where you could follow a workshop. My friend and I chose to do two free workshops, since free is better. We made an artistic bread basket and coloured a Christmas ornament. The bread basket was a bit weird, you got a round batted fabric thing, with 4 areas that you could tie such that they stood up. We got some ‘colours everything’ pens and got to draw. I chose to do 4 different things on the sides, but there were people doing peacocks and owls and all kinds of things. There were some examples so I just took some of them and drew them on my breadbasket.

Here they are,  whales and owl, squirrel and ‘green monster’ (I like this one best).

Whales Owl Squirrel Monster

This is the full thing and how it looks ‘set up’.

Basket Basket

The second thing was to use some permanent markers to draw on a plastic christmas tree ball. I chose to do dotted lines, with a pair of scissors at the bottom. I had quite some fun, my friend drew an angel and stars. It was quite funny.

Ball 1 Ball 2 Ball 3

Super sexy ball this is. Note the little scissors in the last picture.

All in all we enjoyed the fair, even though we didn’t buy a lot. We did get some inspiration for things to craft at home. We are so going to make either a castleball or a nutcastle (this or this) and we might cover a day planner with a nice fabric.

We had a fun day out, and I think it’s worth repeating.