Feathered Scarf

No, I did not pluck a bird for this project. I did, however, purchase a fabric that I really really liked, but for which I originally couldn’t find a suitable garment pattern that would allow me to wear it often. The first time I saw it at the market stall, I really liked the print. Dark red fabric with an almost invisible secondary pattern and blue and yellow feathers all over it. I didn’t dare to buy it because I didn’t like it as a skirt or pants or a top. In the week that followed, I did think of a plan. That plan was to make a scarf, how I would do that was a secondary question, but I didn’t care about that. So the next week I bought the coupon.

Pattern Edges

I first had to decide whether to cut along the crossgrain or the selvedge. I chose the selvedge which make the scarf between 1.8-2.0 meters long. Then came the width, about 1/3 of the fabric would do, I thought. This was approximately 50 centimeters. I folded over the cut edges twice and sewed them. Leaving the selvedge untouched, because I really liked that edge. I turned out that the back of the fabric, which has some dye splotches, would then be visible sometimes. So then I attached the long edges together to form a long tube. That’s it. Easy peasy, lemon squeezy.

Scarf Scarf

 As it is turning into winter again, I hope this will come in handy. It might be a bit thicker than your average scarf, but I don’t mind (yet). Let’s see if I find any flaws during wear.

Rocking Pillows

Waaay back in the day when I was still at uni, I had a fantastic Earth Science teacher. He’s a bit crazy, super fun and very knowledgable. He’s also known to fake his birthday on Facebook to confuse the world. So when I found out when his actual birthday was last year, I had the plan to fix him a gift. In the end I failed, but this year the stars aligned and all the things I wanted/needed were easily available.

See, this teacher has a couch in his office. He is (as far as I can tell) the only one with a couch in his office. He also wears hats a lot and quite likes rocks. Clearly I wanted to make him rock pillows for his couch. Last year I couldn’t find the perfect fabric but this year I found it, it was the right size and it was half price off. No beating that right? I also owned some clay that claims to have a ‘stone’-look once dried. This would be perfect to make stony buttons from, right?! Last but not least, the fabric was exactly wide enough that if I bought a 40x40cm pillow insert, it would fit exactly. I wouldn’t have to do a lot of cutting at all!

So off I went to make the buttons. They are simple round ones with four holes made by a toothpick. I made eight, because I figured on making two pillows. So far I’ve completed only the one, but I figured I’d write about it anyway before I forgot. There are four left over, and four on the pillow.

Buttons

Pillow detail

I think they look quite nice. The process was really simple. I cut a 40 by 90 cm piece of fabric, folded over the short edges twice and stitched. Then put pins at 8, 16, 24 and 32 cm along a short edge, sewed the four buttonholes and slit them open. I folded the short edge over by 20 cm and folded the other short edge over too, right sides together*, such that the width would be approximately 38 cm in total. Pinned it and sewed it. I turned it inside out and put pins through the button holes without the pillow in it. I sewed on the buttons in the right places and voila!

Pillow back Pillow

*The long edges were already finished in my fabric, but if they wouldn’t have been, I’d have put the short sides over wrong sides together, sewed the seam, turned it outside out  and sewed it again to make a French seam.

A rocking pillow! I hope he likes it, but if not, I’ll have a new pillow..

Christmas Cards

Every year it is the same question, will I send out Christmas cards this year? Real ones, with paper and that (if I don’t hand them over to the recipient directly) go through the mail and stuff. This year, the choice was easy. I was in a shop, I saw a kit for making paper Christmas balls and decided I could use the idea for my cards this year.

The shop sold craft paper blocks which I got one of, bags of buttons in different sizes (120 in a pack), metal loops for ornaments and gardening wire. I had my card almost ready!

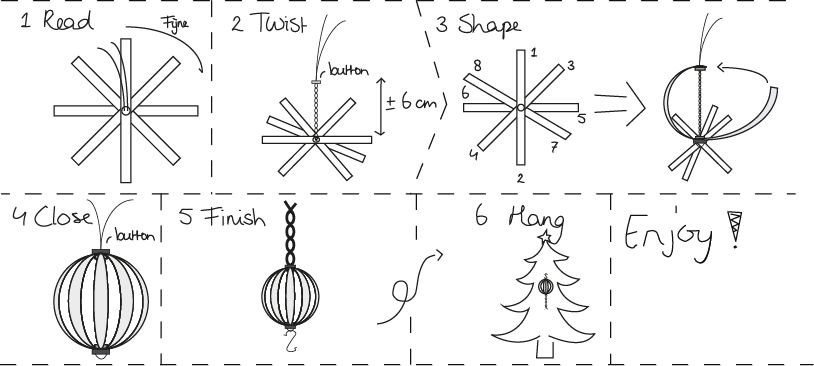
I’ll explain what I did, there are more pictures below. First, I’ll show you the ‘instructions’, I drew them and then created them in Photoshop (not very well, but still), I copied my own handwriting and printed 3 of them on 1 red A4 piece of paper. I then signed my name in the bottom right corner and added some metallic fireworks. The back was used for a personal message and the address.

Instructions

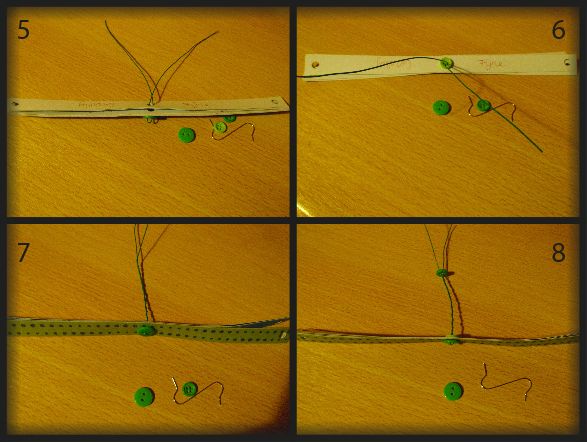
To put the kit together I cut strips of the paper using my paper-cutter machine thing. It can do straight lines, dashed lines or curved lines. I used the first and the last. Then I made holes in the ends of the strips using a hole punch. I noted the middle of the strips and punched a hole there (1). I wrote the text I wanted on the strips (2), the text is (translated) Happy Holidays and a Healthy, Cosy (untranslatable) and Happy 2014. It was written (mostly) on different coloured strips (3). I cut a bit of wire and added the first button (4).

Cards 1

I put the strips on the buttoned wire (5) and added a button on top to keep it in place (6). This was placed with 2 other buttons, a hanger and the instruction in an envelope and sent. To make the ball, you twist the wire (7) and add another button (8).

Cards 2

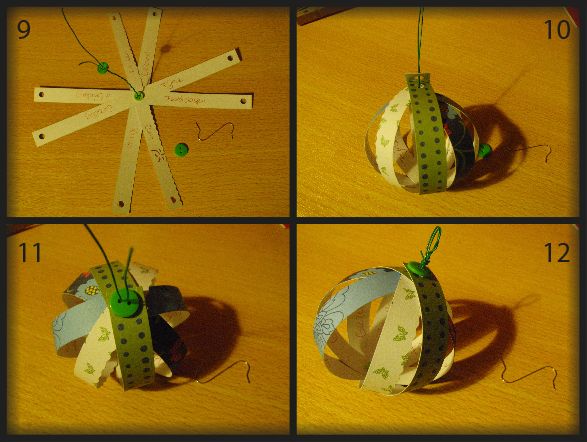
You can read the entire text in now if you turn the strips out (9). Then the ends of the strips are put on the wire (10) and the last button is added (11). Twist the wire a bit and add the hanging loop (12).

Cards 3

That’s it! Then you enjoy the pictures people send you of their balls in their trees. I enjoyed that the most. I had fun making them. Next year, I’m going for a new idea. I got some inspiration from a card we received during the holidays, so who knows…

Gifts – 4 – Frog tutorial

So here I’ll document the process of producing this frog:

Frog open

For this tutorial you need:

– Stuff to draw (pen and paper/computer) or this drawing: Rabbit, Cat, Frog, Whale (these are all the pouches I made, seam allowances are not added)
– Stuff to sew (machine/needles/thread/scissors/pins)
– Embellishments (buttons/ribbon/zipper)

You can click the pictures to enlarge them.

Frog tutorial-01

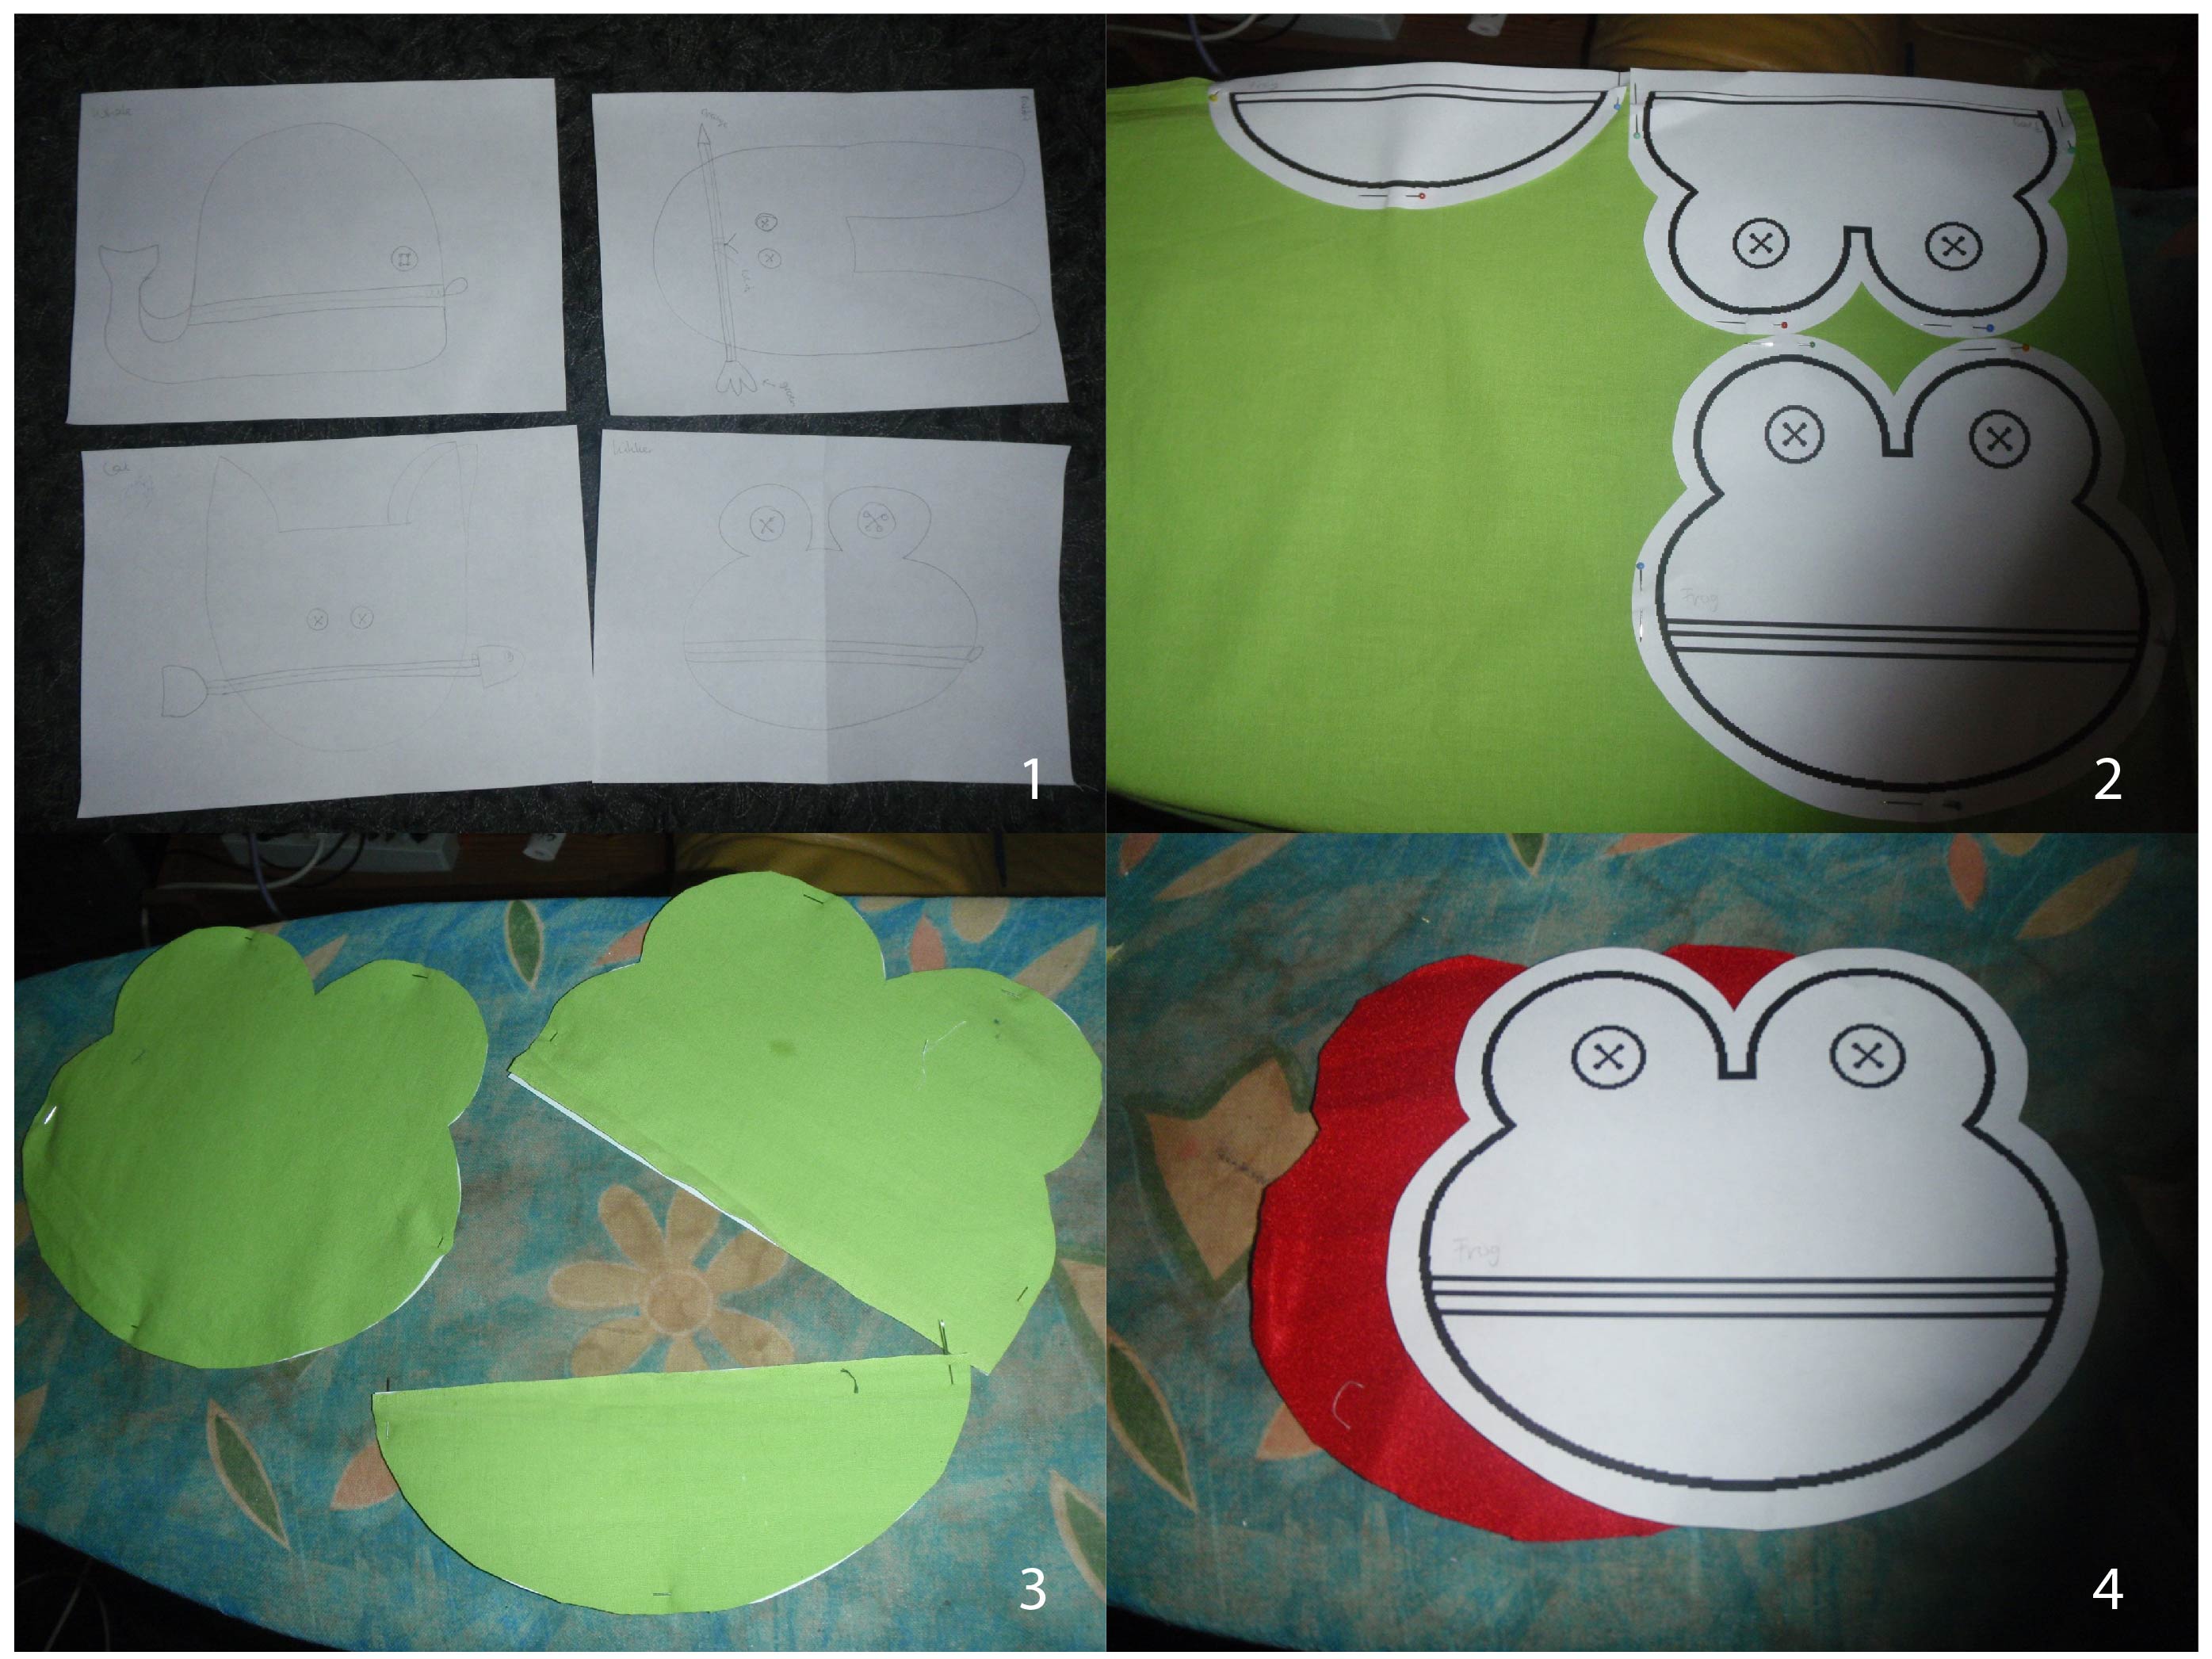
1. Design an animal and print it out/draw it twice. Then draw a line where you want the mouth to be and cut one of the heads open along this line. Add seam allowances.
2. Place the pieces on the fabric such that they fit.
3. Cut out the three pieces (back, front bottom and front top) from the main fabric.
4. Cut out the back piece from the lining.

Frog tutorial-02


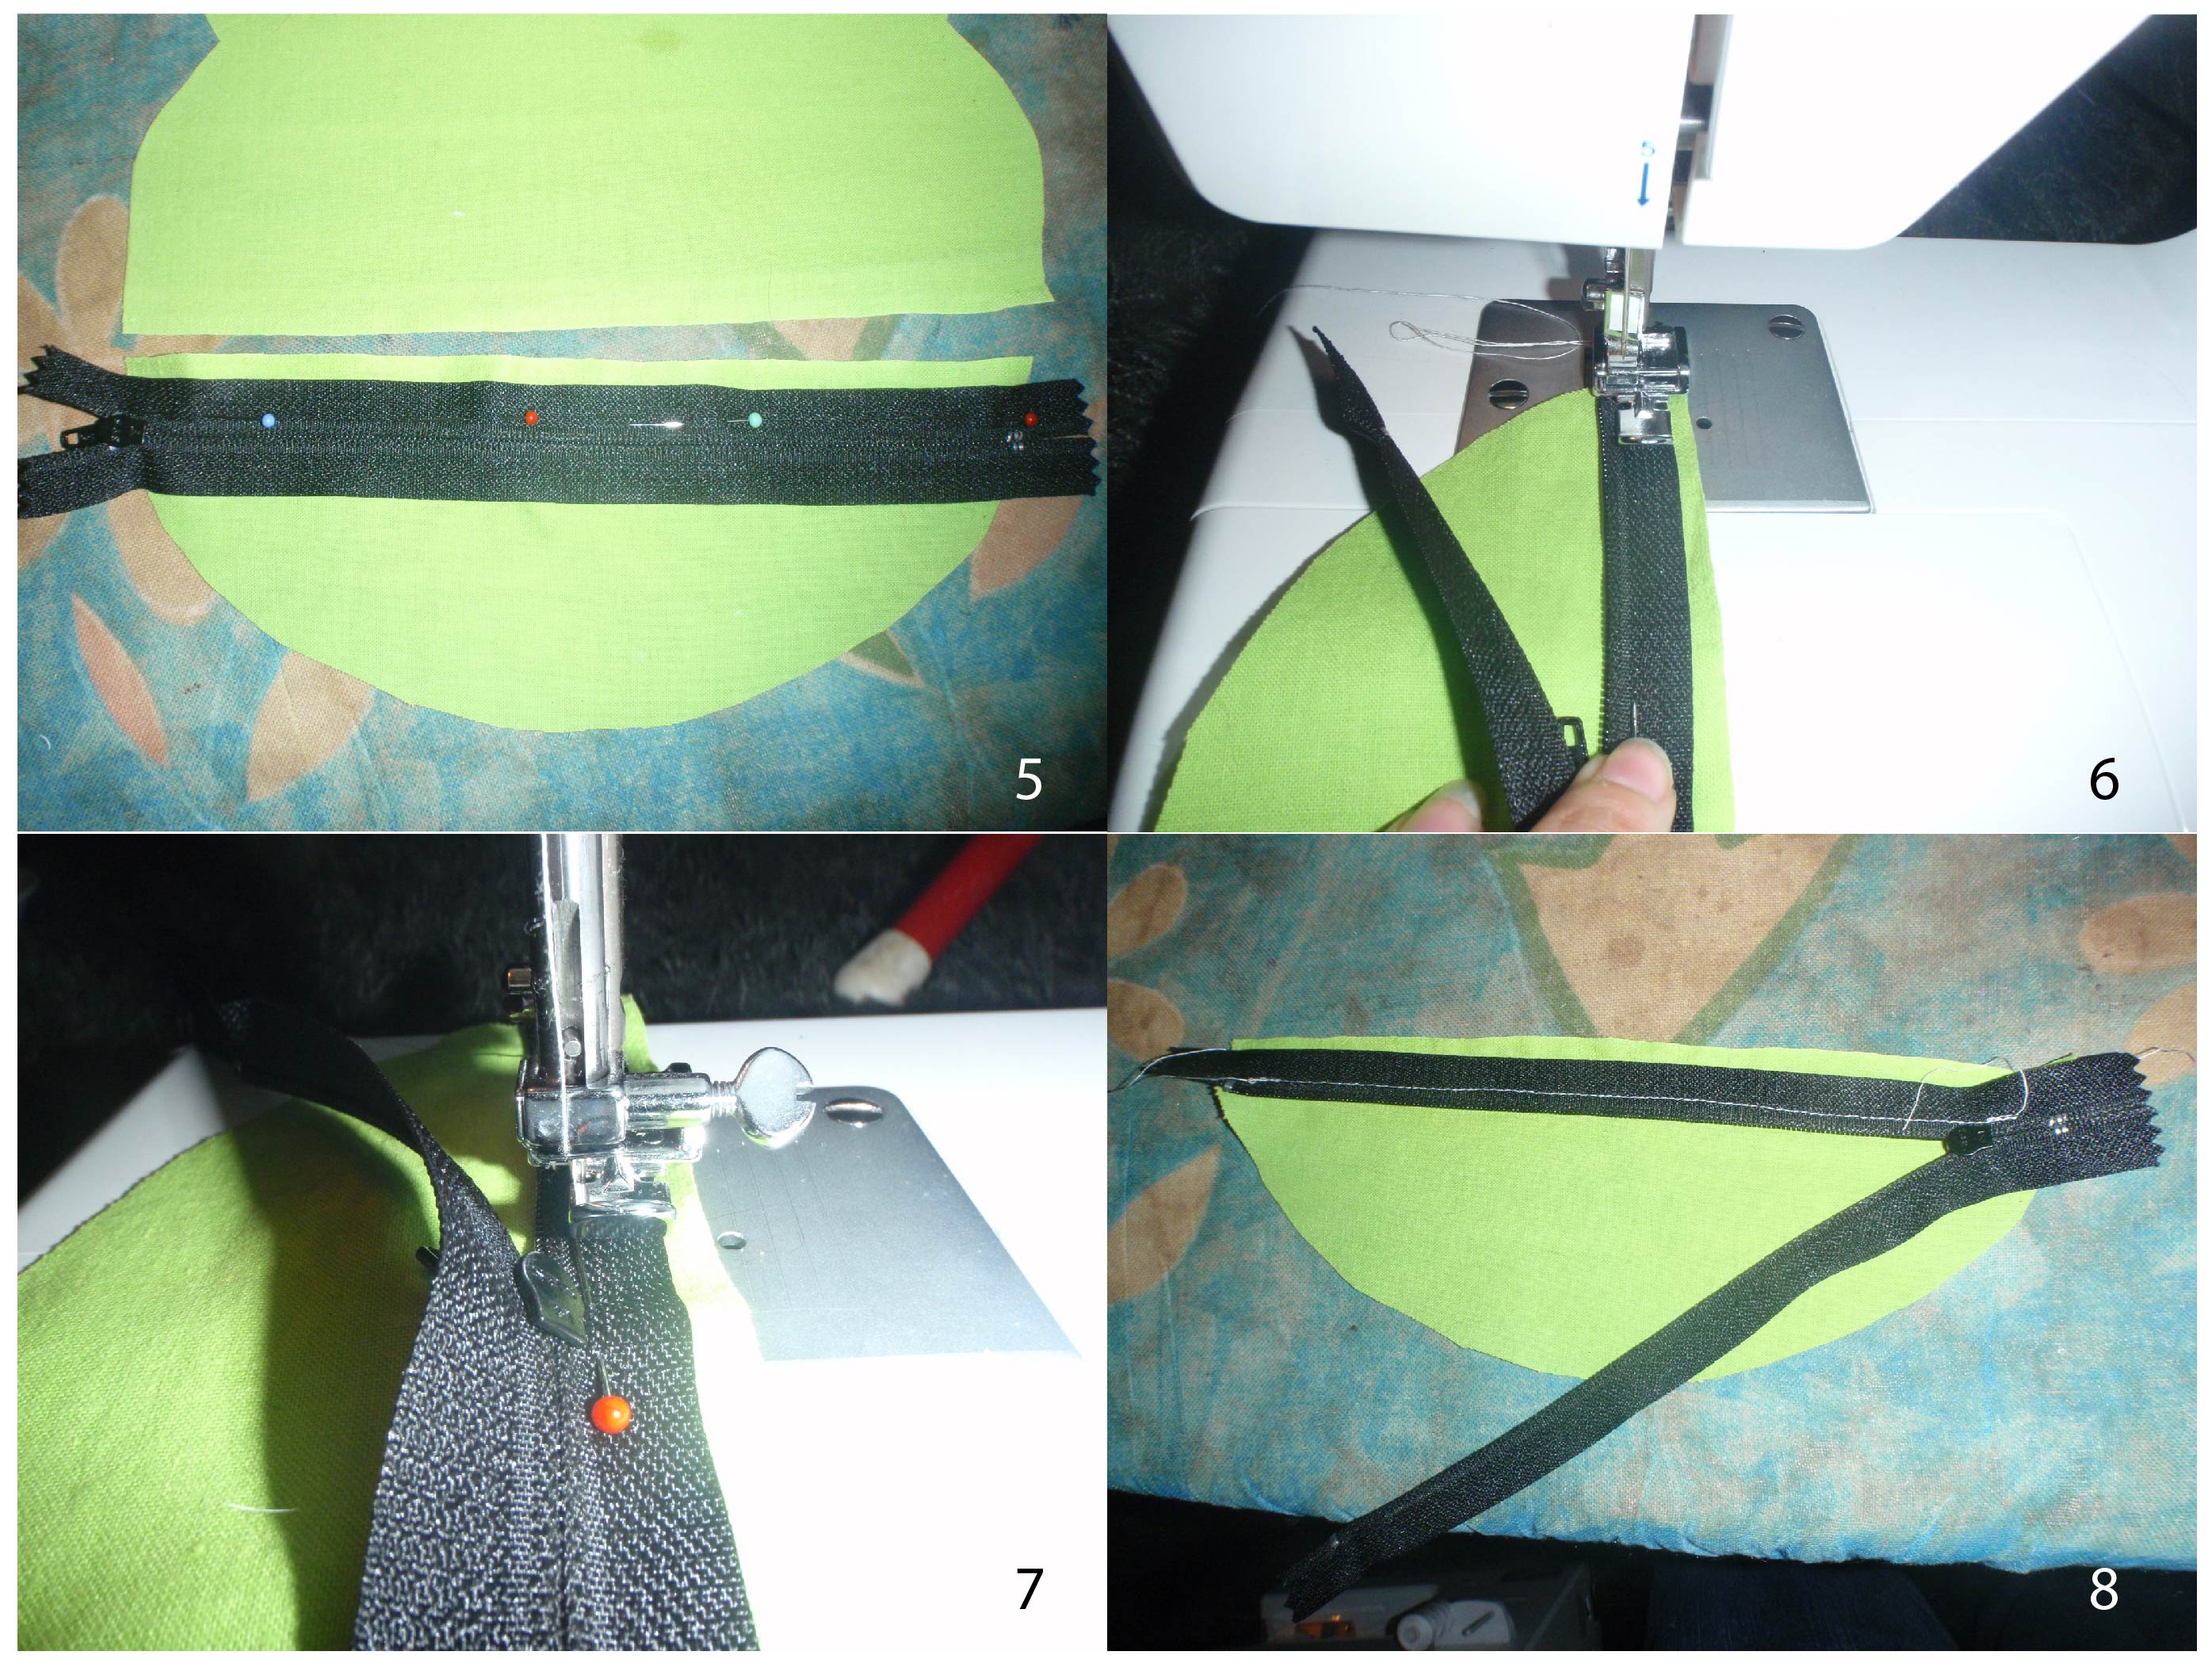
5. Take the front bottom and align the zipper as in the picture. Upside down on the right side of the fabric.
6. Sew it in place using a zipper foot.
7. Put the needle down when you reach the zipper pull and raise the foot. You can then wiggle the pull past the foot and needle and continue sewing the seam.
8. Press the zipper seam. You can now also finish the seam with pinking or serging. 

Frog tutorial-03


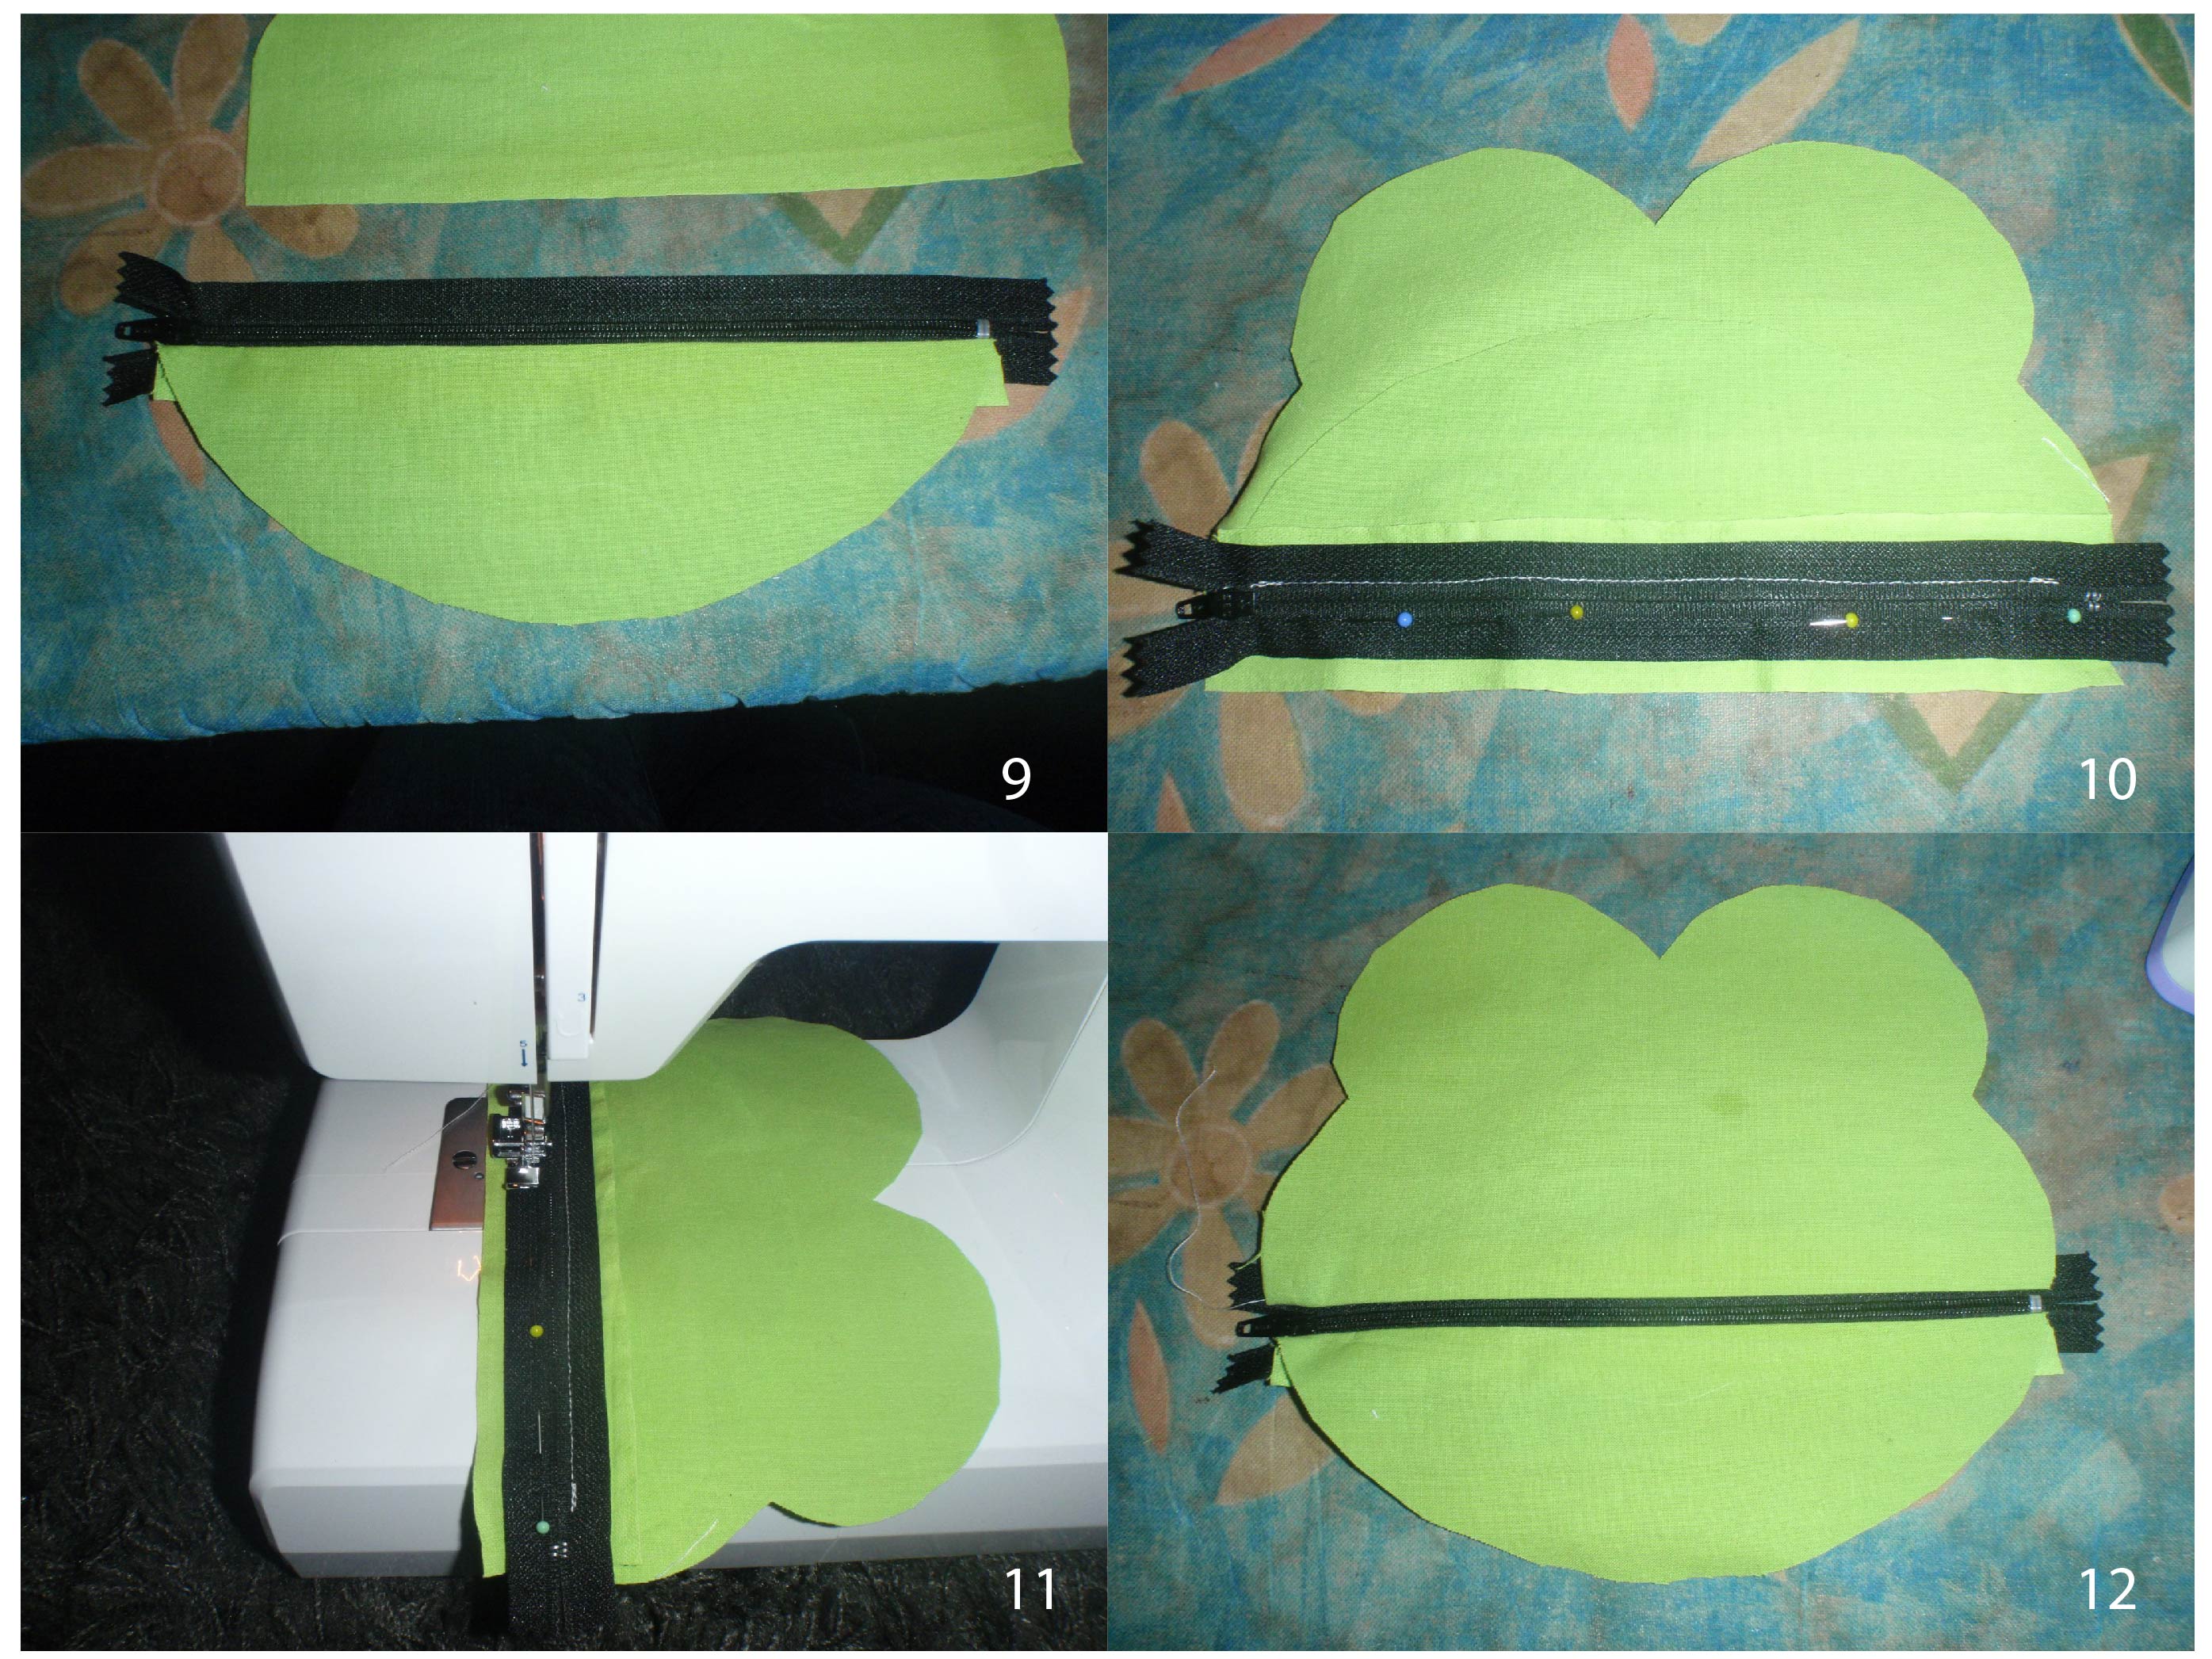
9. Press the fabric to the bottom.
10. Align the zipper on the right side of the front top. Such that the front top and bottom line up. The zipper is again upside down.
11. Sew the zipper in place.
12. Press the seam front and back, finish the seam and press them to the top. The front is now sewn. 

Frog tutorial-04


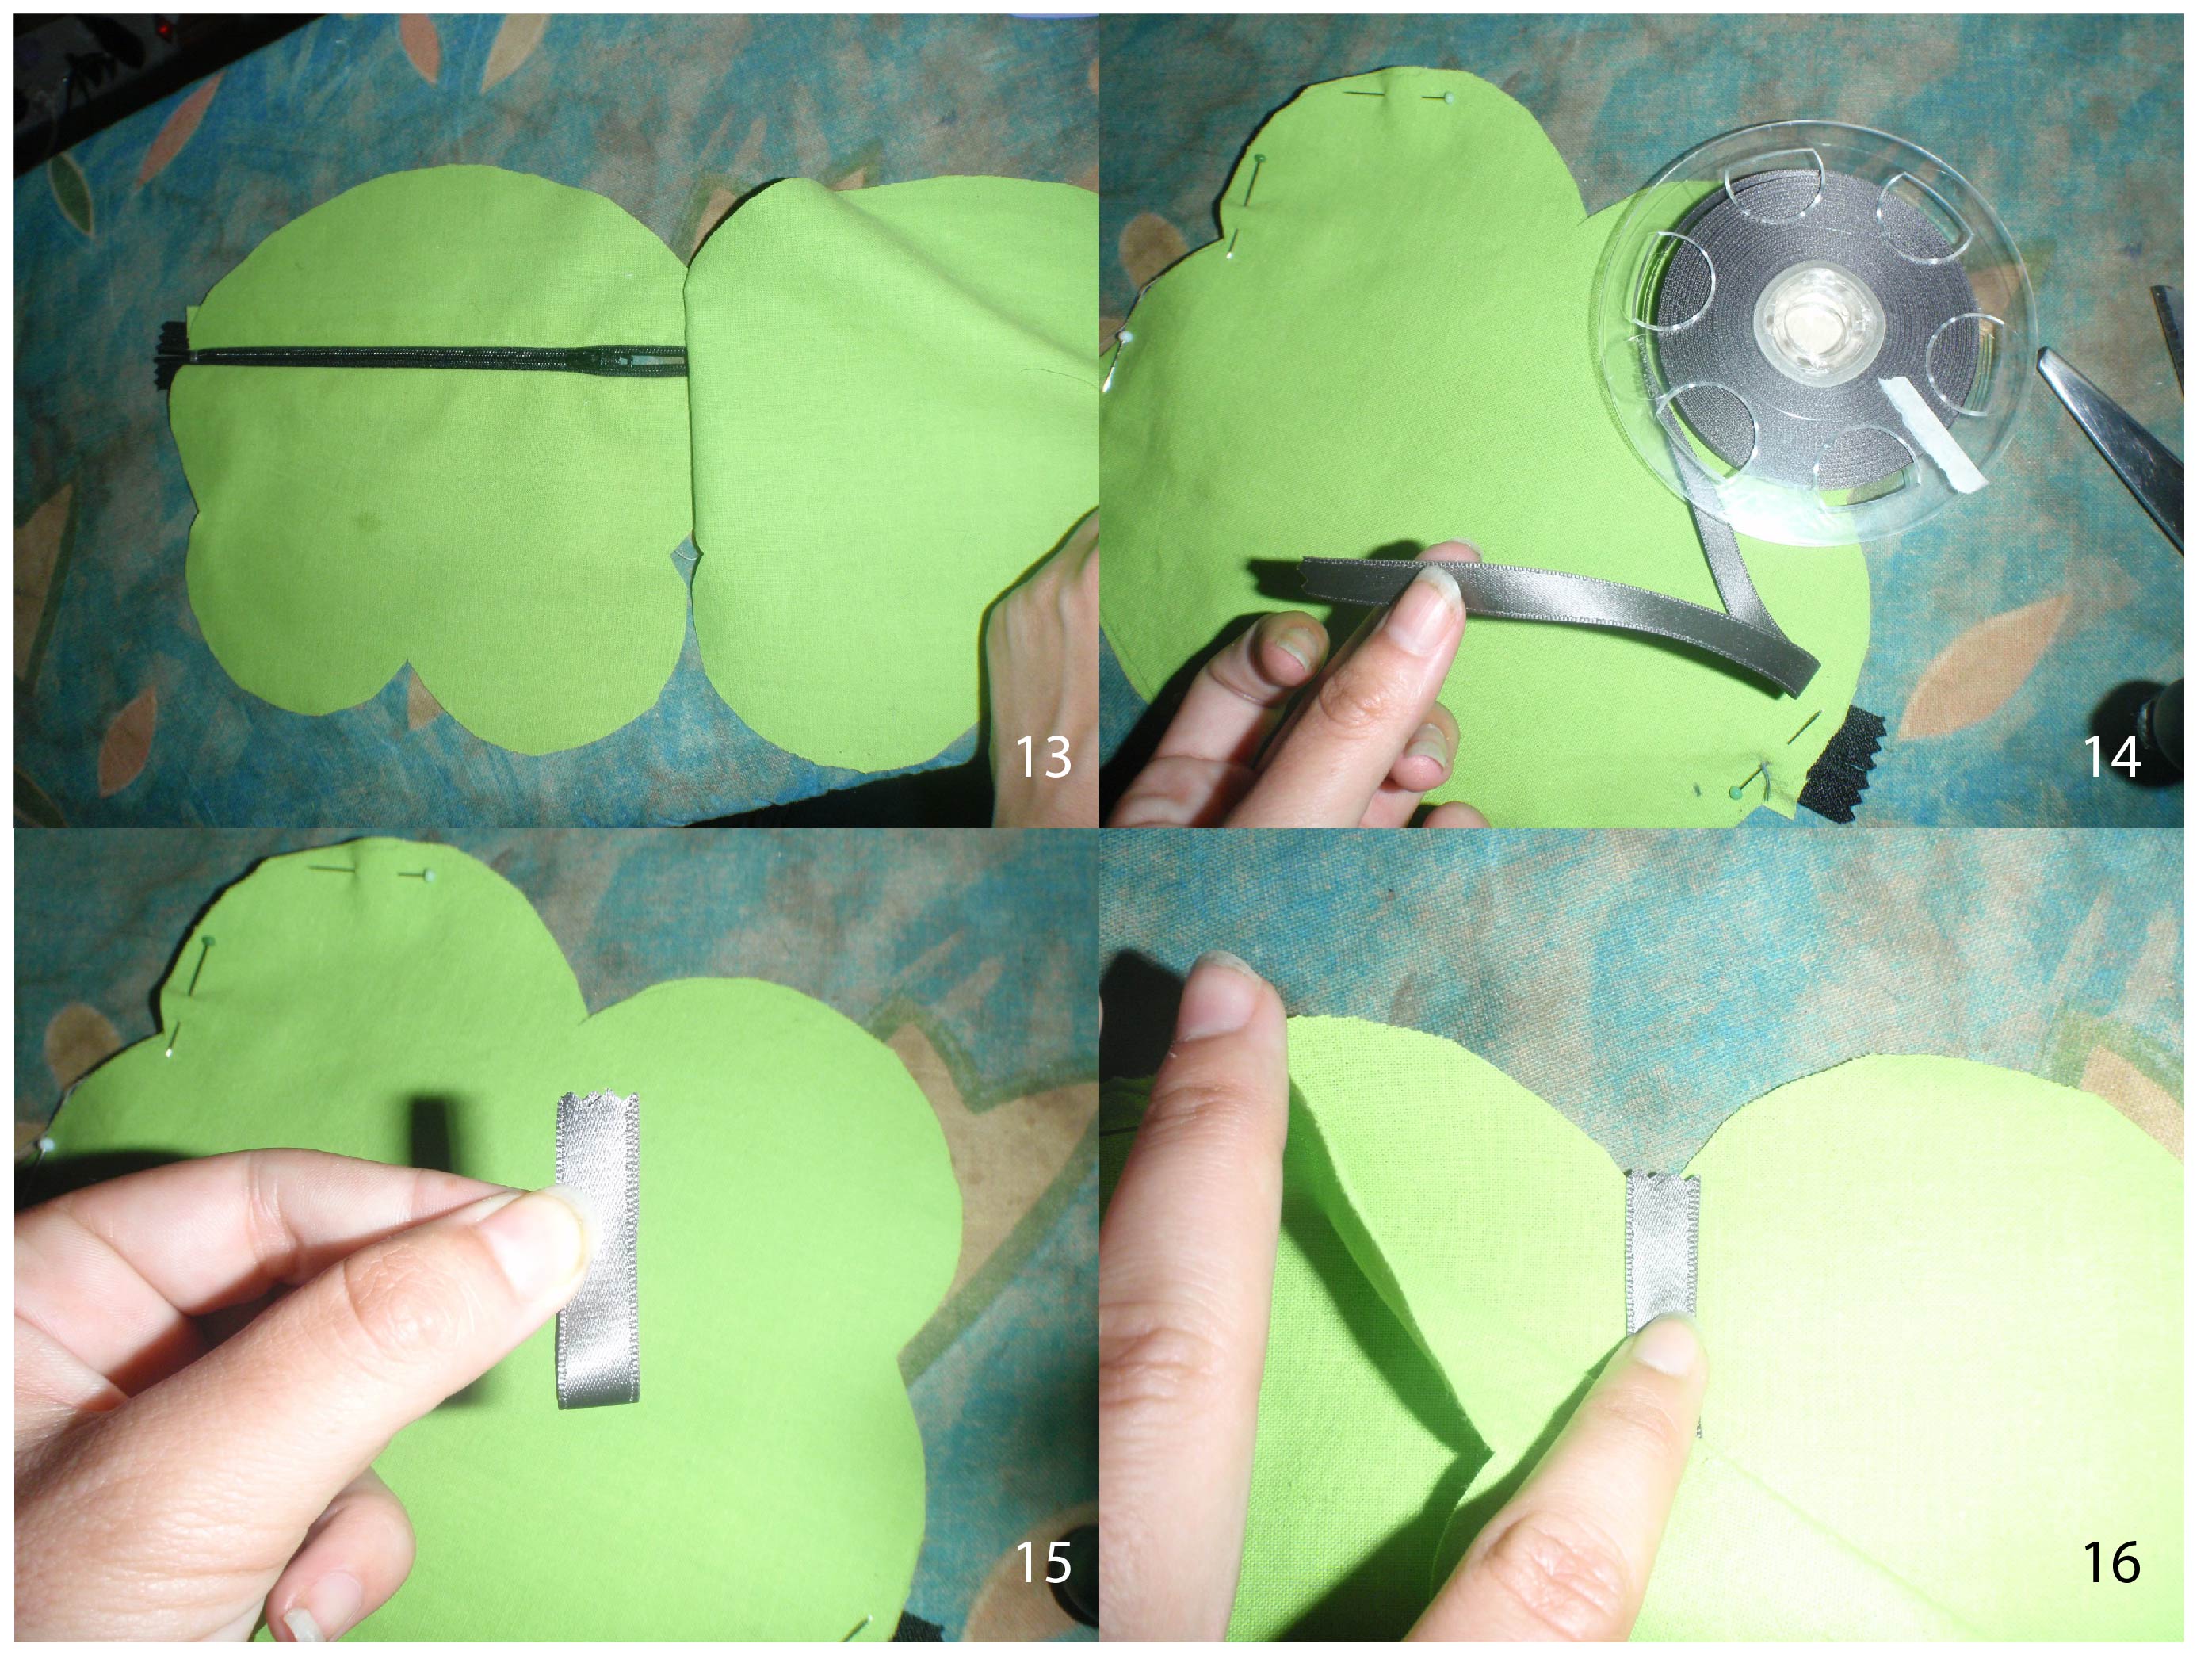
13. Place the right side of the back on the right side of the front and pin them together apart from the area between the eyes.
14. Take ribbon and cut twice as much as the loop you want.
15. Make a loop of the ribbon.
16. Place the ribbon between the eyes of the frog. The loop should be pointing downwards, while the cut ends are at the seam. 

Frog tutorial-05

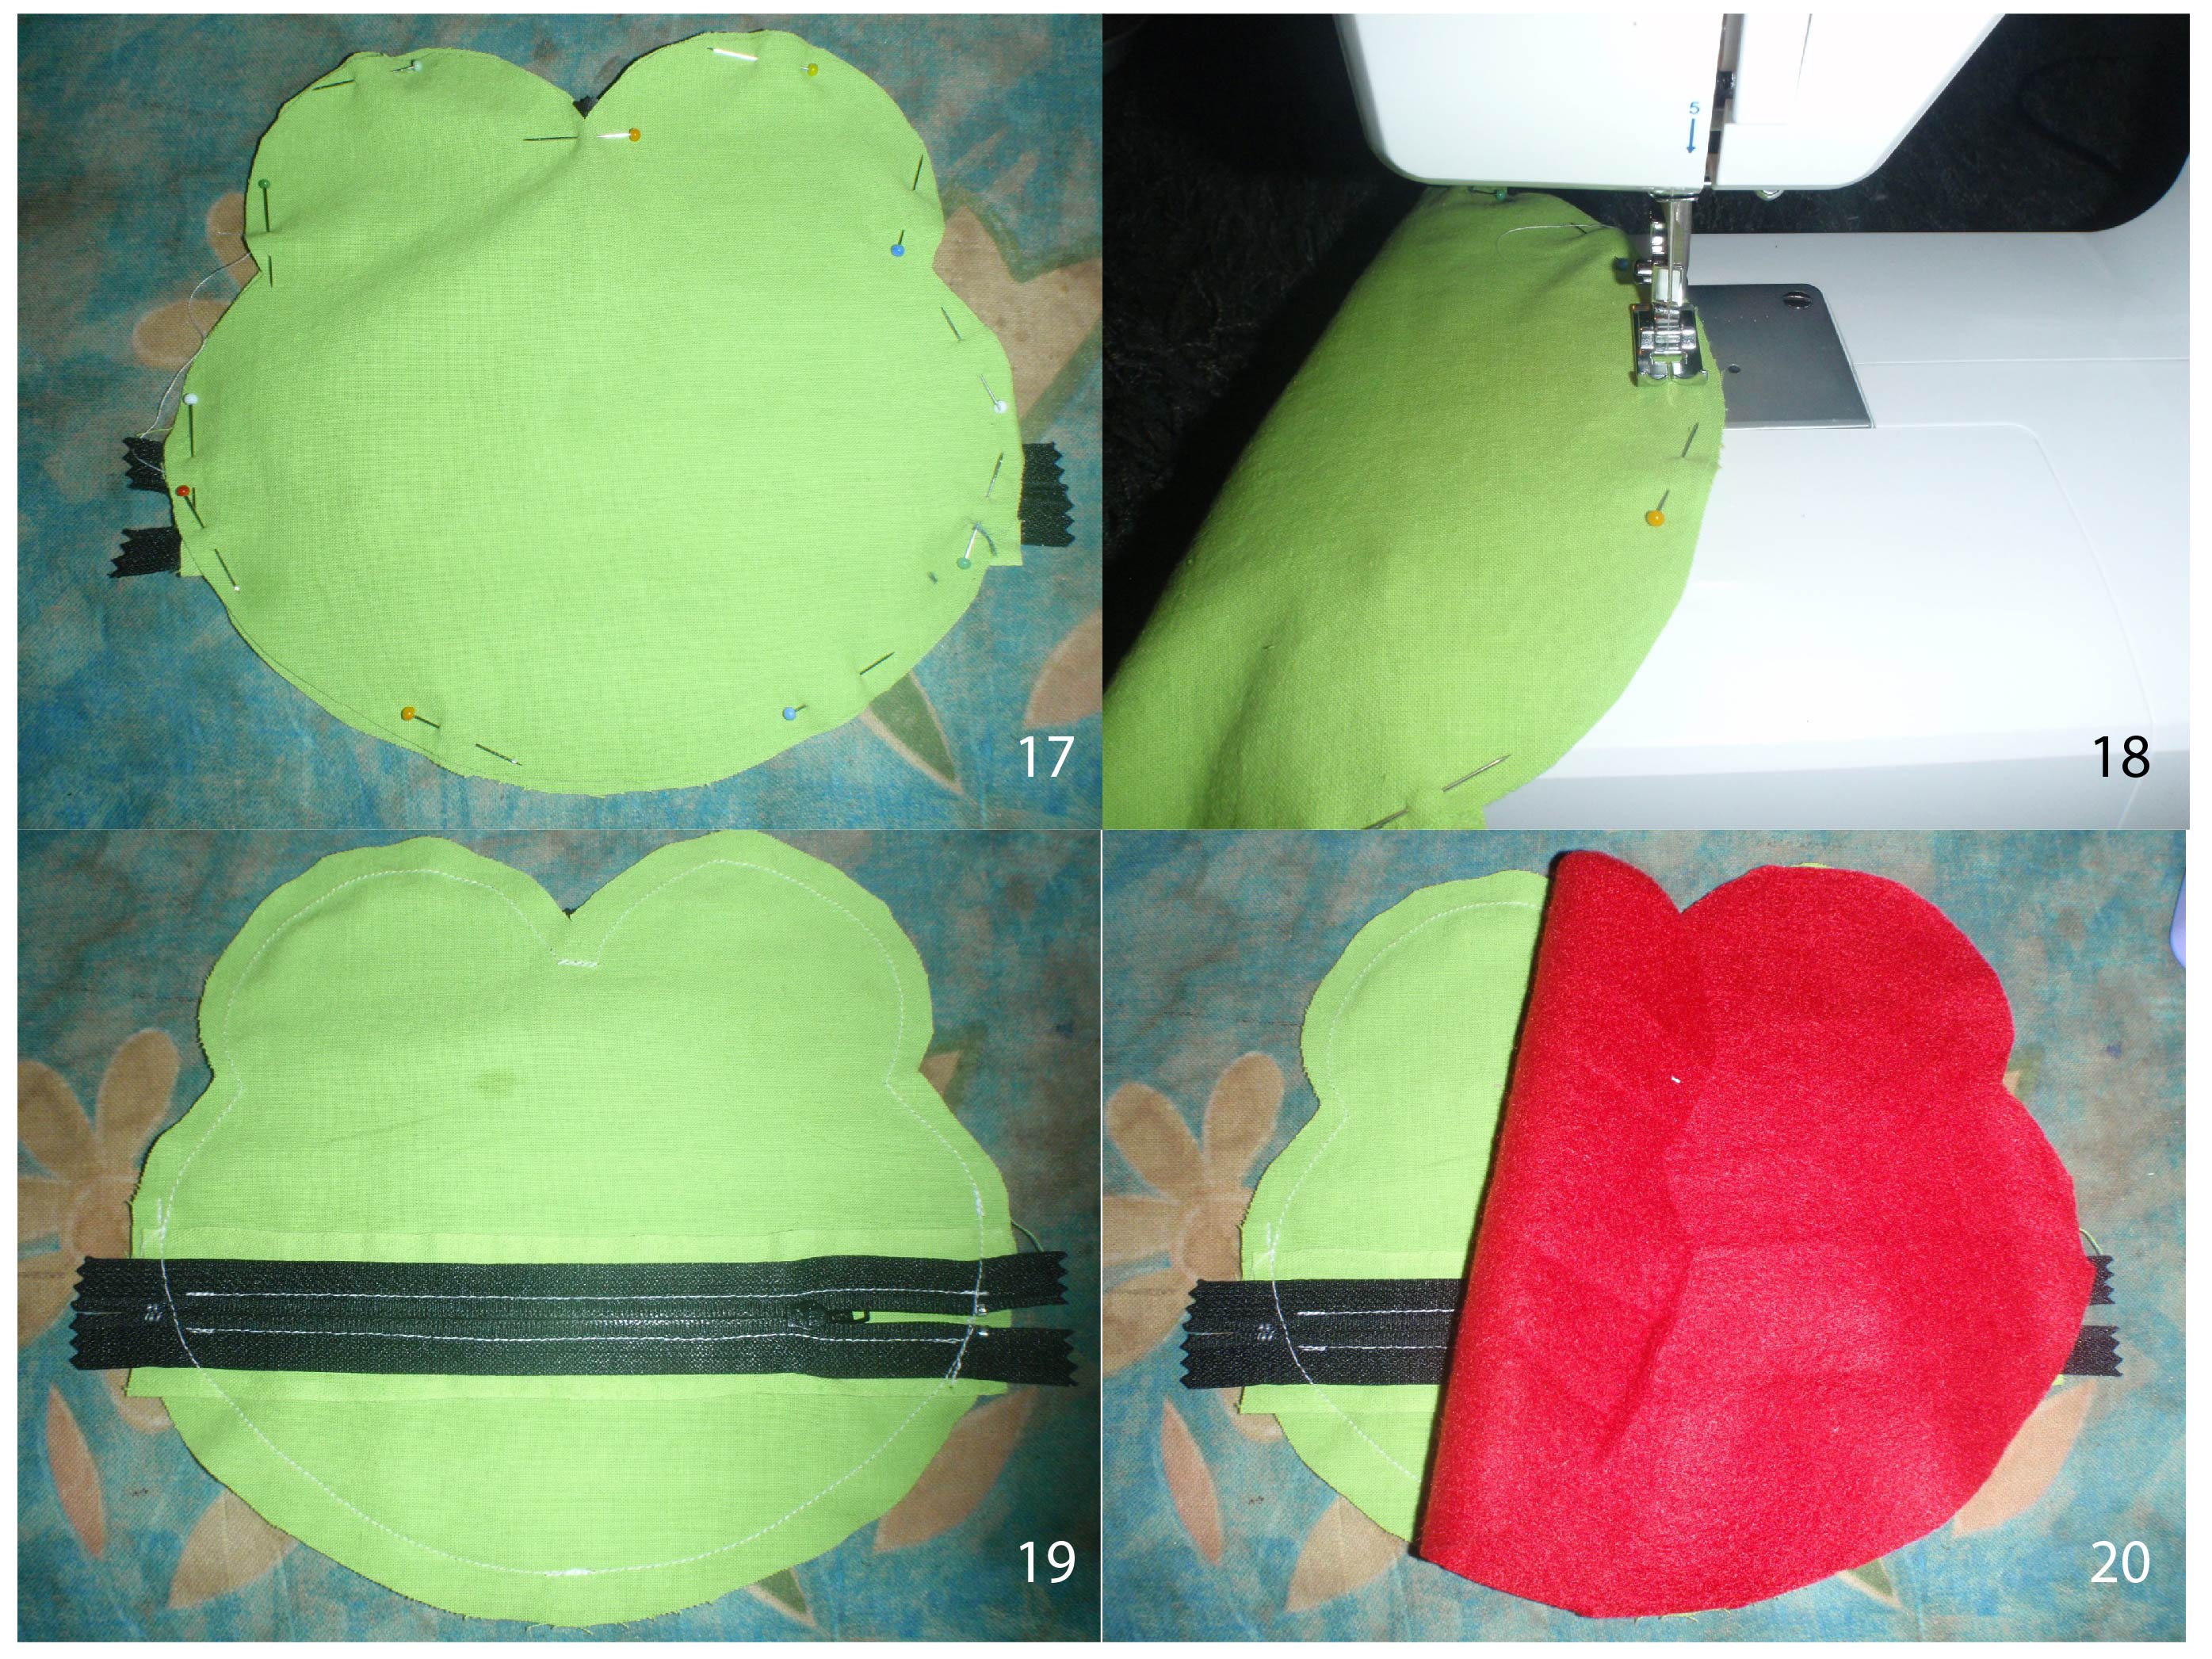
17. Pin the ribbon between the eyes.
18. Make sure the zipper pull is ‘inside the frog (see 19). Sew around the frog. Enforce the area of the ribbon. Watch out at the zipper. You do not want to sew through the metal parts of the zipper.
19. Press the seams
20. Place the lining over the front of the frog and pin in place.
 

Frog tutorial-06

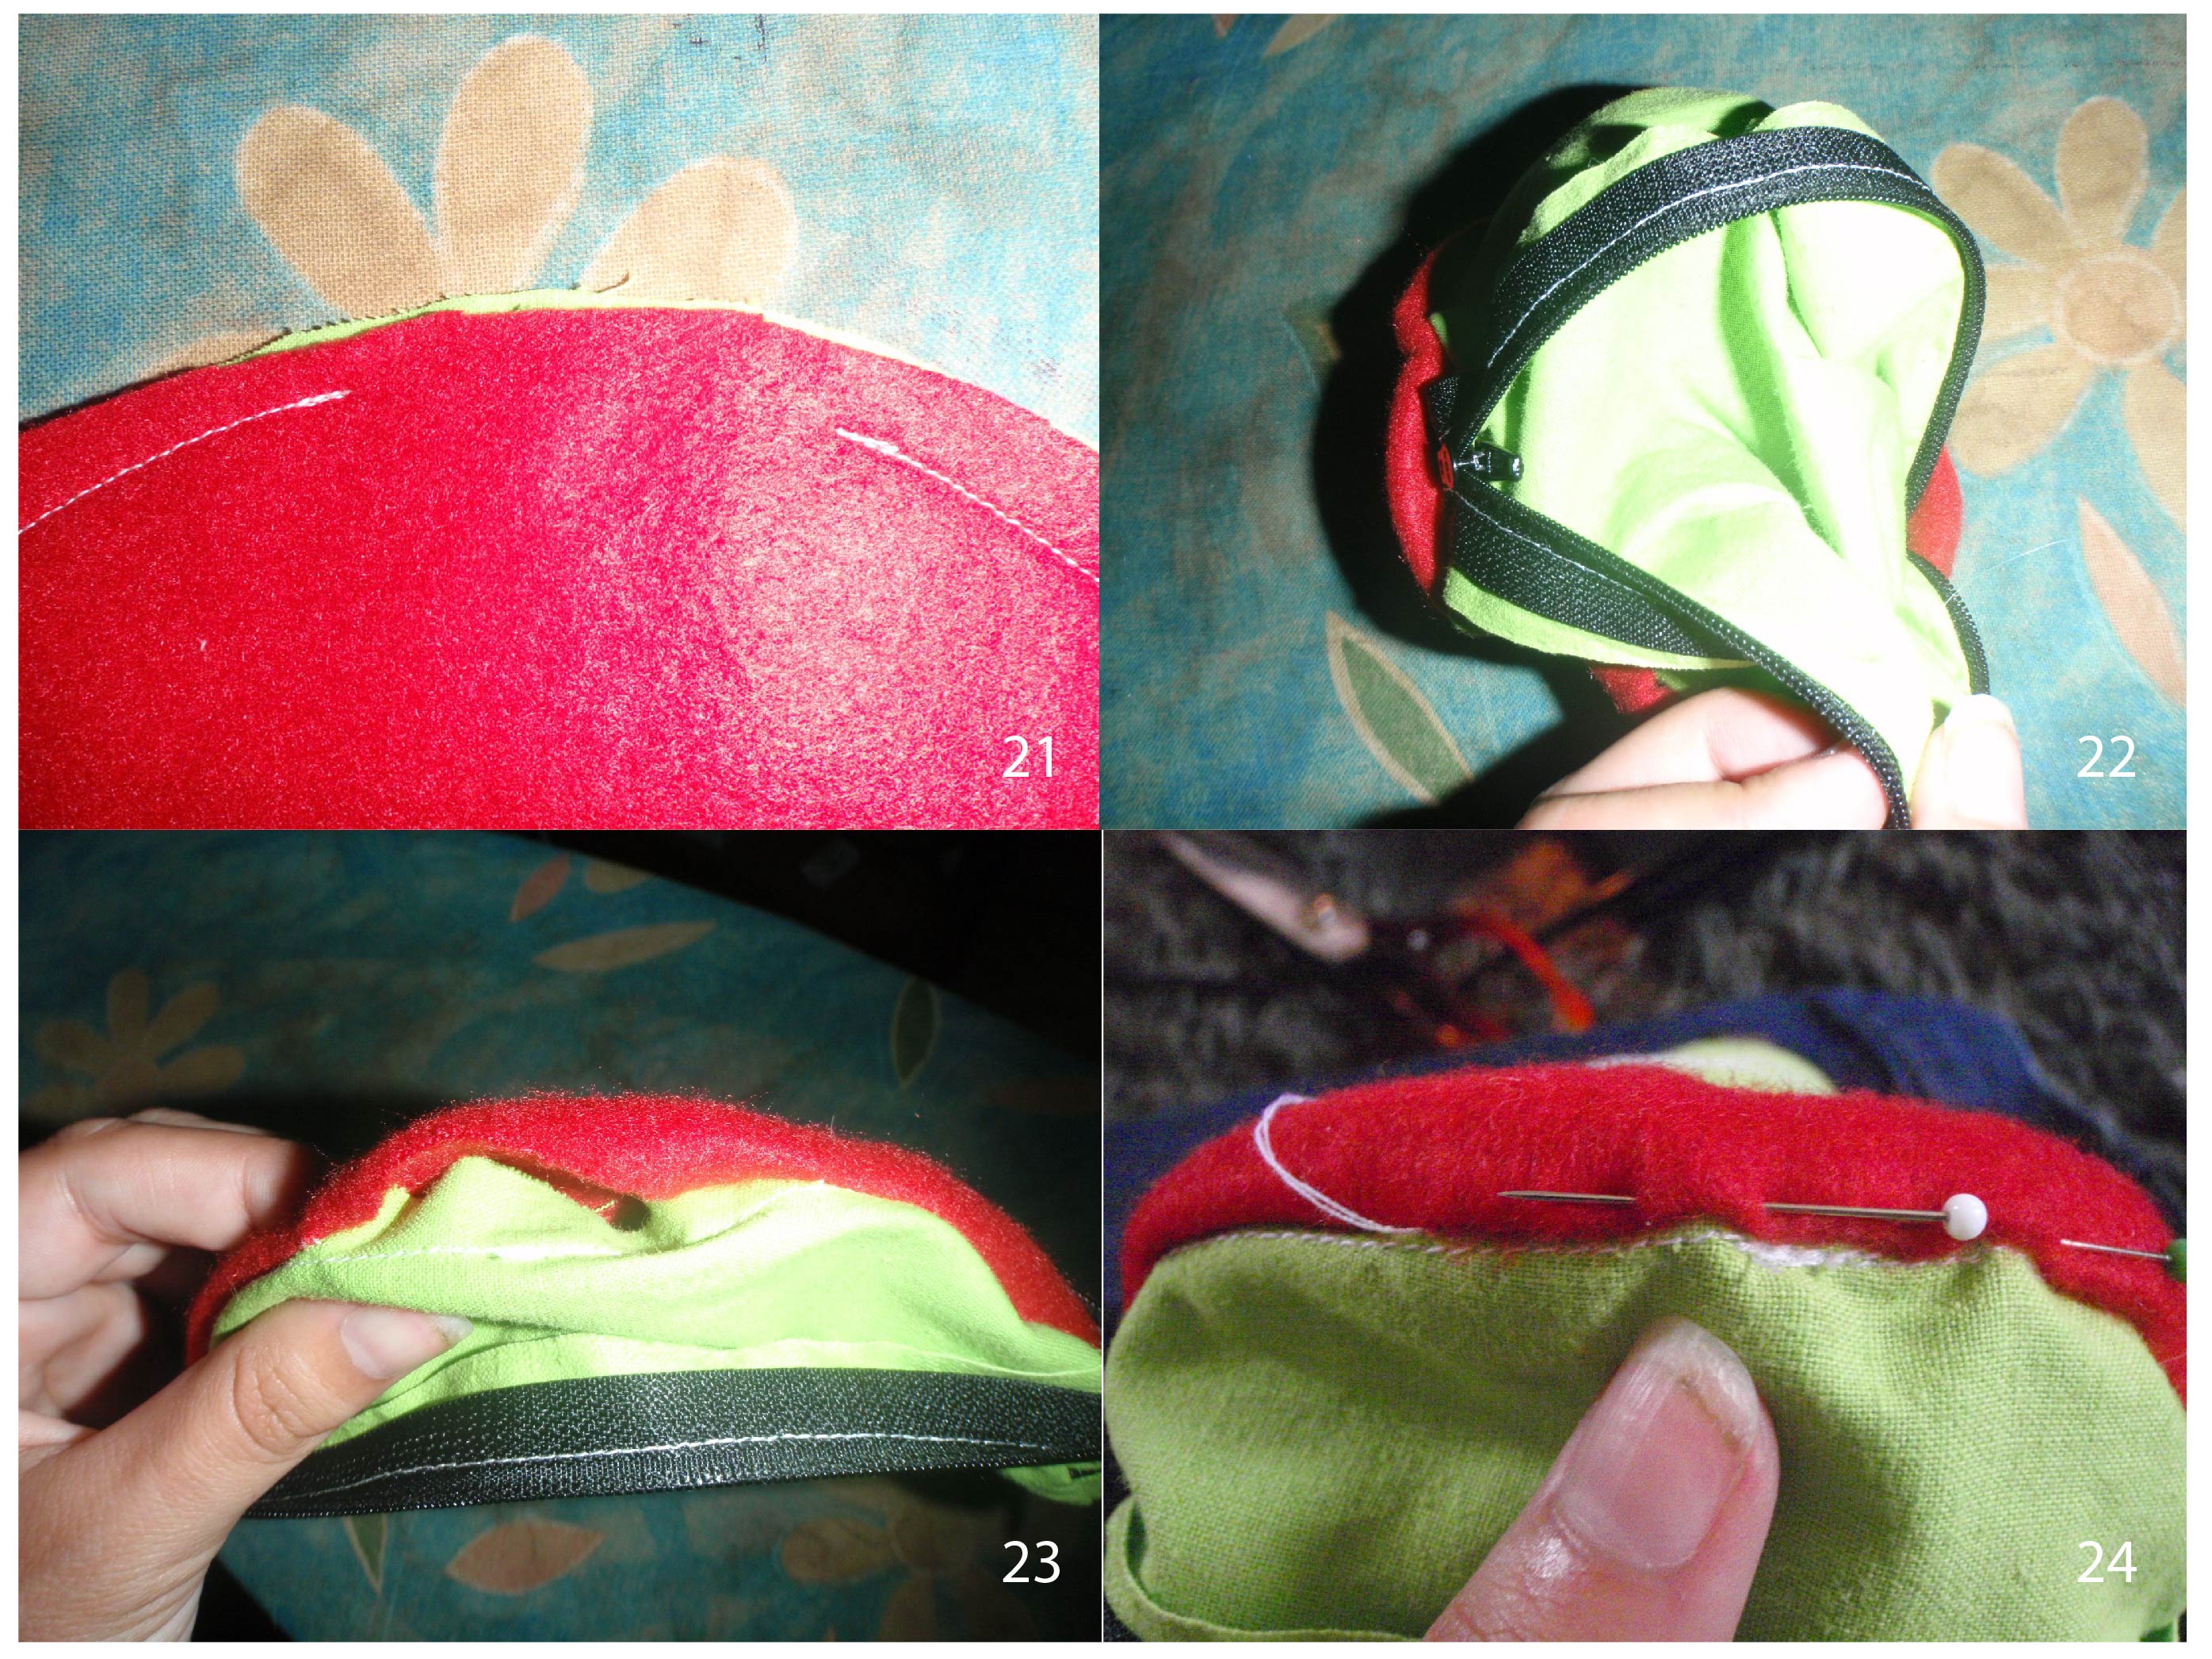
21. Sew the lining a little outside the original seam line. Be sure to leave an opening somewhere (in this case I chose the bottom) to be able to turn it. Clip the curves (especially near the eyes).
22. Turn the frog outside out and back so it’s inside out. (This is fiddly, just try).
23. You now have a bit of lining left that is not attached.
24. Once you’ve found the lining opening, pin it. 

Frog tutorial-07

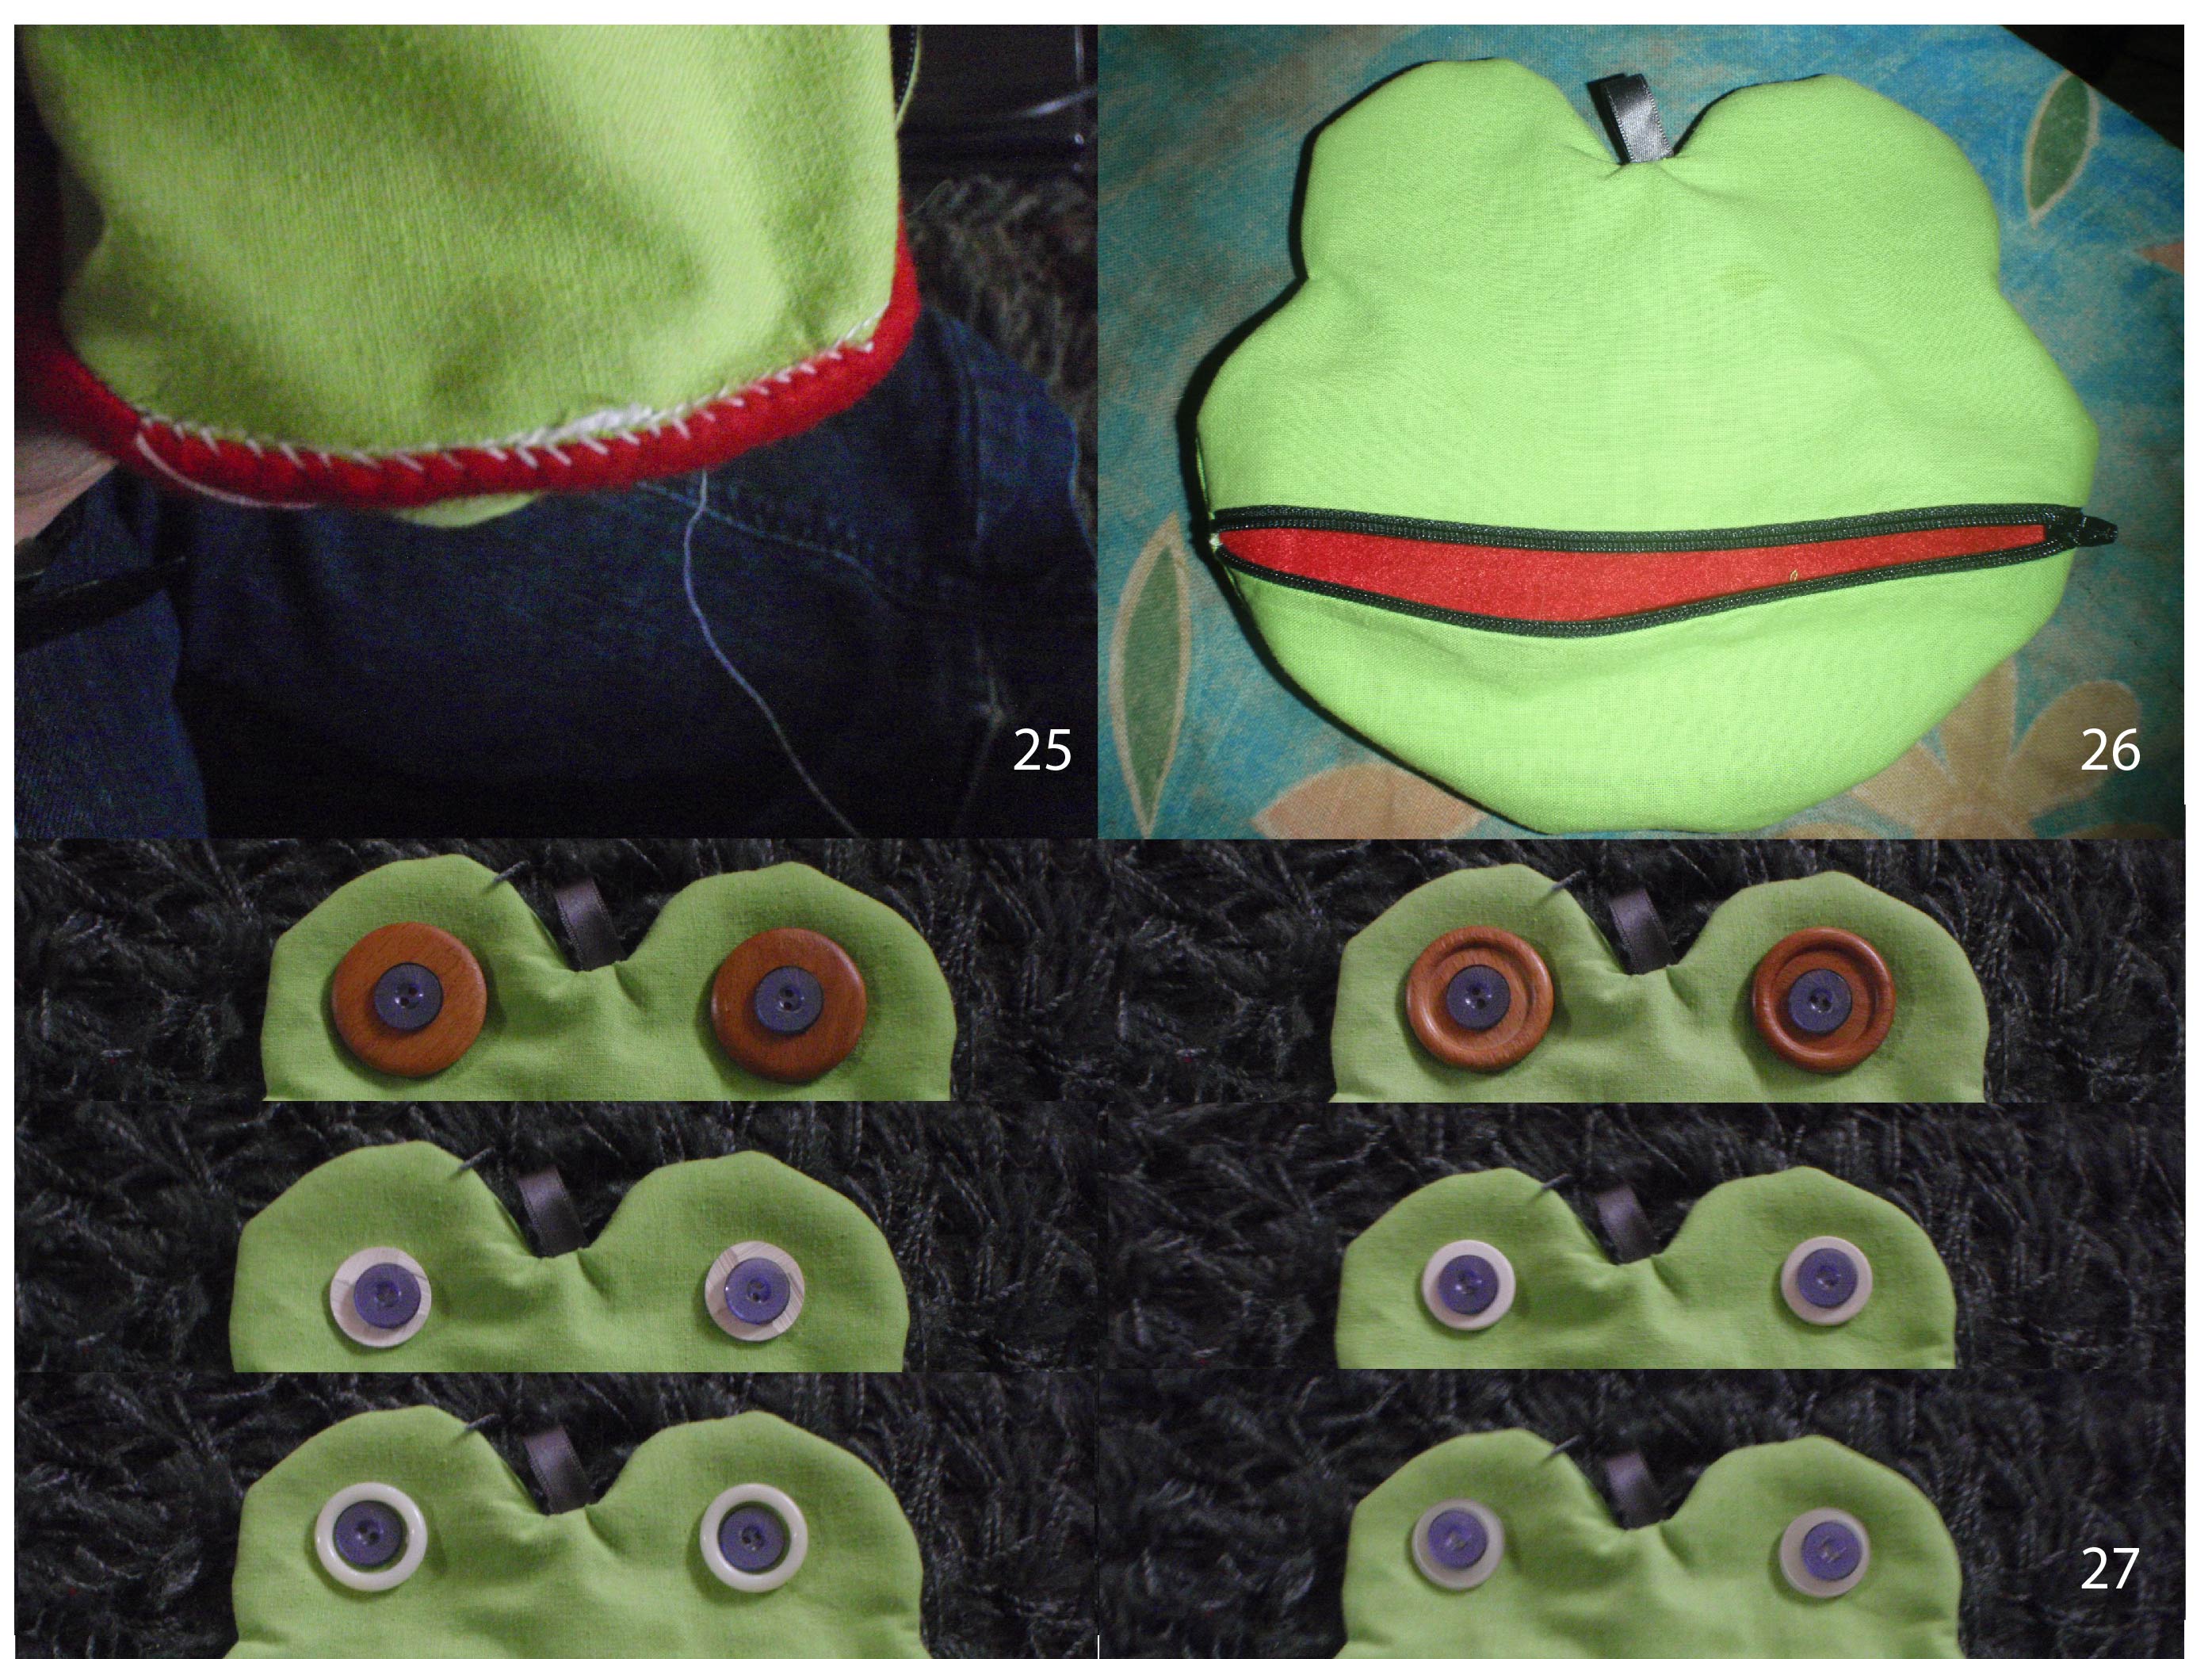
25. Sew the lining to the frog. I did this by hand.
26. Turn the frog outside out again.
27. Choose your eyes. These were the ones I considered. In the end I chose the bottom left. And sew them on. These are actually buttons surrounded by white curtain rings.

28. Appreciate your handiwork!

I had fun making this tutorial. If there are any questions, don’t hesitate to ask. I haven’t a clue if it makes any sense what so ever. I did enjoy playing with illustrator and writing this up. Tomorrow the last instalment of Gifts.