Victorian vibes with frogs, ghosts, cats and candles.
In the ‘big haul of small cross stitch patterns’, I also found this cute Family Portrait. It’s an almost Victorian looking frog in a top hat with a little cat looking in on the left, a big ghost looking in on the right and a tiny frog in a little frame in the back.
It was a lot of fun to see all the little bits appearing while working on it. I also liked the full coverage of this project. The cream from the shirt was the last colour that was working, so I could already envision what the end result would look like.
I now have seven bits of embroidery on the wall. The vibes of this one are a bit different from the others, but I think it still works together. I hope that another small thing will fit on the right string, so I’m working on that at the moment!
The first frog was great, but he was more toad coloured than I wanted. So I decided to get on a new frog. This started by dying some yarn bright green and slightly lighter green. I think I measured ten grams from a skein of Titanium Sock yarn and then dropped it into a green bath. It didn’t exhaust entirely, so I dropped 10 more grams in to make some light green yarn.
As usual, the actual knitting time for a frog is very short, however, convincing myself to finish adding the arms and legs took several weeks yet again. I started him on October 22 and finished on November 26. The back, arms, and legs were done with a combination of the bright green sock yarn and DROPS Kid-Silk in 18 Apple Green and the tummy was the light green sock yarn and Søstrene Grene Mohair Blend in 1650 Blanc. He’s got wires in his arms and legs and is posable. I’ve not tried to pose him yet because I still want to make some clothes.
The original frog has since found a new home and I’m more than happy to have this one hanging out on the dinner table!
Frogs perching on lily pads make the best head gear.
I’ve been subscribed to Dot Pebbles a.k.a. Claire Garland’s newsletter for a few years now, and every so often I get a free pattern for a knit animal. These knits are always very life-like and look insanely complicated. I made the polar bear before and while it all worked out, I wasn’t sure it would while knitting it. So I’ve been eyeing the Frog pattern that’s been making the rounds on the internet recently. I thought I had received it a while ago in my free patterns too. Turns out that I indeed had and I really wanted to have a frog…
Since I really wasn’t sure if it was going to work, I tried to get similar yarns to the ones Claire Garland suggests. I got some drops kid-silk in my mailbox and dyed some fingering weight yarn in ‘toad-green’. The body and legs of the frog were going to be toad-green with apple-green kid-silk. It’s belly was undyed yarn with moonshine kid-silk.
Knitting the body is really fast. I only deviated from the pattern once, by skipping the mouth stitches. I couldn’t get them to work and it just looked awful. Once the body was done, I knit the legs and arms on. At that point, I decided that I need him to be posable so I found some armature wire in my stash and added that. When I make the frog again, I’m going to try to use the wire while knitting, instead of when it’s all done. That way, I can probably hide the ends without having to use so many bits of yarn. With the wire in, froggy can do push ups or sit awkwardly instead of just flop down.
So I had a completed frog when my mother sent an invite for her birthday party. The assignment was to wear ‘your best head gear’. I knew I wanted to wear my green Rita-cousin dress, so I wanted to make some sort of hat that would work with that. I also had this frog. 1+1 = 2 and I decided to make a lily-pad fascinator with the frog pinned to the top. The lily pad pattern was based on the left leaf from an image on the internet. I cut it out from the same green fabric as the dress, stretched over some foam. I then added some hair clips to the bottom. The frog was maneuvered into a normal sitting frog and safety-pinned onto the lily pad.
I love this thing. It’s adorable, it doesn’t hurt while wearing it, it’s got a frog, what’s not to like!
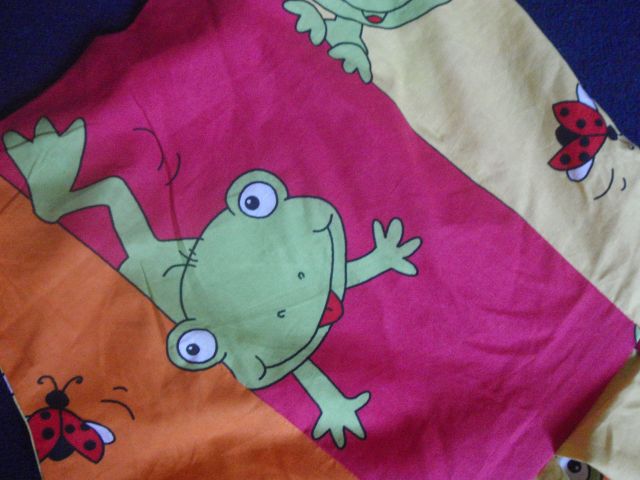
I bought this froggy fabric somewhere, some time ago. I don’t really remember, but I always thought they were very cute and that my mom would also find them quite funny. They are colourful and different and would be perfect for a top. When I made the Cheshire Cats batwing top, it was basically meant as a wearable mock up for this fabric. I brought it to my mom and when she tried it on, it fit fine but could probably do with a tiny bit more width. So I printed out a new copy of the Amy Bat Wing Top, now in a size M. There were two adjustments made, one to add a bottom band and one to add a neckline band.
Everything was sewn on the serger apart from a line of stitching around the neckline to keep it in place. This is definitely the benefit of adding bands instead of hemming tops. I really like the frogs and the colours and the shape of the top. My mom also seemed to like it and I still have enough leftover to make a shirt for myself. Now I just need to get around to actually doing it…
After some serious trials and tribulations, a tomato frog joins the tribe
When you try to make a cute little frog plush and it fights you every step of the way. That was my experience at least. As usual it’s a free pattern from Sew Desu Ne / CholyKnight aptly named Frog. I’m fairly certain my issues had nothing to do with the actual pattern, but more with fabric choice and not paying enough attention.
Anyway, I wanted to make a red frog and then googled to see if they exist and found the Tomato Frog. Perfect name for a red frog. They seem to have light coloured bellies, so I chose the off-white for that. All the pieces got cut out (so far, so decent). I stuck on the eyes which took a few tries and the nostrils, and I’m fairly certain that by that point the head-bits got stretched out of shape (friggin’ frog moment 1). I recut them and sewed all the possible red bits together. I then chucked the frog in a corner for a few weeks because I didn’t own any more red thread. Then I lost one of the feet (friggin’ frog moment 2) only to remember that it might be in my bag for when I went out to buy matching thread.
Left
Head on
Right
Yesterday, I finally got the courage to get going on the frog again. You see, this frog requires visible topstitching for its feet and this fabric does not want to show stitching. In the end, I sat down and hand sewed some toes. Then used long bent tweezers to stuff the toes so that there was some definition. To get some more effect, I even trimmed the webbed bits to see if it would help. I then had to attach the legs to the body. The one side went fine, the other side I basted in place a whopping 4 times (friggin’ frog moment 3) because I first put it in the wrong place – there was a notch?, then upside down twice before finally figuring out how to do it. Going back to the first failed baste.. Why was there a notch on the head?! Turns out, I stitched the head together wrong (friggin’ frog moment 4) and spent the next 45 minutes picking out tiny stitches.
Top
Bottom
Back or I’m not speaking to you!
After putting the head back on correctly, and attaching the belly the remainder went well. Just some stuffing to do after all and sewing a frog’s butt closed. While working on the back legs, I kept wondering how someone can think in 3D shapes in such a way to make one ‘moon-shaped’ pattern piece resemble an entire back leg of a frog and I decided to just be in awe. I don’t love this one nearly as much as some of the others. Which is ok, not everyone can be on top. I still have a few more plushies cut out, but I’m probably going to leave them cut and unsewn for a while. We’ll see where the sewing machine and mood take me.
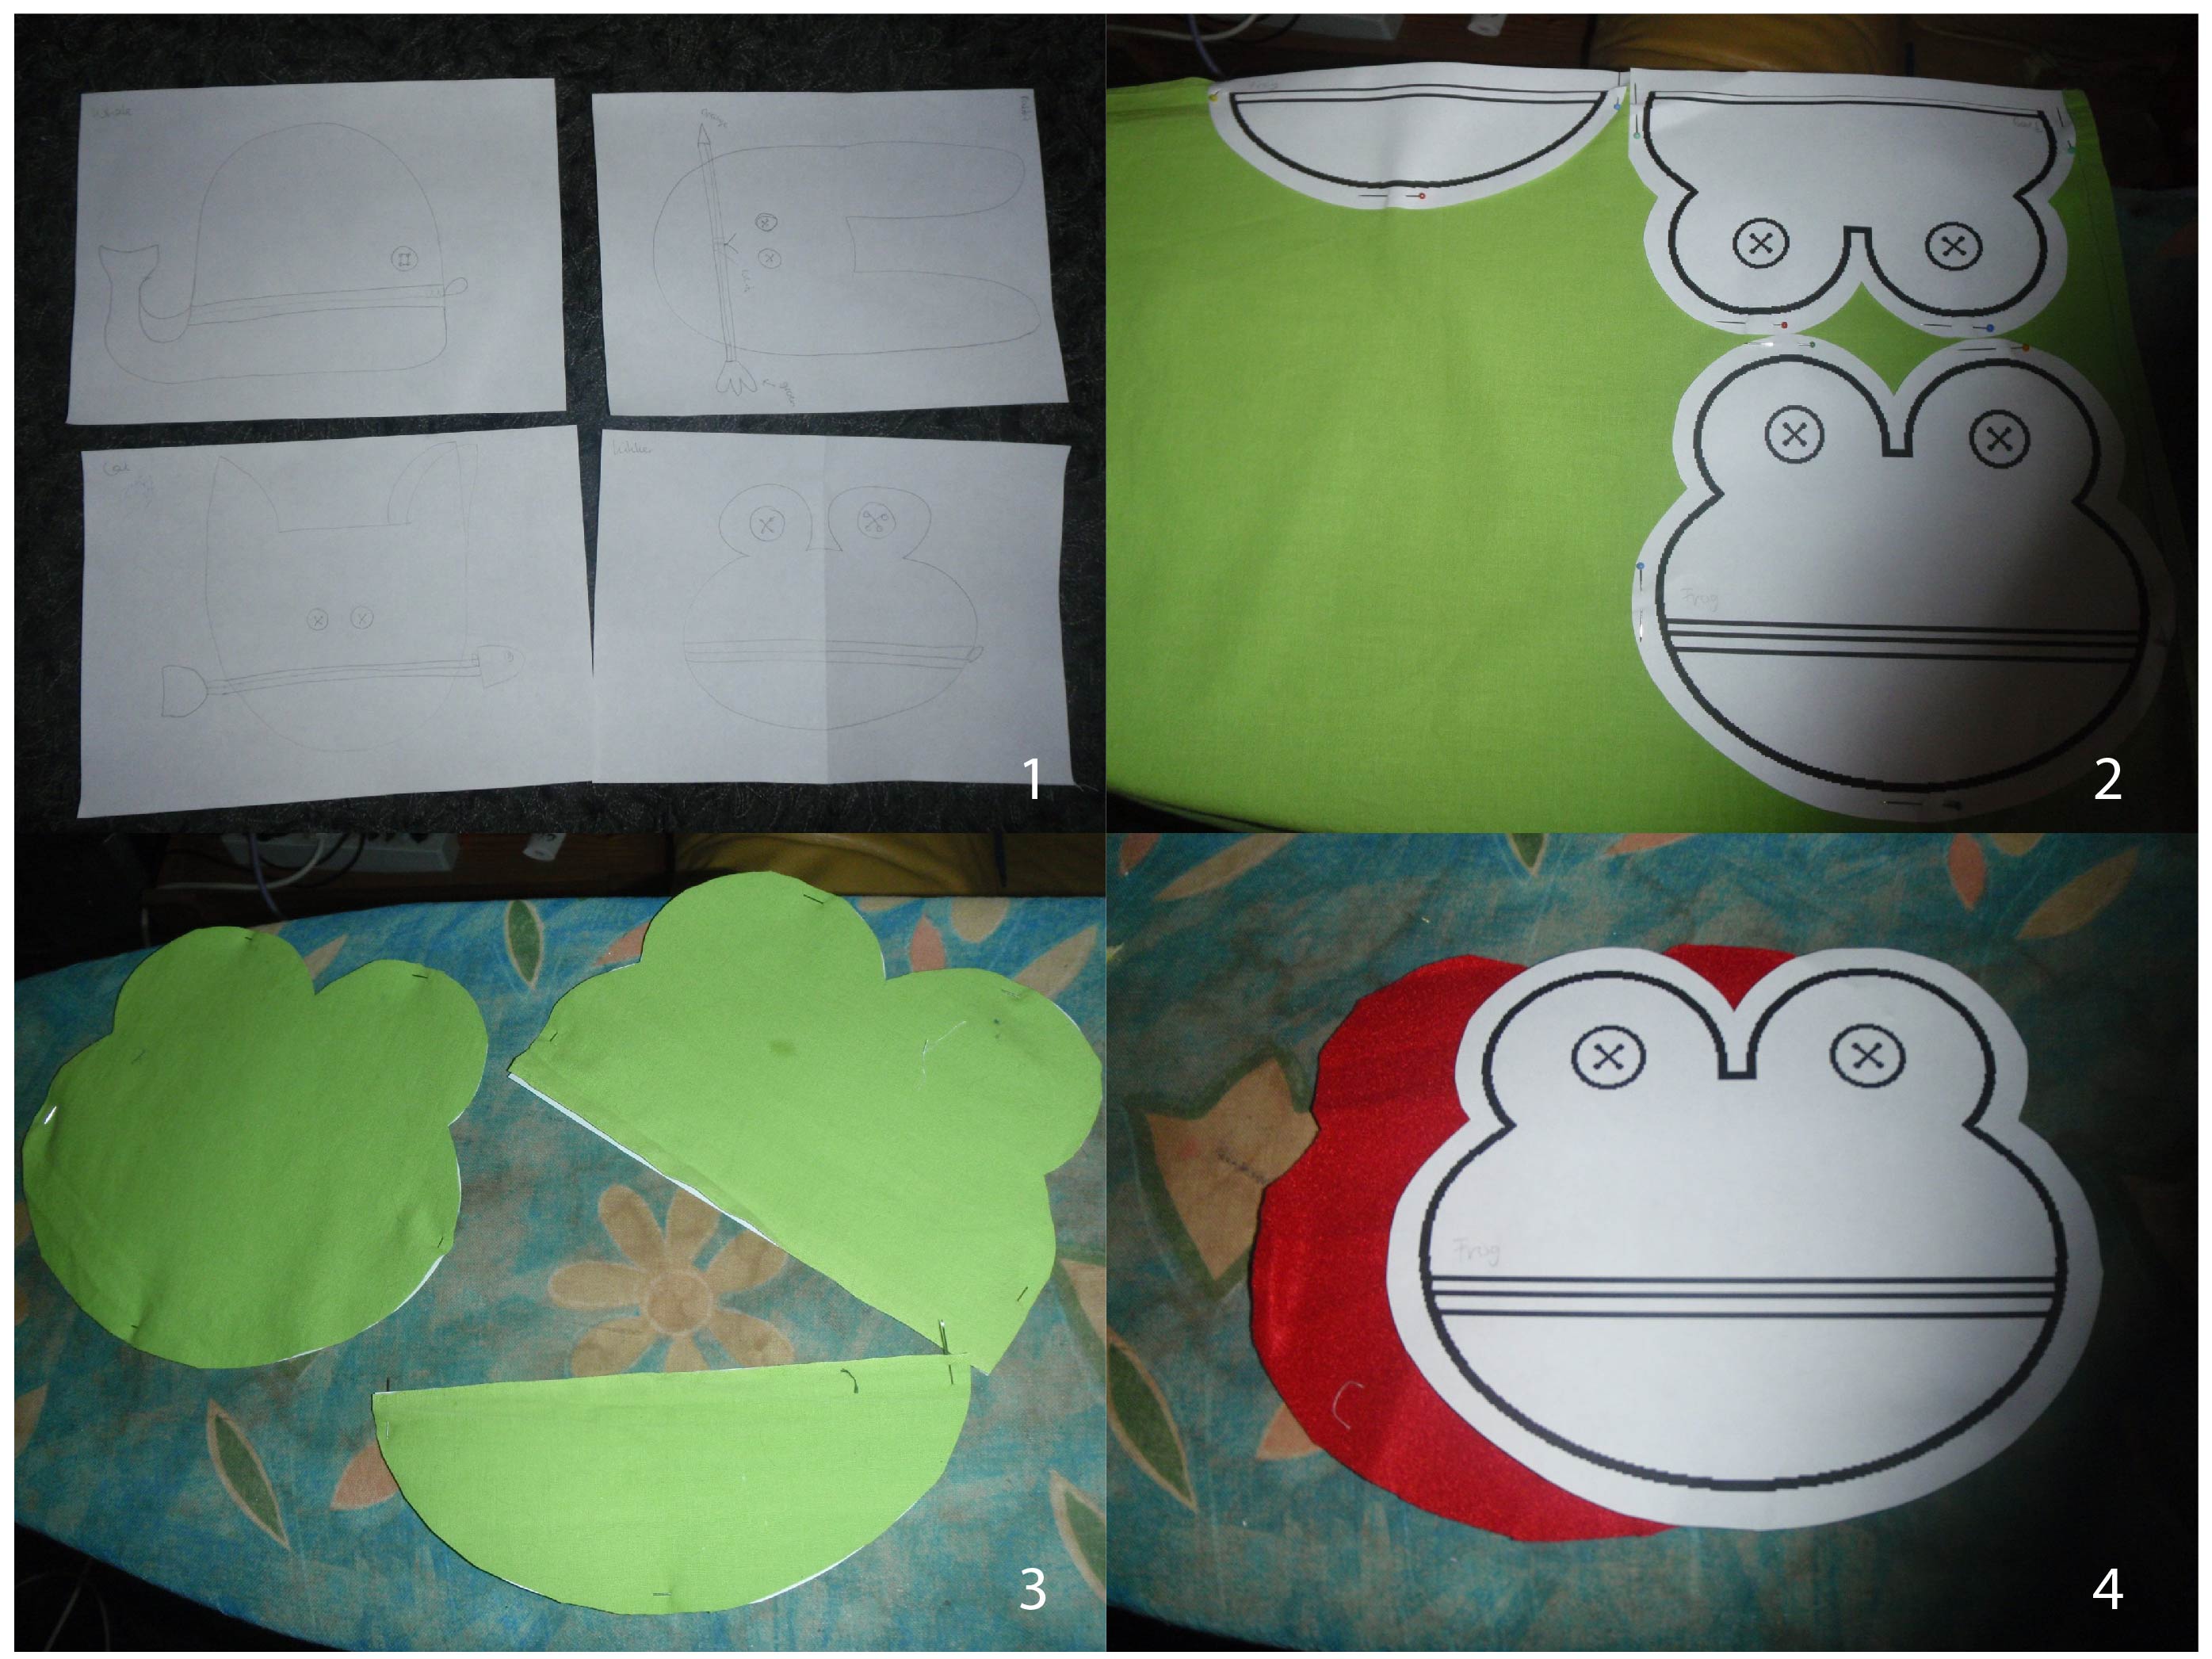
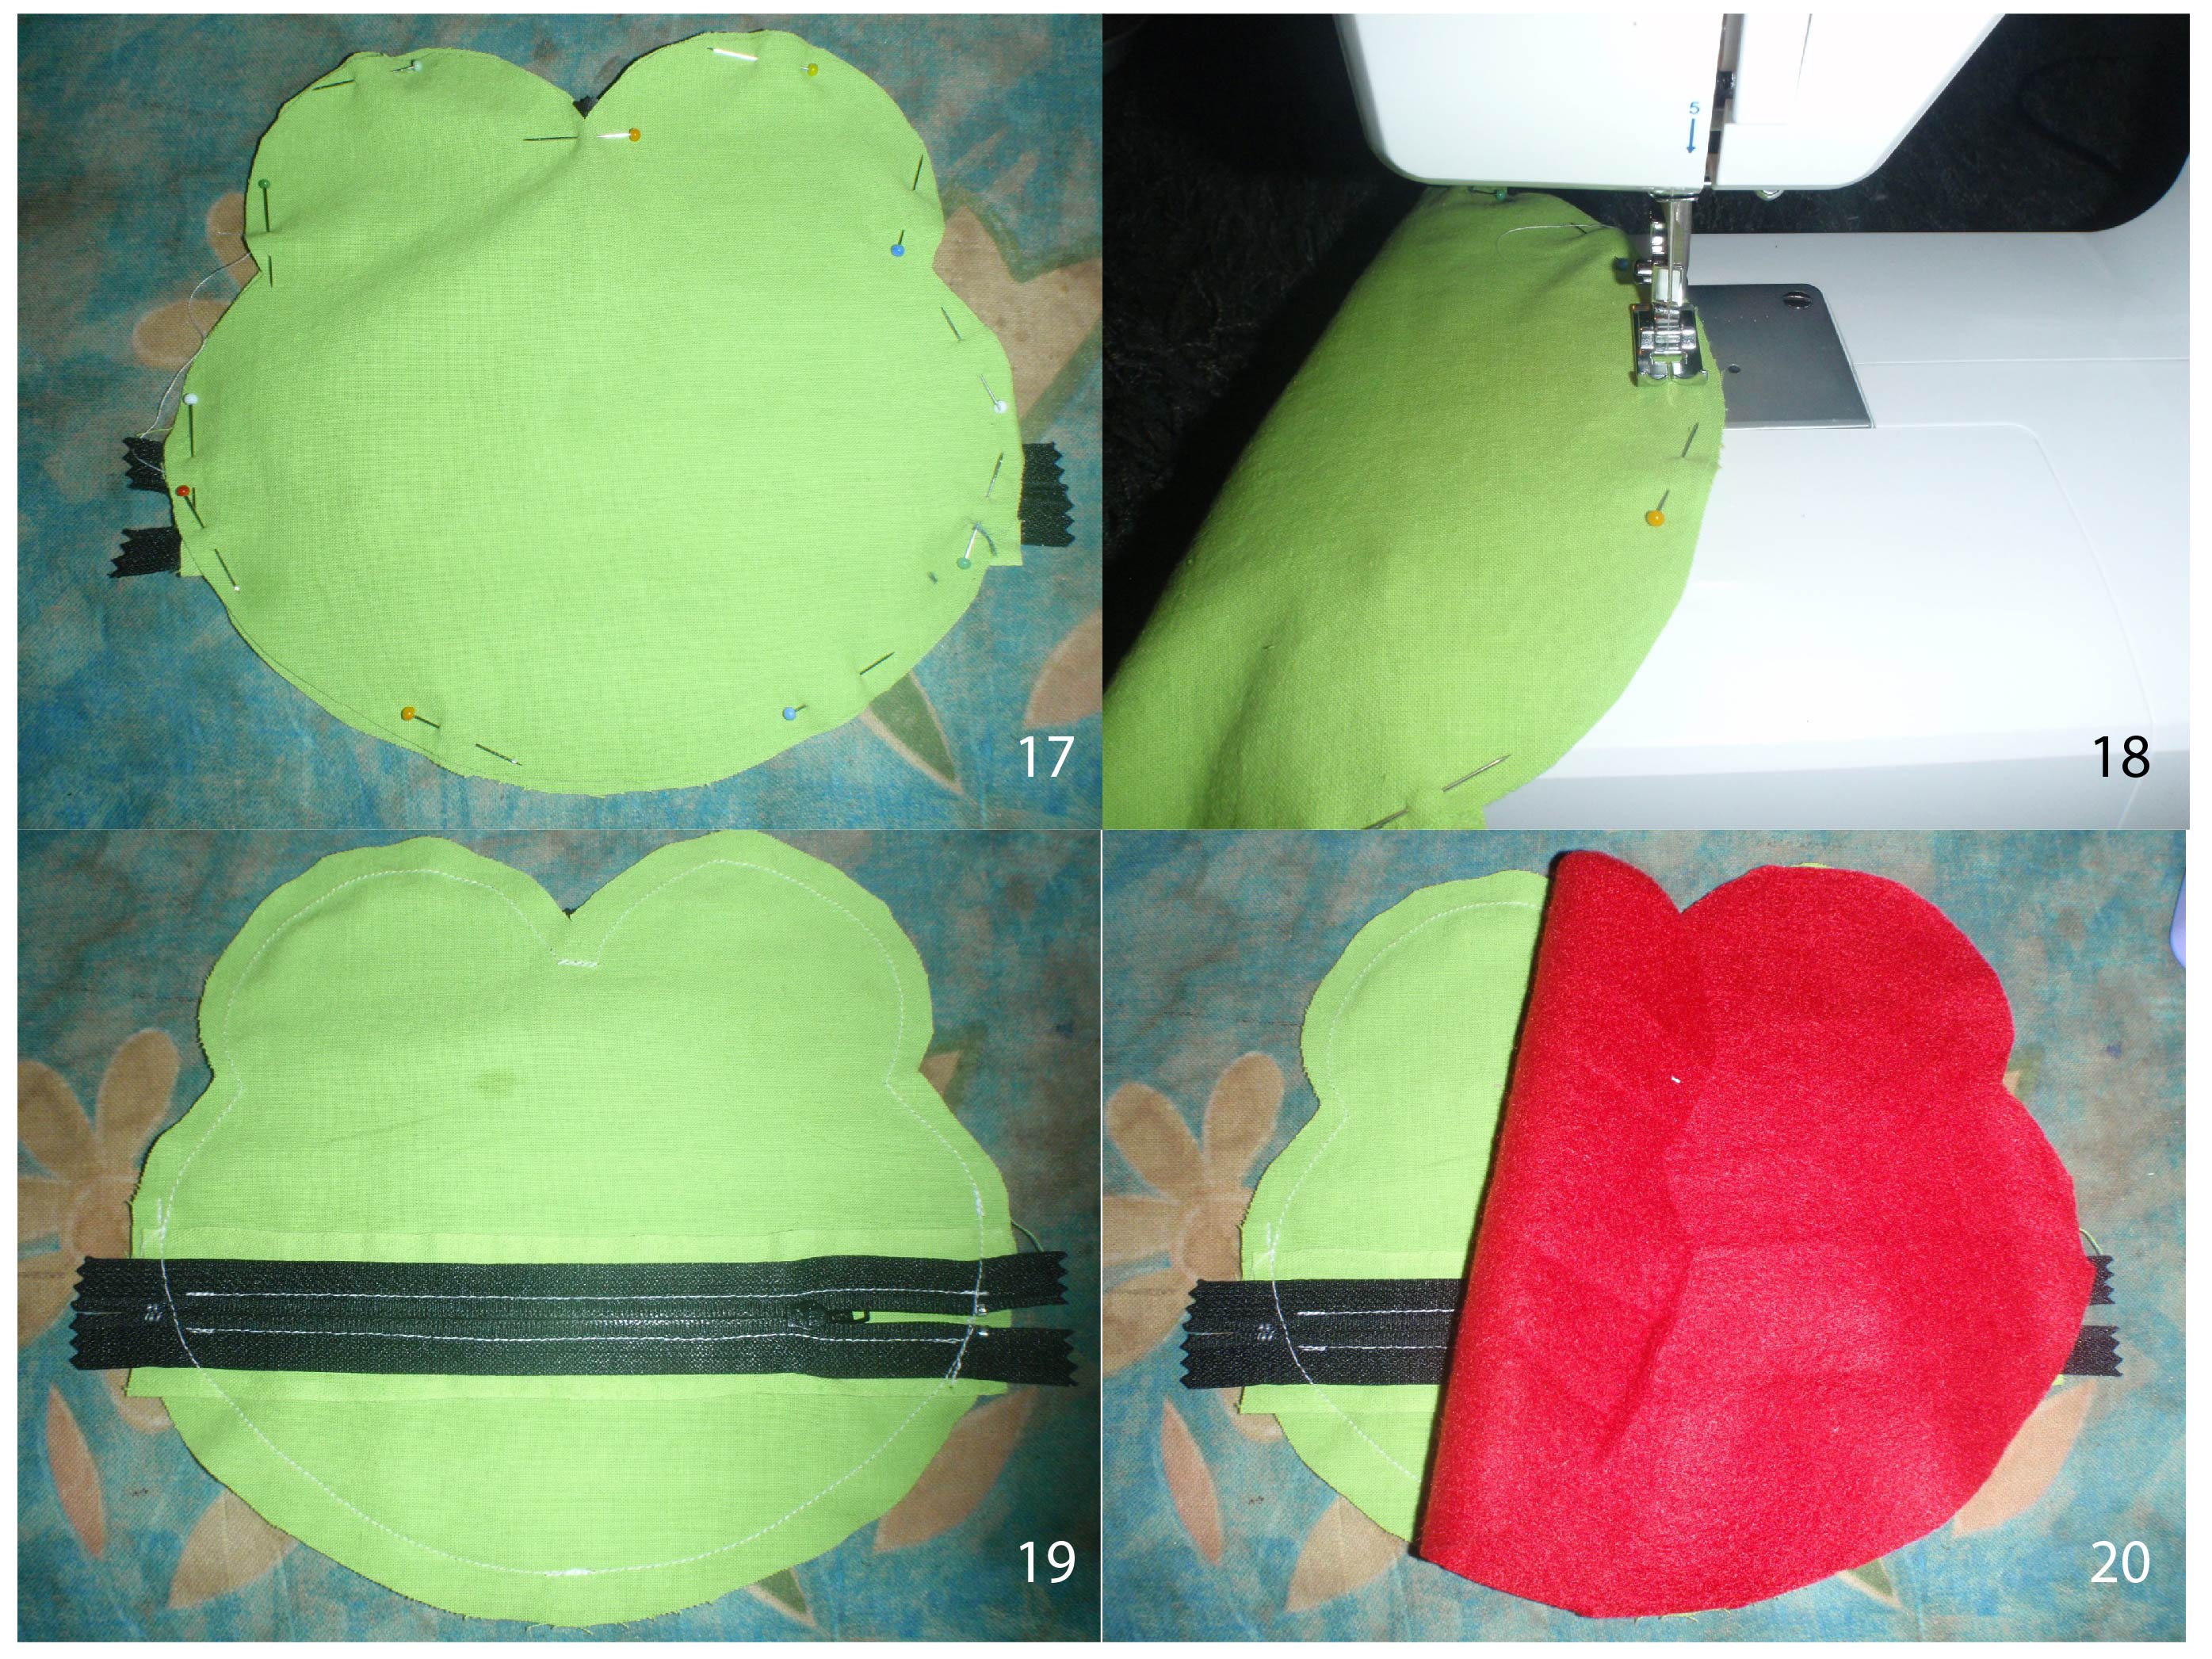
So here I’ll document the process of producing this frog:
For this tutorial you need:
– Stuff to draw (pen and paper/computer) or this drawing: Rabbit, Cat, Frog, Whale (these are all the pouches I made, seam allowances are not added)
– Stuff to sew (machine/needles/thread/scissors/pins)
– Embellishments (buttons/ribbon/zipper)
You can click the pictures to enlarge them.
1. Design an animal and print it out/draw it twice. Then draw a line where you want the mouth to be and cut one of the heads open along this line. Add seam allowances. 2. Place the pieces on the fabric such that they fit. 3. Cut out the three pieces (back, front bottom and front top) from the main fabric. 4. Cut out the back piece from the lining.
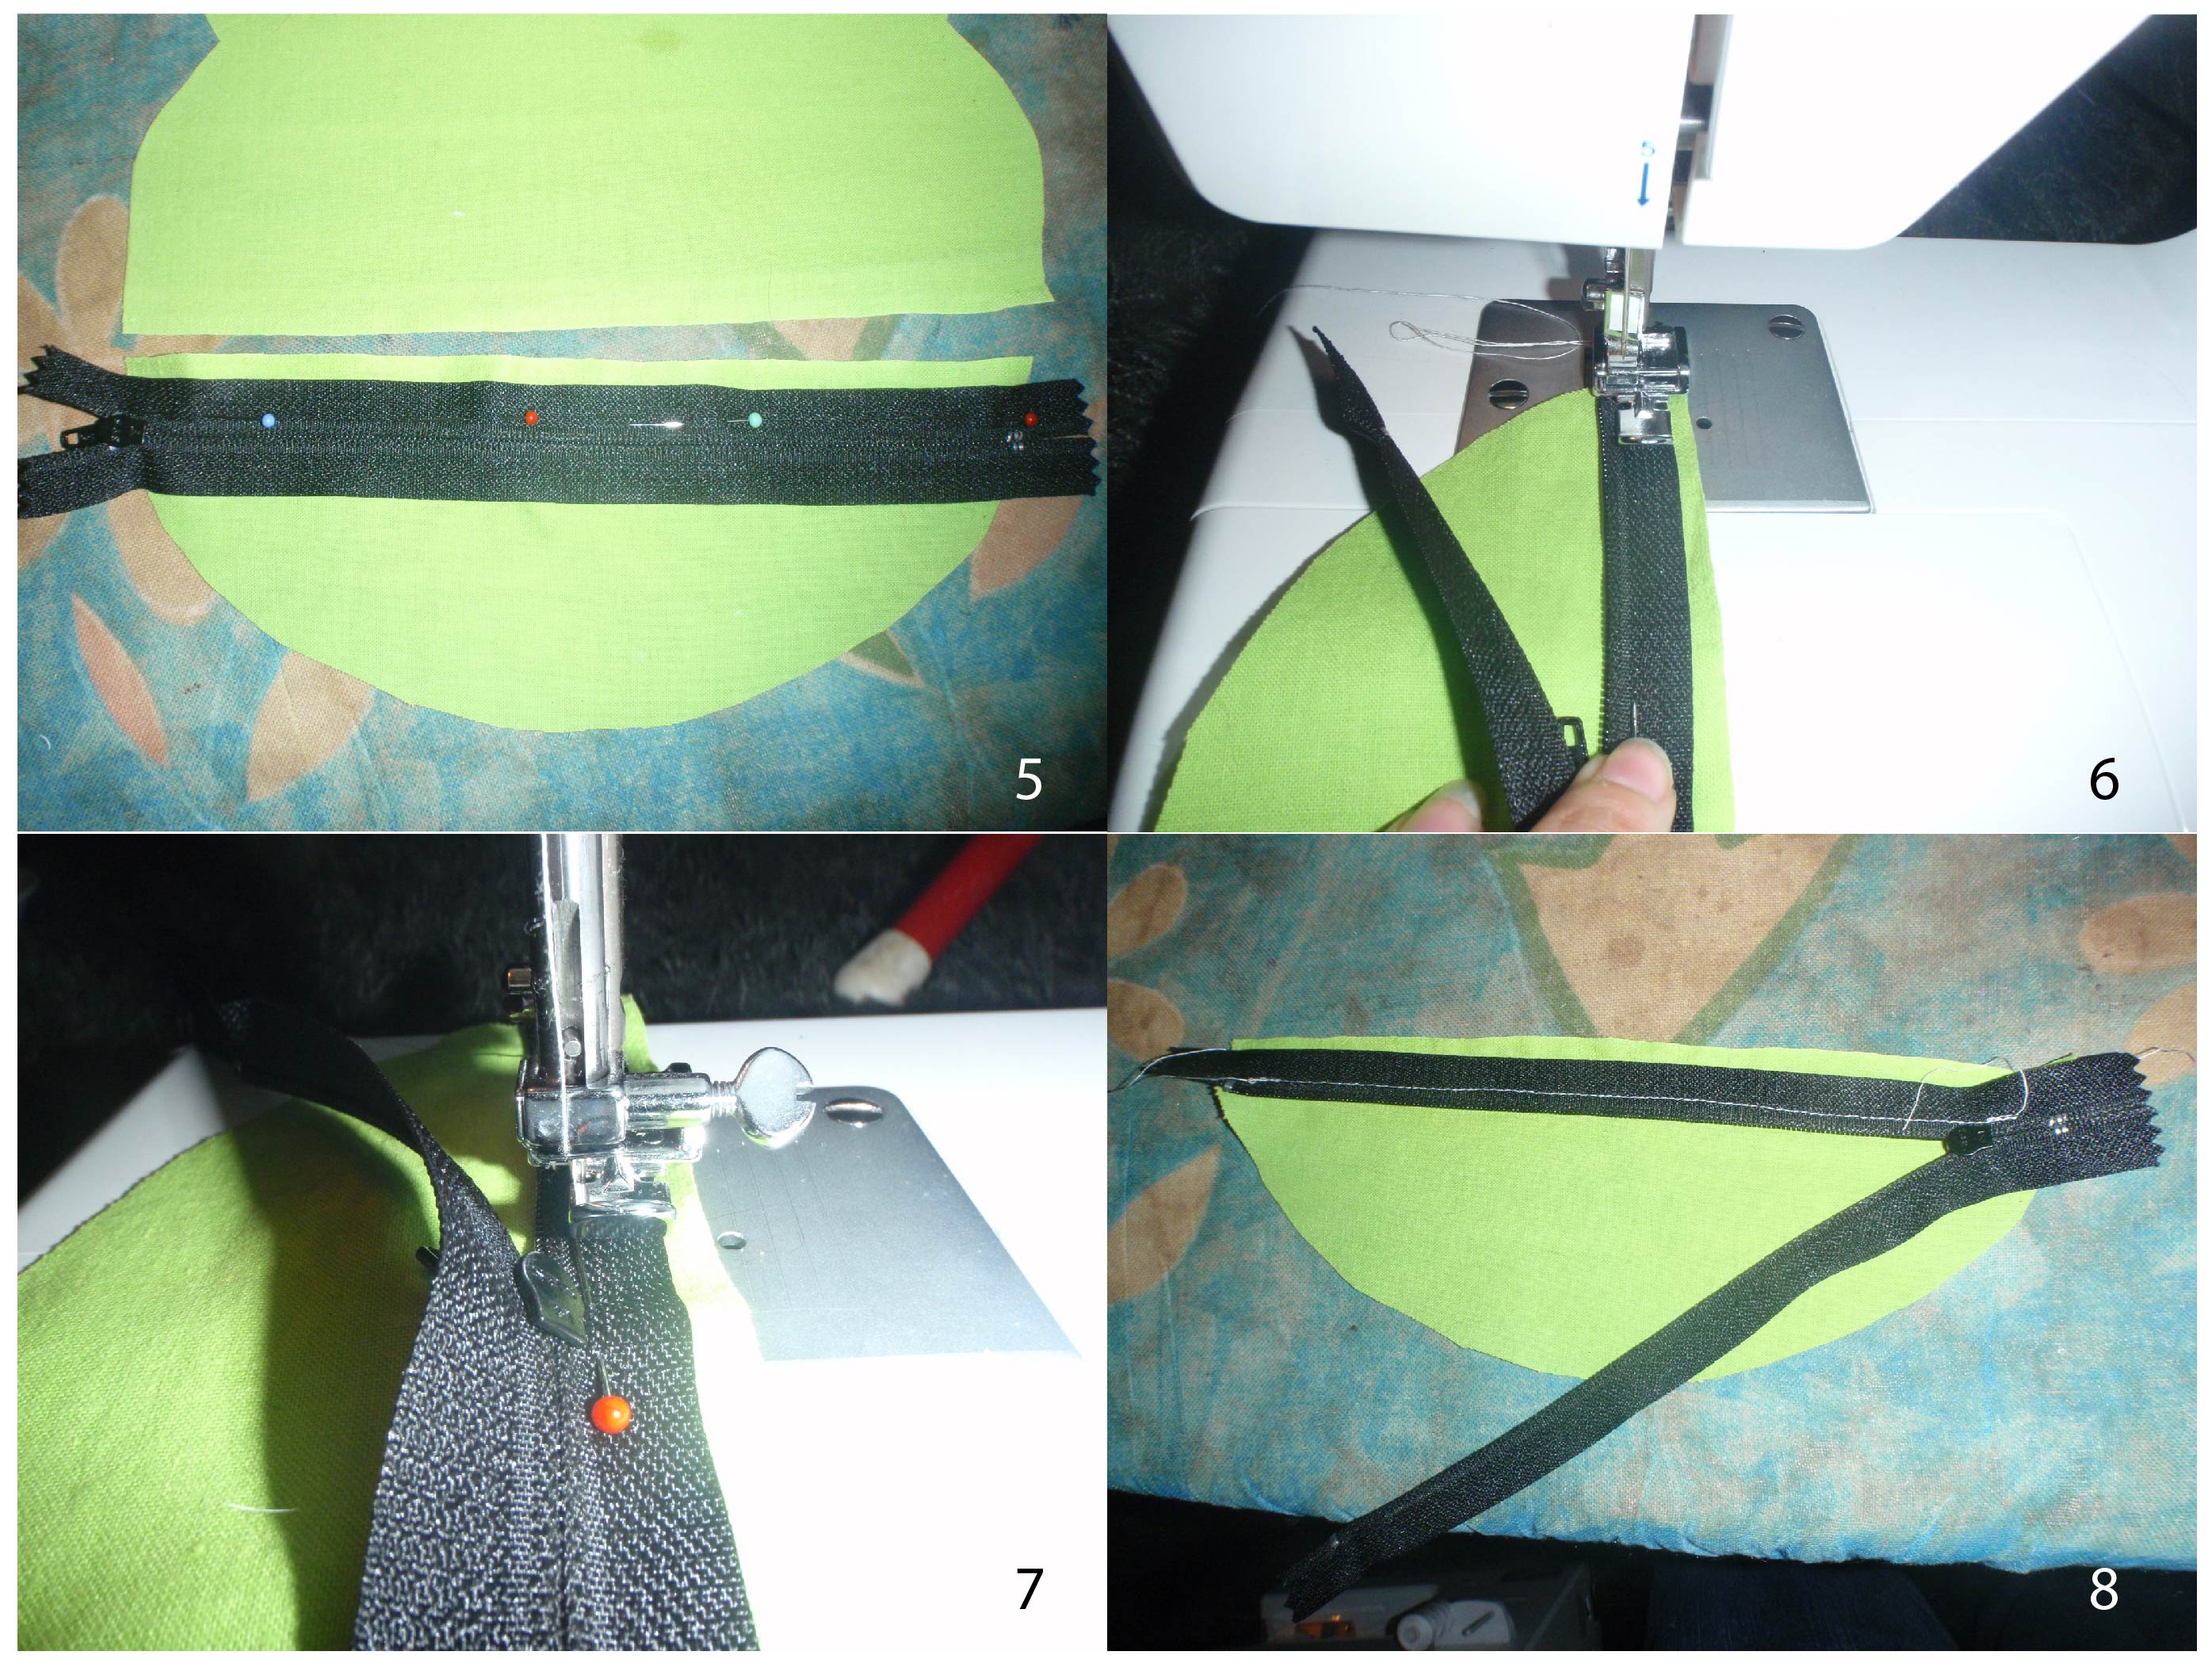
5. Take the front bottom and align the zipper as in the picture. Upside down on the right side of the fabric. 6. Sew it in place using a zipper foot.
7. Put the needle down when you reach the zipper pull and raise the foot. You can then wiggle the pull past the foot and needle and continue sewing the seam. 8. Press the zipper seam. You can now also finish the seam with pinking or serging.
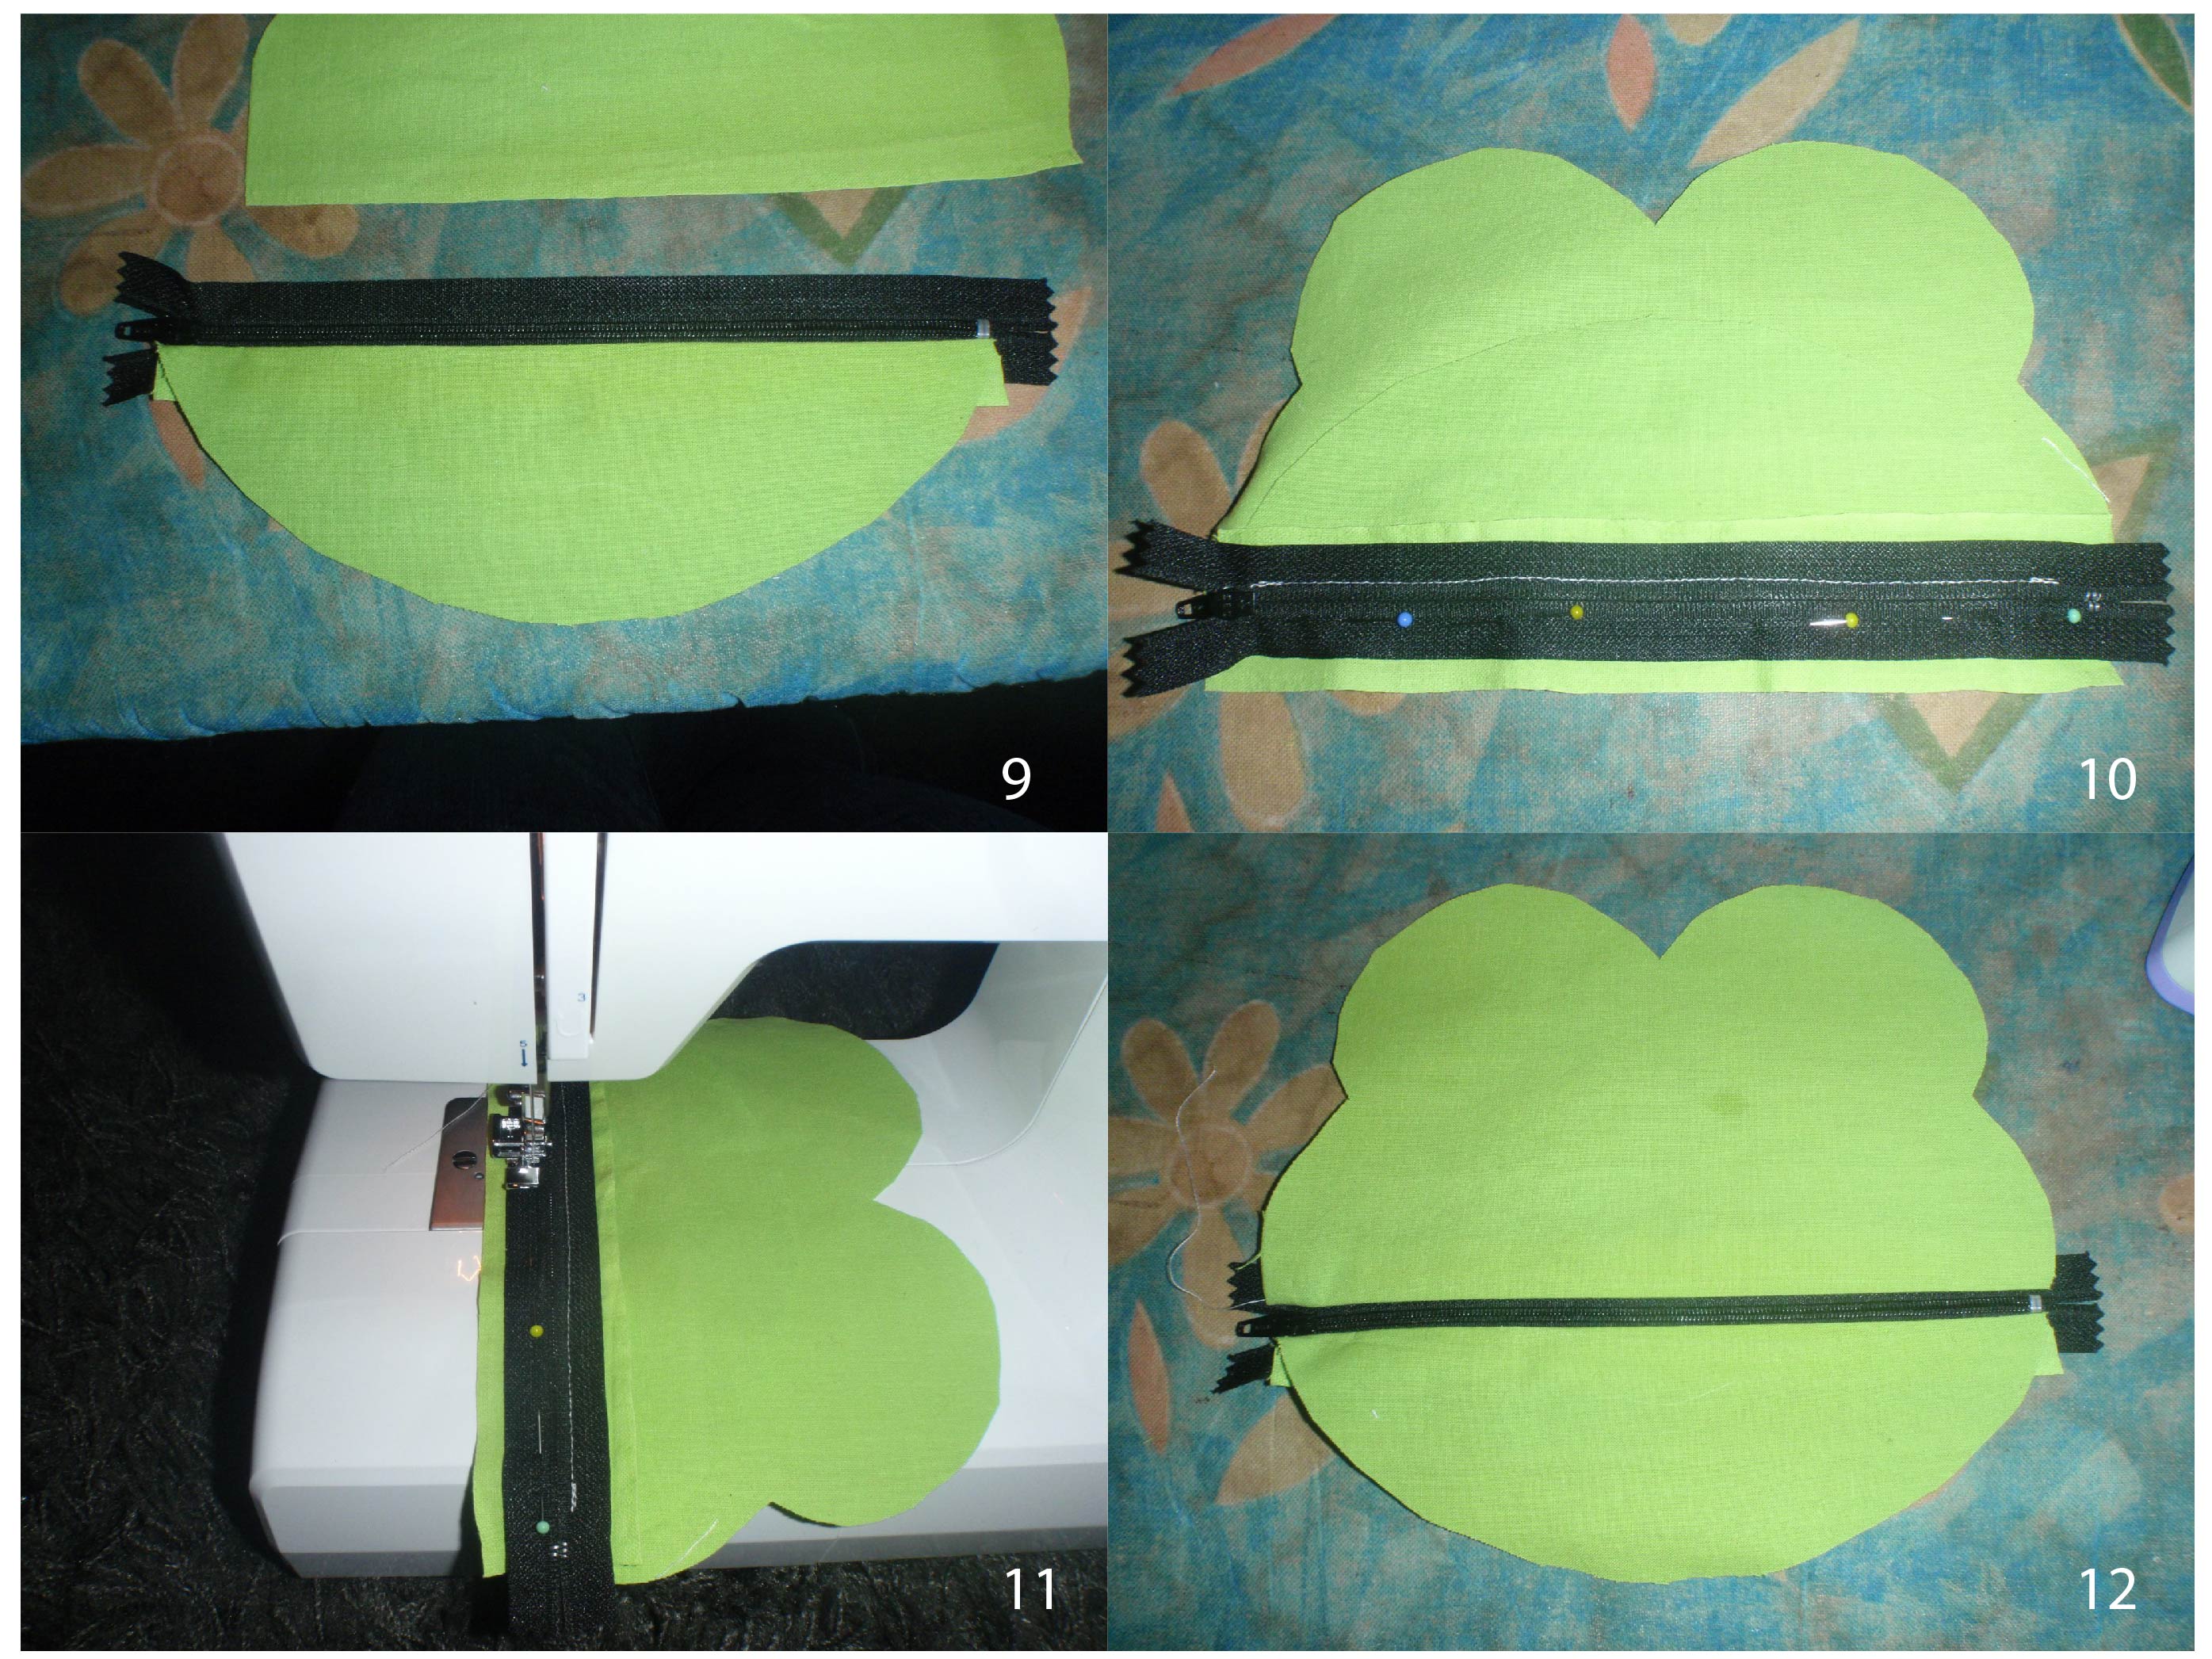
9. Press the fabric to the bottom. 10. Align the zipper on the right side of the front top. Such that the front top and bottom line up. The zipper is again upside down.
11. Sew the zipper in place.
12. Press the seam front and back, finish the seam and press them to the top. The front is now sewn.
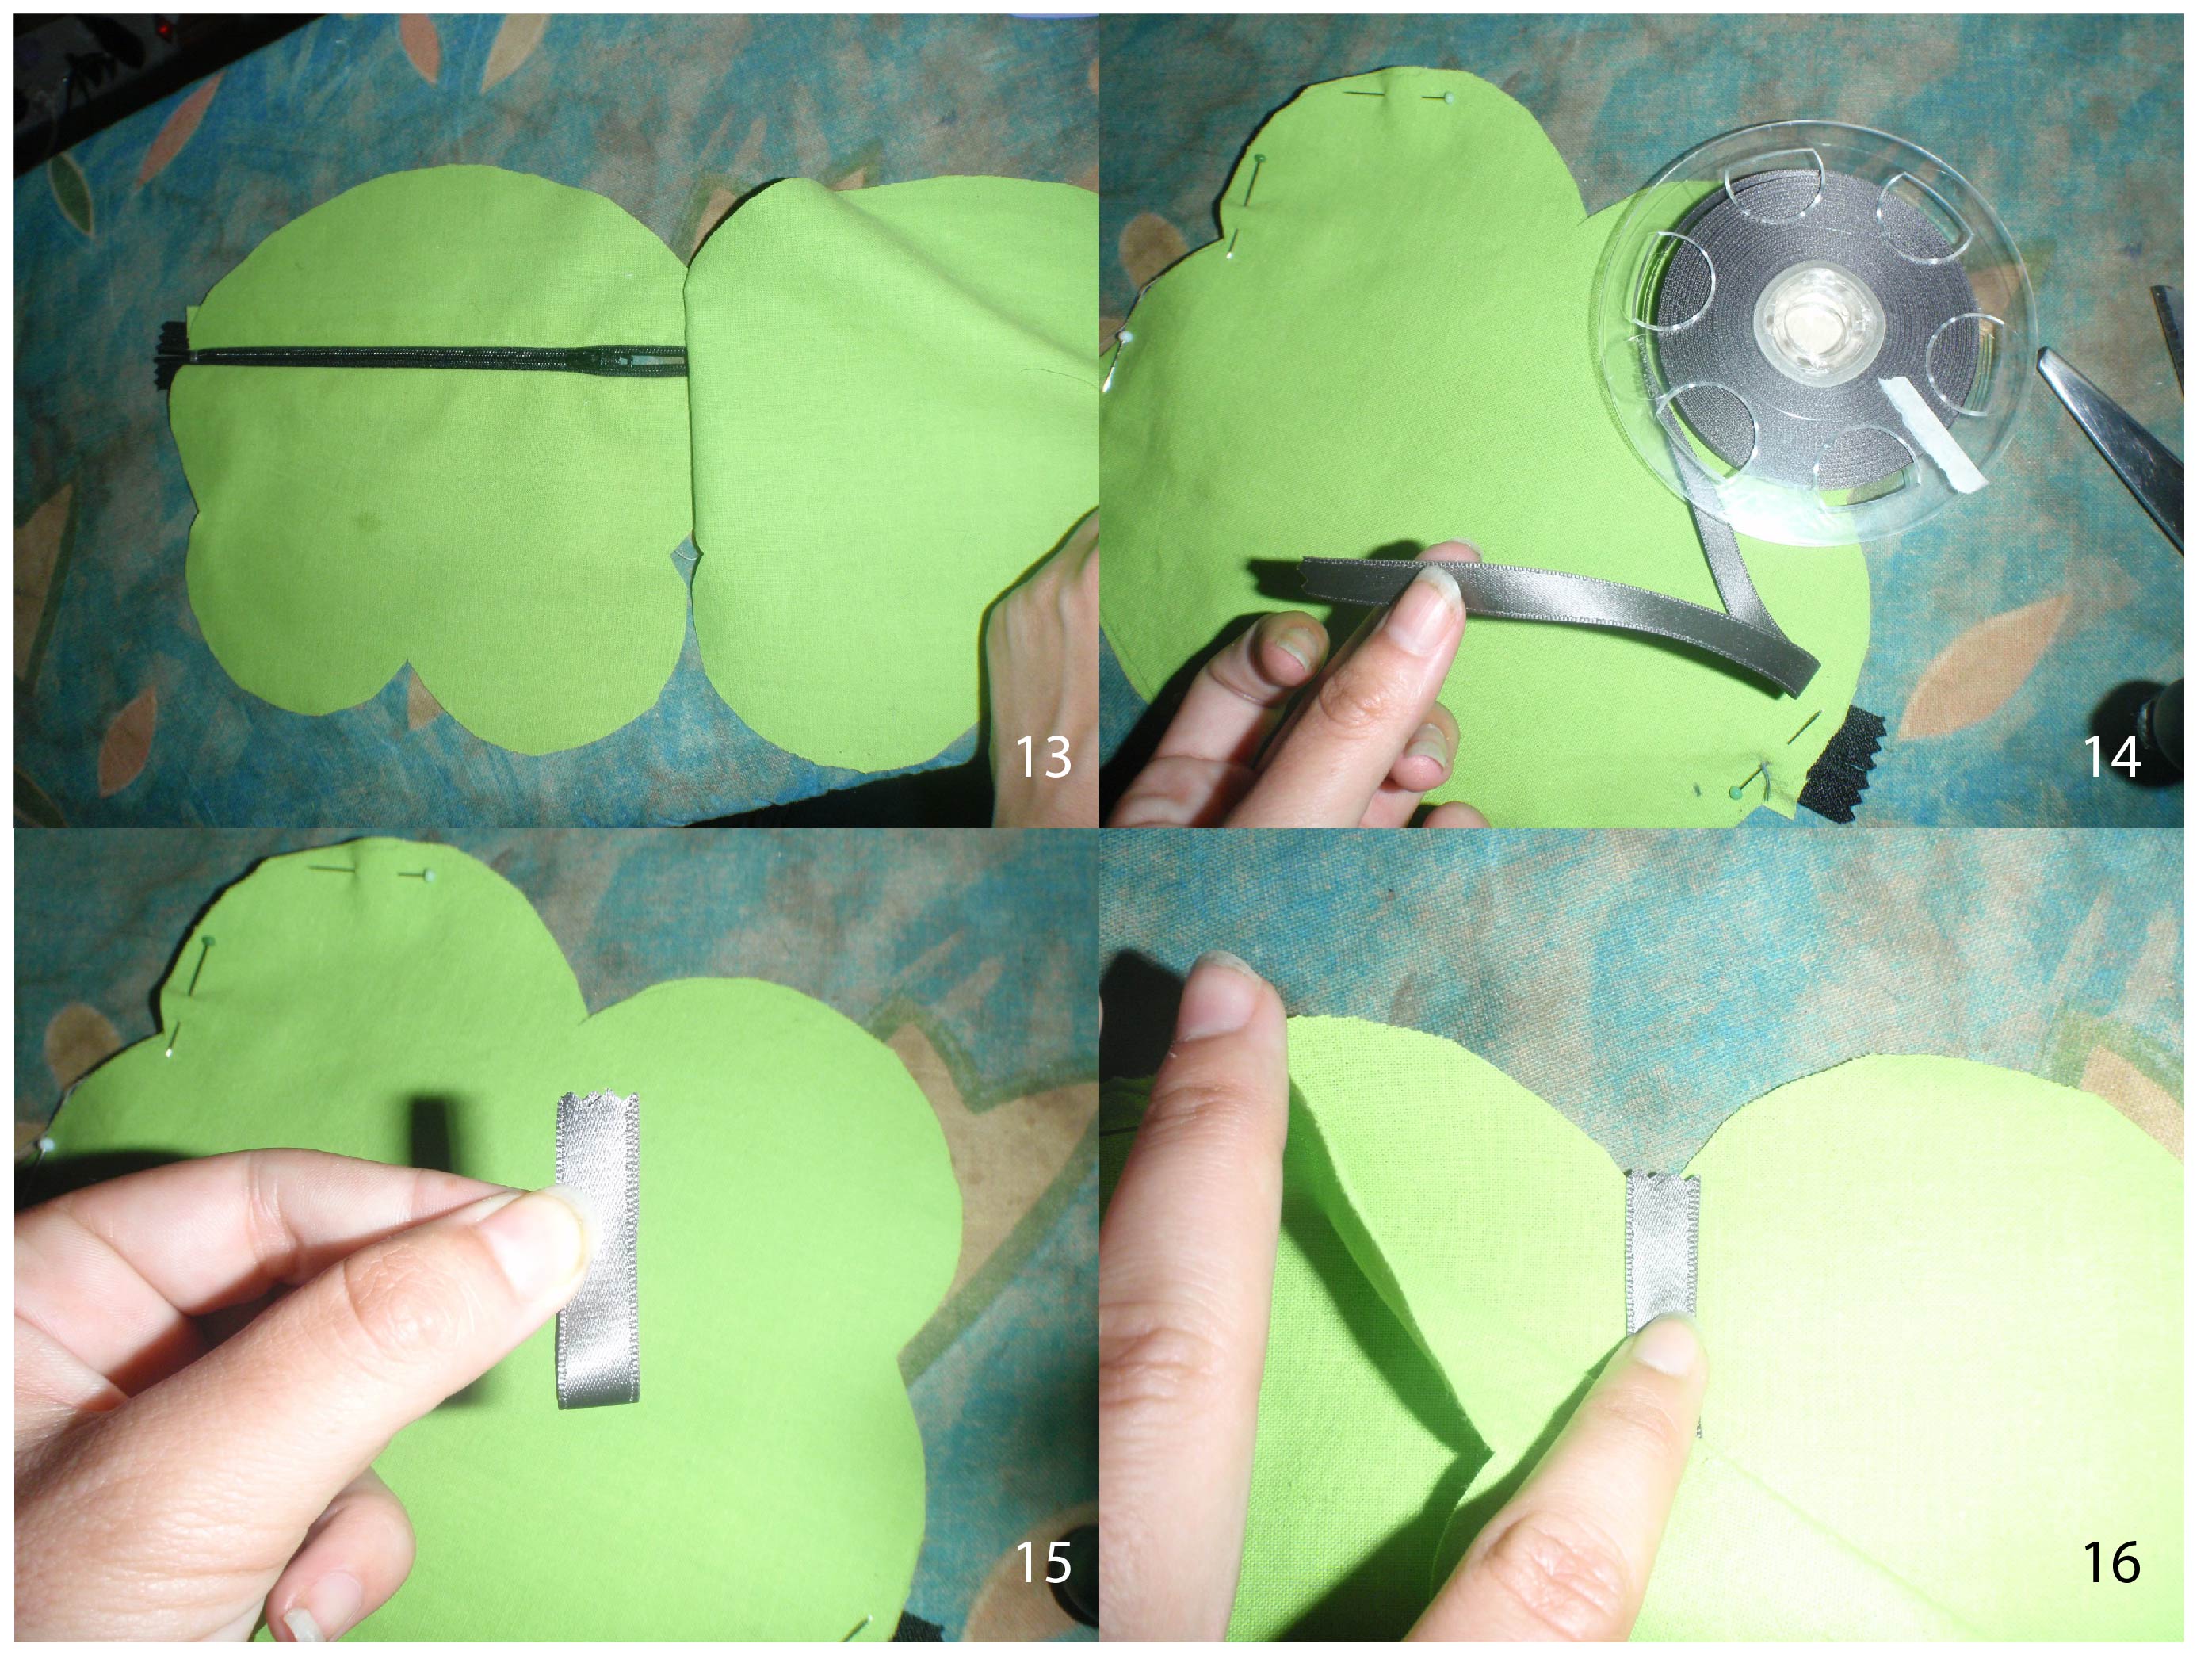
13. Place the right side of the back on the right side of the front and pin them together apart from the area between the eyes. 14. Take ribbon and cut twice as much as the loop you want.
15. Make a loop of the ribbon. 16. Place the ribbon between the eyes of the frog. The loop should be pointing downwards, while the cut ends are at the seam.
17. Pin the ribbon between the eyes.
18. Make sure the zipper pull is ‘inside the frog (see 19). Sew around the frog. Enforce the area of the ribbon. Watch out at the zipper. You do not want to sew through the metal parts of the zipper.
19. Press the seams
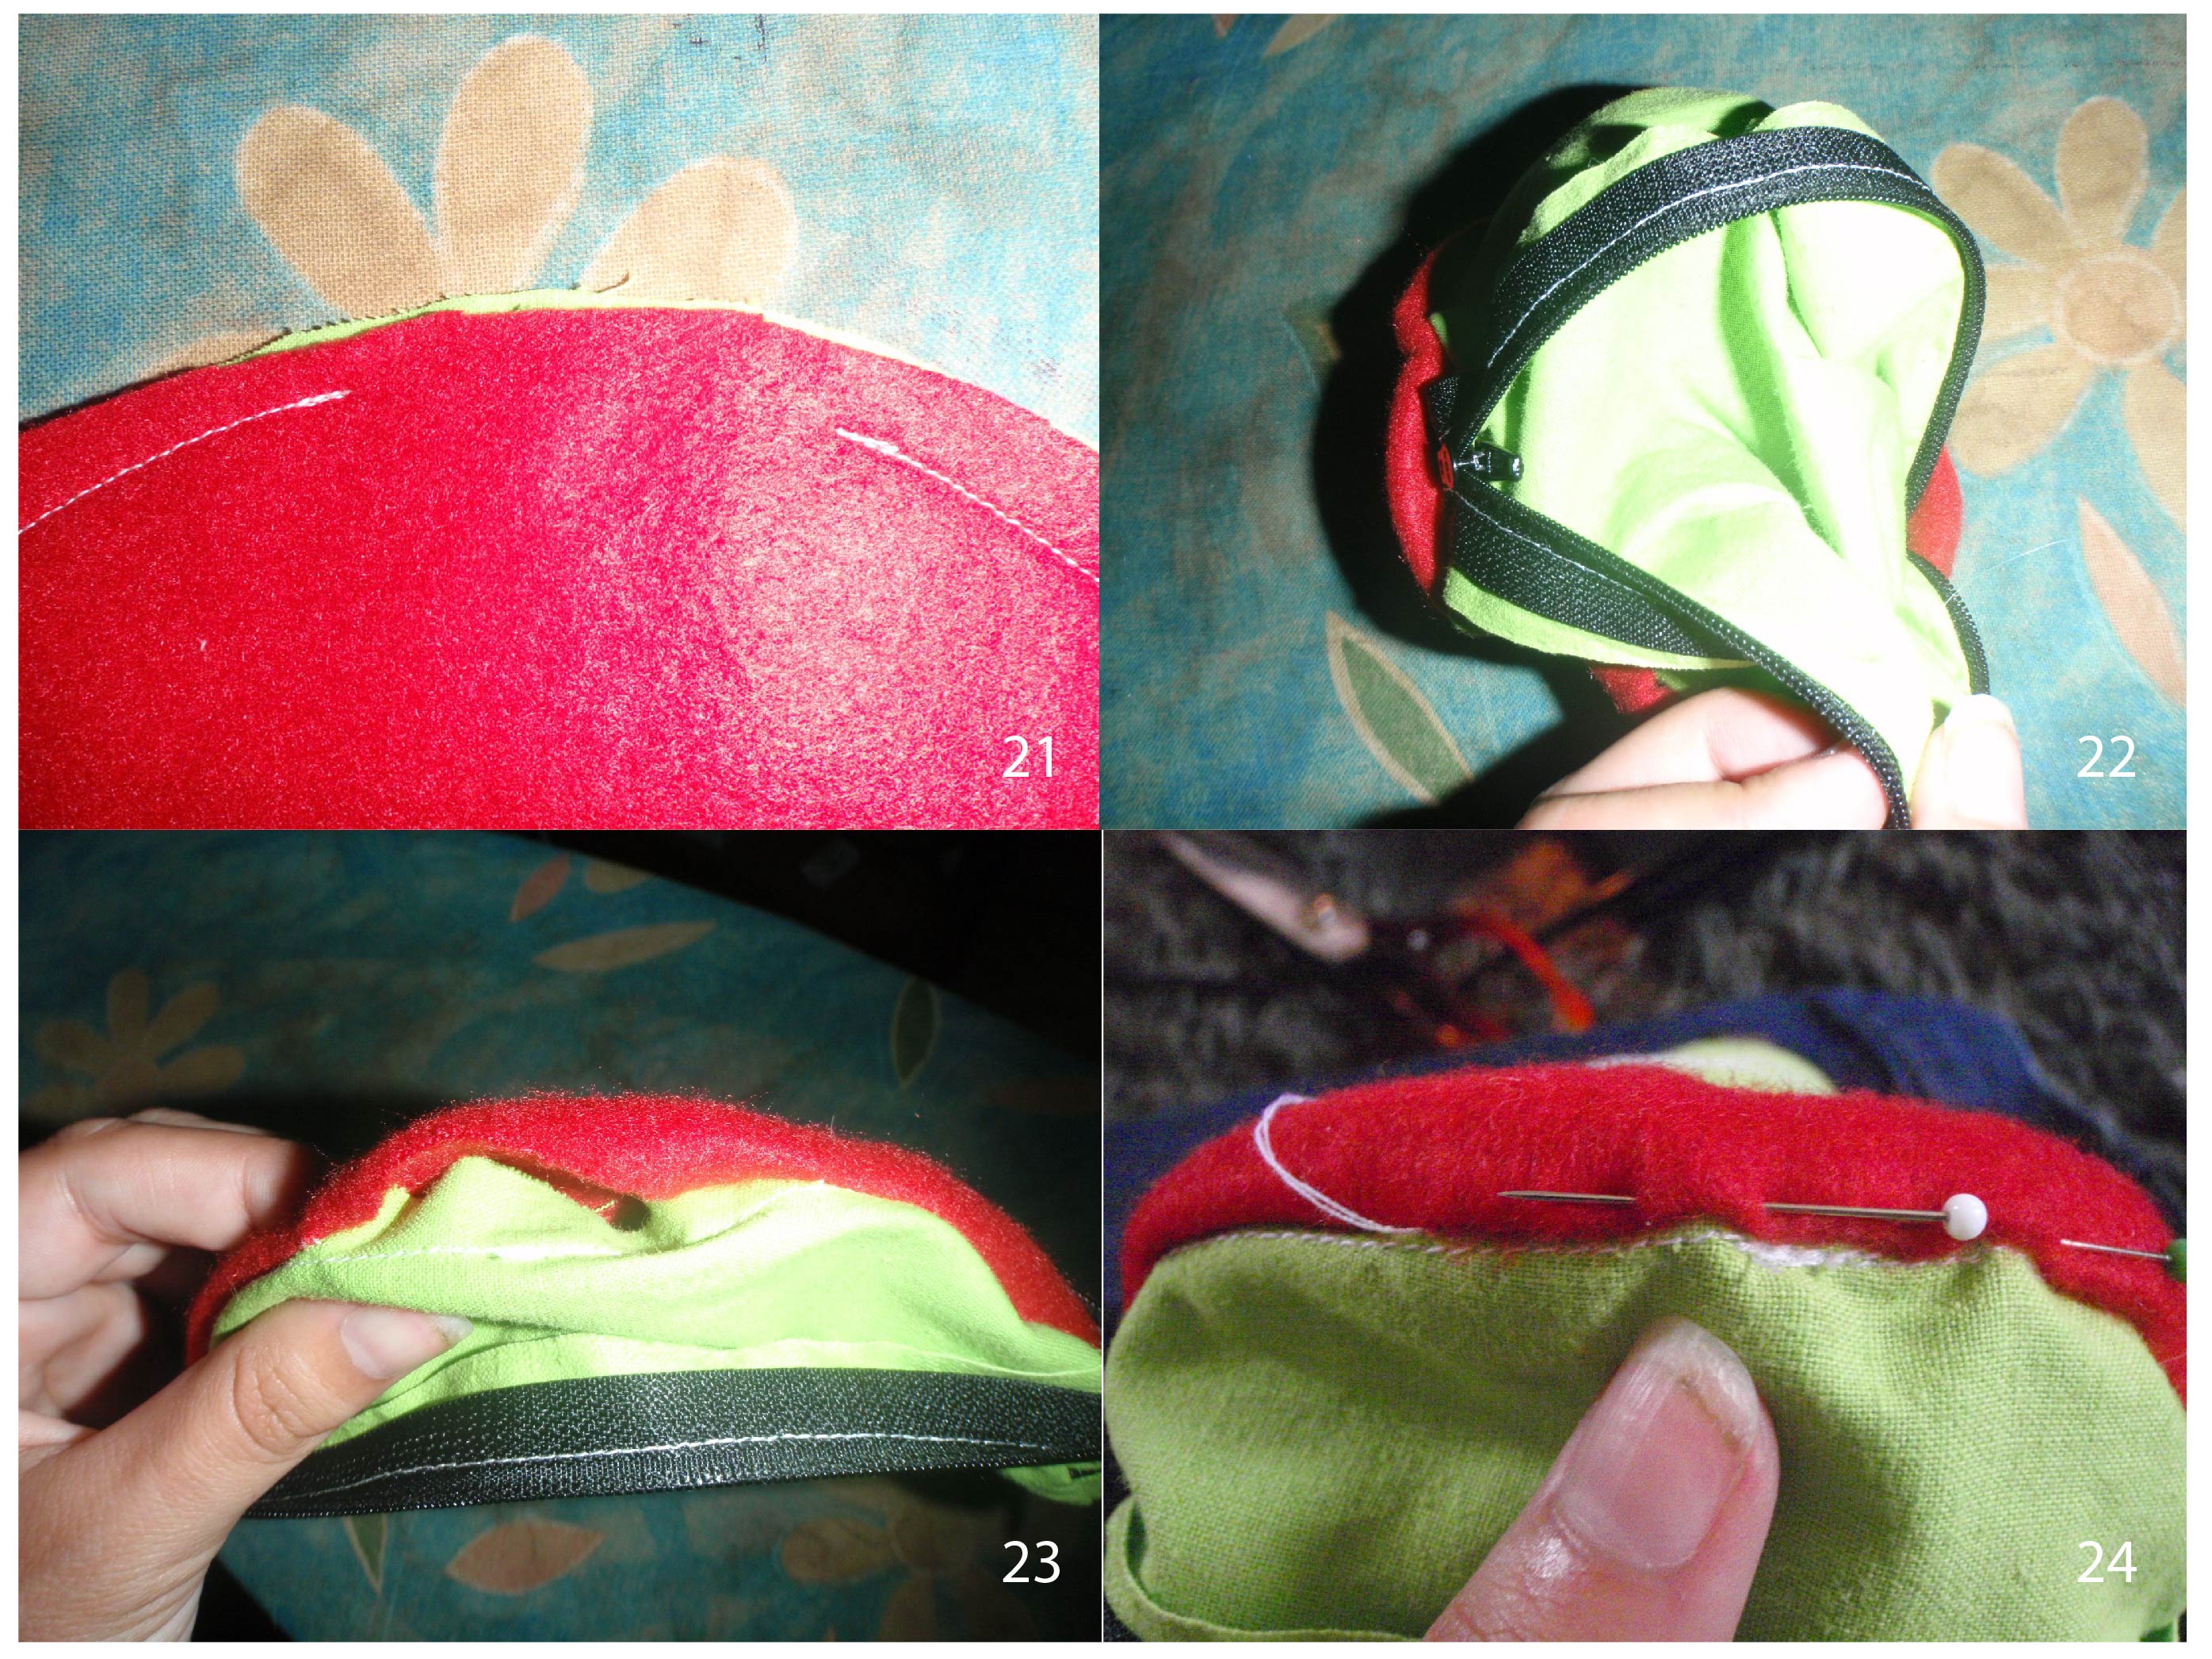
20. Place the lining over the front of the frog and pin in place.
21. Sew the lining a little outside the original seam line. Be sure to leave an opening somewhere (in this case I chose the bottom) to be able to turn it. Clip the curves (especially near the eyes). 22. Turn the frog outside out and back so it’s inside out. (This is fiddly, just try).
23. You now have a bit of lining left that is not attached.
24. Once you’ve found the lining opening, pin it.
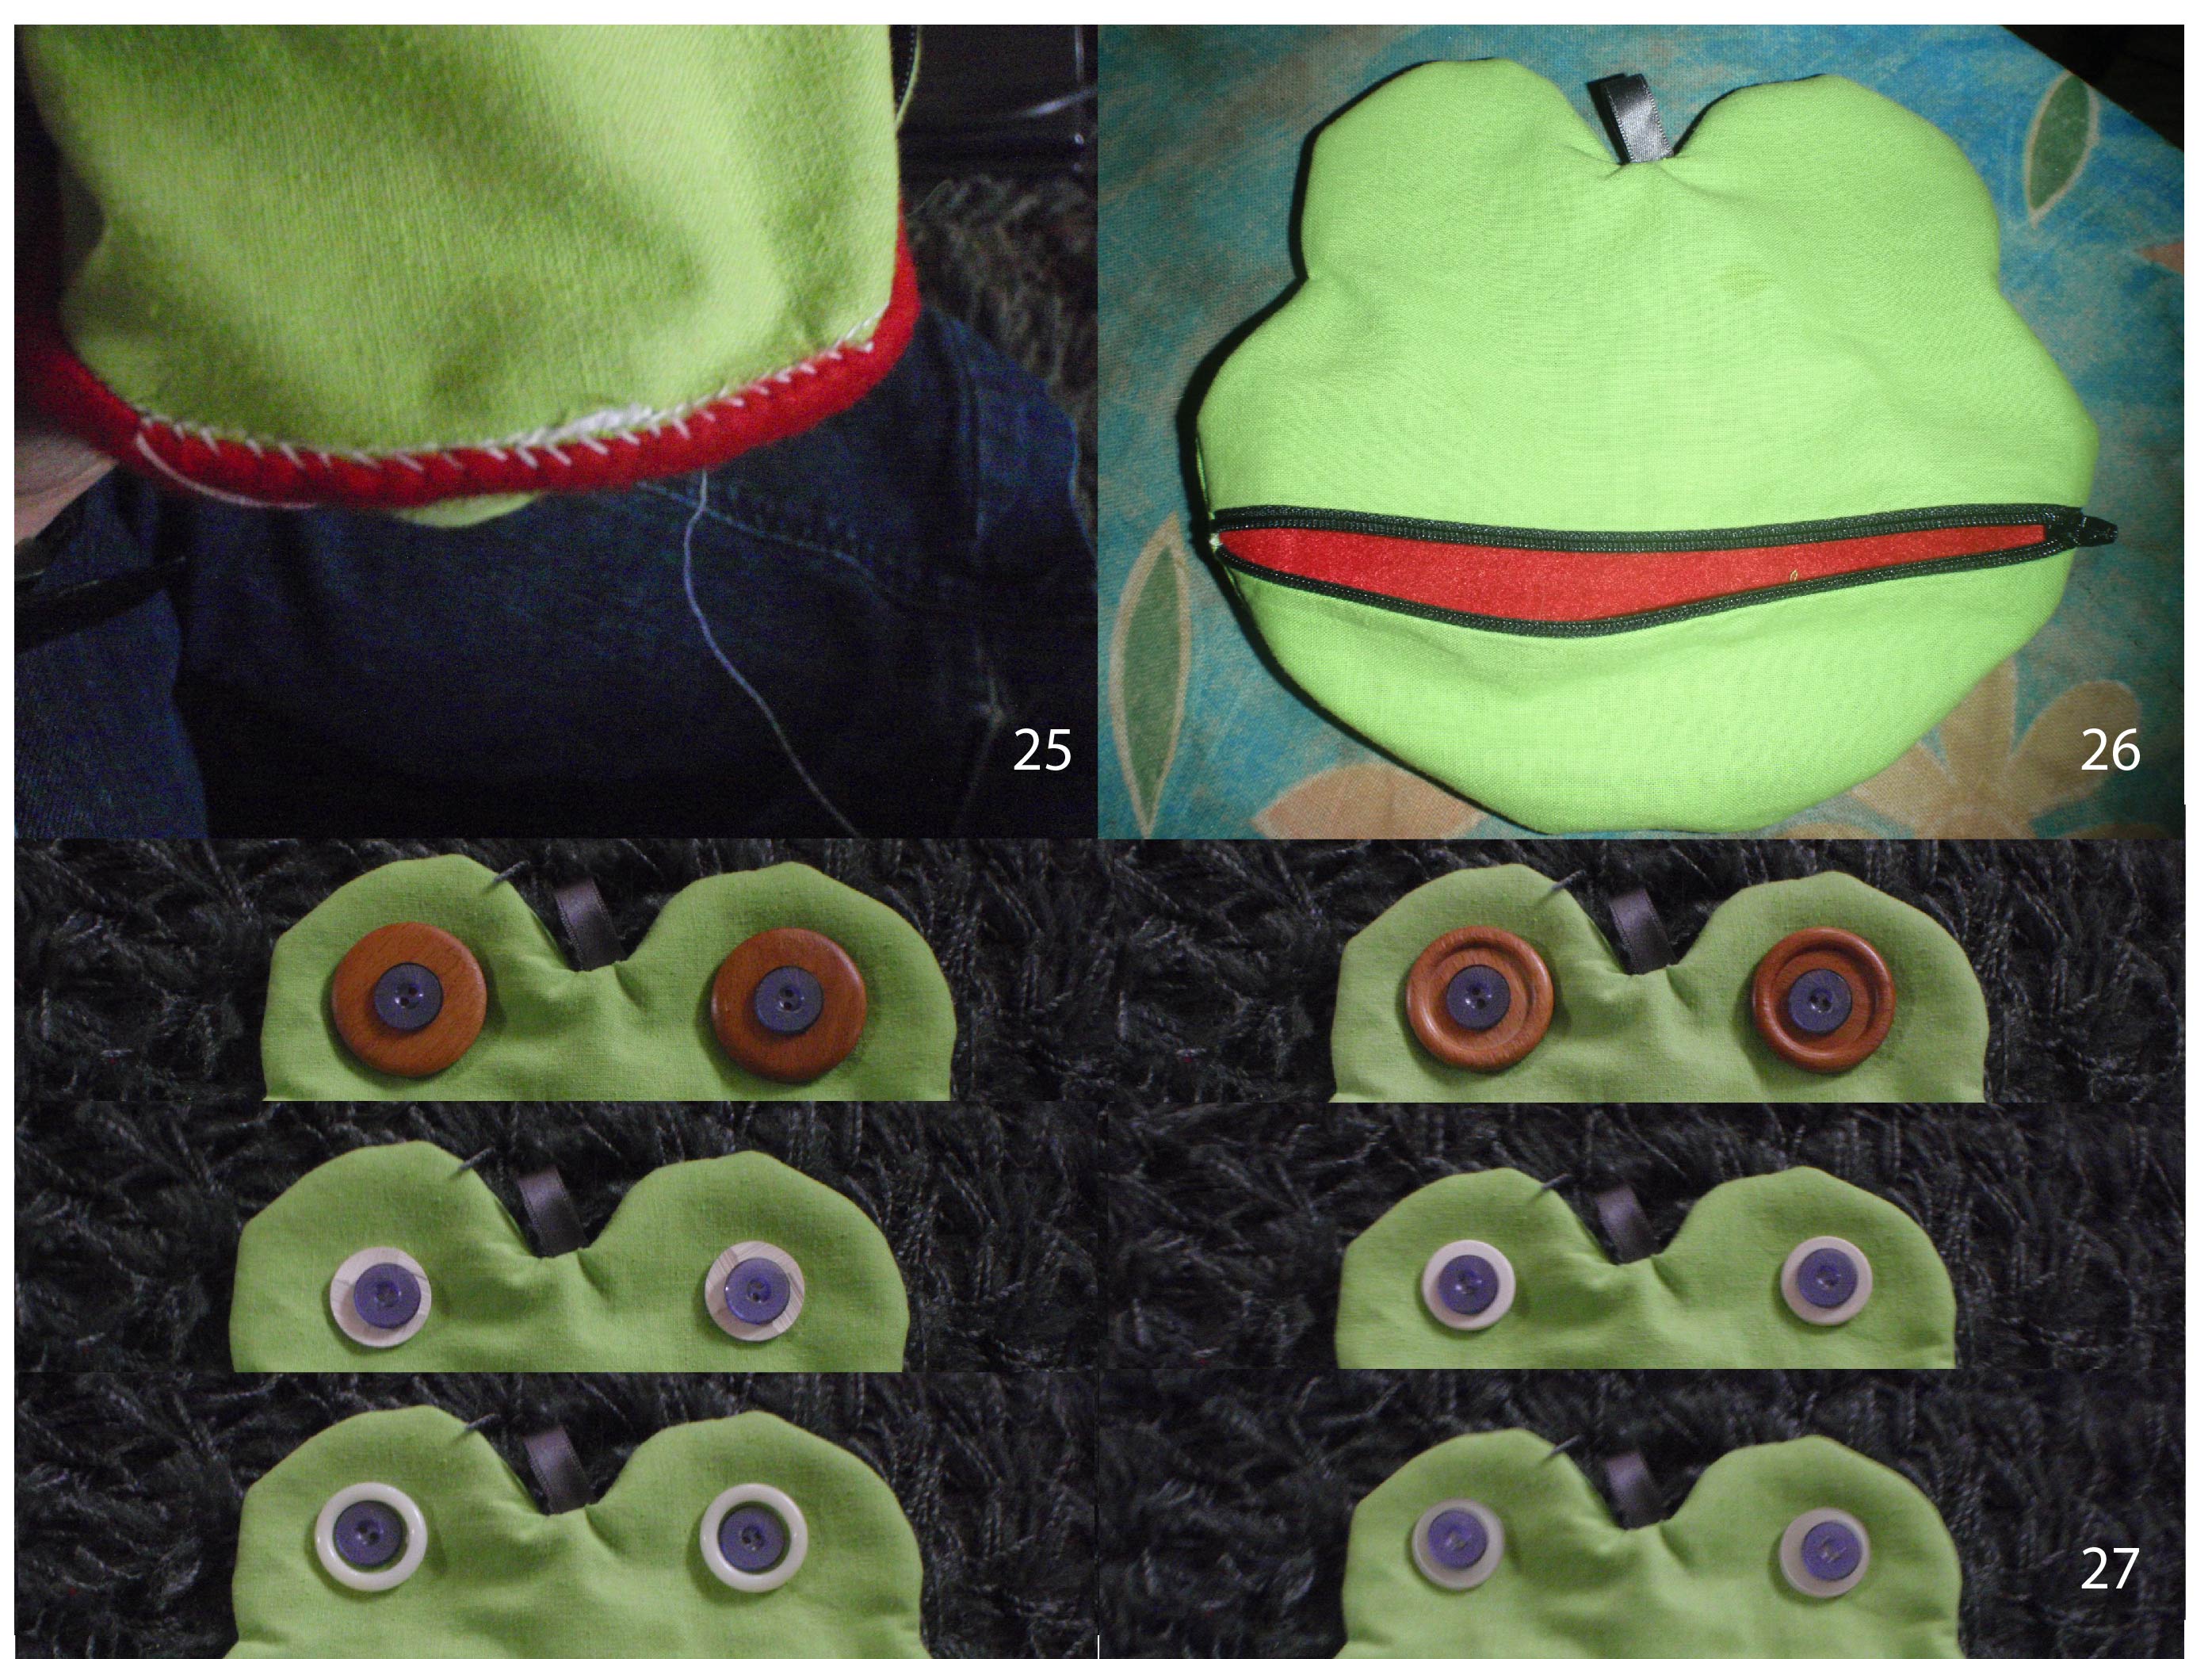
25. Sew the lining to the frog. I did this by hand.
26. Turn the frog outside out again.
27. Choose your eyes. These were the ones I considered. In the end I chose the bottom left. And sew them on. These are actually buttons surrounded by white curtain rings.
28. Appreciate your handiwork!
I had fun making this tutorial. If there are any questions, don’t hesitate to ask. I haven’t a clue if it makes any sense what so ever. I did enjoy playing with illustrator and writing this up. Tomorrow the last instalment of Gifts.
I think you can see where I’m going with the title of this post.
Today I finally finished one of my million UFPs. This one in the shape of a dress I practically finished over two years ago, only one little thing needed to be done.. The Hem.
I don’t know about you, but I’m terrified of hemming. I’m always afraid I’ll make them too short, or incredibly uneven or that I accidentally cut something of that I wasn’t supposed to. But in order to really finish a project hemming needs to be done. And being without a dress form and never trusting my own eyes when it comes to having a straight hem, I need at least another person to help me with this.
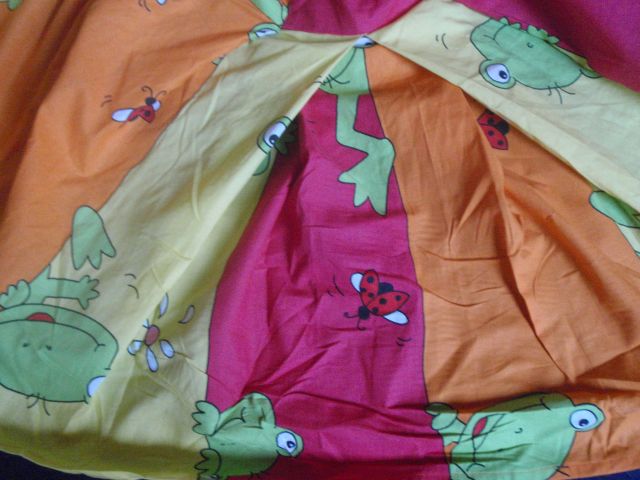
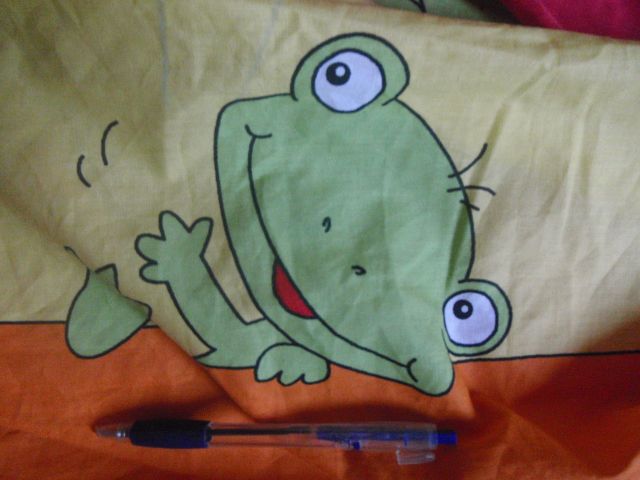
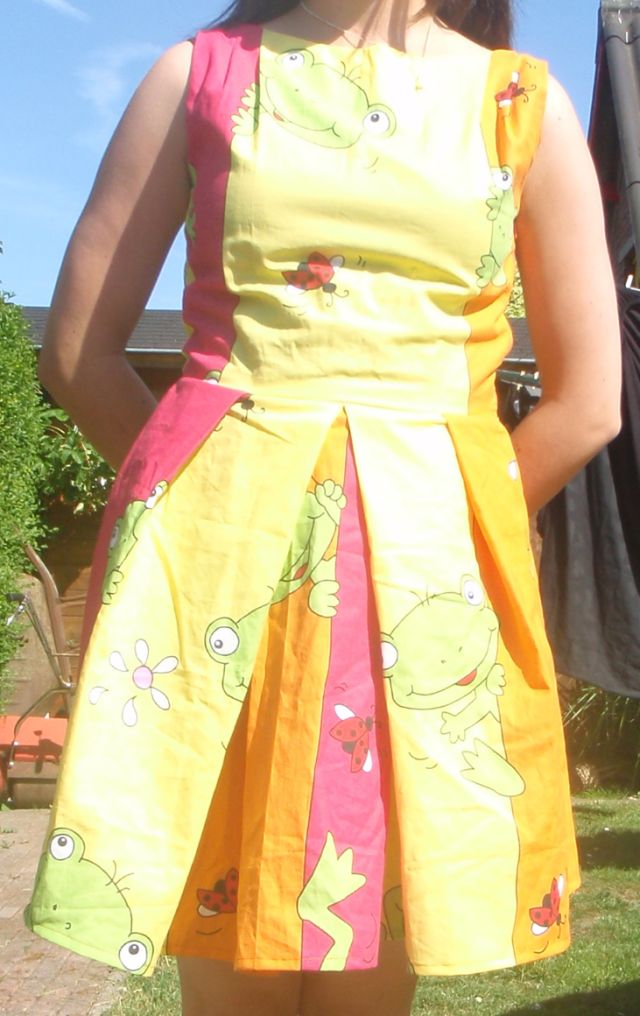
So today was a wonderful sunny day, I was reading in my bed for most of the morning. When I finally got up my parents announced that they wanted to go camping tonight with the two of them, so I helped them pack a bit, still in my pyjamas. Eventually I decided that I needed to put on some real clothes. But the only thing I wanted to wear was this dress that I had, which was almost finished, only the hem needed to be done. The reason I wanted to wear it is because it is a perfect summer dress, yellow, orange and pink with big green frogs and red ladybugs (I think it’s supposed to be kids curtains).
The most right picture has a pen to show scale, they are really pretty big, my cute frogs. I really like the ladybugs too.
So I put it on and walked downstairs to show my mother. She told me that it looked pretty straight and that I should hem it the way it was. So I did, and it worked (I was amazed). Something I’ve dreaded for over 2 years was finished in half an hour. Eventually I also decided to add pockets, since dresses without pockets are like a bike without a key, nice to look at but not very practical. And that worked too, I put in somewhat invisible pockets in the side seams, and even remembered to colour coordinate so they would not be very obvious.
And here it is.
This is the finished dress
Sorry for the colours, but I wanted to take a picture outside, but the sun was somewhat too bright I think. So the frogs are not really very visible, but they are definitely there.
So what did I learn from this project? That two years ago my sewing skills were abominable (the inside looks like it’s been chewed by something), that pockets next to zippers aren’t nearly as difficult as I thought, and that with a little help hemming is easy. I hope this will help me overcome some fears and hem more in the future. Lets finish up some other UFPs soon!
Active filters:
Category
Tag
Post Type
·
No results found. Try a different search.
No results match these filters. Try clearing some, or searching for something else.
No results match these filters. Try clearing some, or searching for something else.