Ducks part 2

So, here are the details of the duck’n’lizard skirt. I scoured the web comic looking for nice pictures of the duck and lizard that I could crop and enlarge to be the same size (250 pixels either wide or high). I found quite a lot of them, and subsequently printed them out on tissue paper. I cut them out, and taped them to a strip of white fabric. Then I embroidered them.

Took a while, but I managed to get them all done. Here are the strips in full, with my feet for scale (and because I couldn’t not take a picture of my feet).

Ducks full

Here are the ducks and lizards in a bit more detail, oh and a stuffed rabbit. I think they are wonderful! When I wear the skirt, it doesn’t seem too childish, so that’s good! I really like it! Ducks forever! 

Ducks 1 Ducks 2 Ducks 3 Ducks 4

So thanks Dave for making such a fantastic web comic! I’ll enjoy the ducks!

Ducks Part 1

Ducks, funny creatures those. I’m reading a web comic called Sheldon (http://www.sheldoncomics.com/), which is awesome and is about a billionaire boy who invented (or something) a talking duck and who also has a lizard type thing. Anyways, I really like the style of art and the creatures are so funny. So I wanted to used them in a something. It took me quite a while to think of said something, but I figured something out.

I first e-mailed the author to see if I could use his drawings, and he said:
“For personal stuff, of course! Just nothing that can be sold, etc.
Thanks for asking!
Dave”

I may have squealed when I actually got an e-mail back. He’s like.. famous (in my head), even if it may have been an assistant or something, but probably not. Anyways, I do not intent to sell it. “What is .. it?” you may be asking. It is a skirt with a duck/lizard border. I first embroidered the ducks and lizards, which you will see in a later post in more detail. Then I sewed the bands onto black linen, of which the entire piece was used and therefore determined exactly what I could make (length and width wise).

I chose to make a skirt, with 5 pleats in the front and 5 in the back, in-seam pockets, a side seam zipper and a loop on the side for keys. It is two rectangles of approximately equal size, that were pleated to make it fit my .. below the waist. It’s built up from just rectangles. The top is finished with some of the biastape I made from the same fabric. The first two pictures are the front and back, it’s black, photographed in the bathroom, the detail is .. crap at best. Trust me when I say it looks really nice in real life, ok?

skirt Skirt 

Then we get to the pocket with the zipper next to it. Luckily the zipper and pockets are hidden in the pleats. So you can’t really see them. I like that, a lot. On the right is the loop on which I can hang my keys. The only annoying part is that it is on the left, when I usually have them on my right. Therefore, I don’t know if it’ll see much use, but at least I thought of it?

Pockets Loop 

Last but not least, the insides, nicely finished with a lining. I gathered the lining instead of pleating it. I think it probably works.

Lining

I’m very curious to find out how it ends up after a wash cycle. The reason being that I used some sort of starch on it, to make it shift less. Hopefully it will not fall to flat, but we’ll see. Tomorrow, I’ll show the details of the ducks and lizards. Hopefully!

Skirt

The skirt I started here, finally got hemmed on Tuesday. I decided to also redo the top. Gather it a little more. Since last time I messed up my calculations and made it wide enough for my hips and it had to cross over in the back. This made the hem all weird and crooked. So before attempting to actually hem it, I had to unpick the top and do it all again. Luckily it went a little faster than the first time.

Skirt front Skirt back

Front and back respectively. It is a narrow hem, therefore it doesn’t stand out as much as it could do. There is approximately 6 meters of circumference in the hem, so imagine how long it took to hem it.. (pin, iron, sew, iron, iron, cut, iron + pin, sew, iron, iron… I saw each piece way too often).

Skirt

Yes, I pulled my shirt over my sweater, I know, it’s silly, but it keeps up the sweater really quite well. I’m thinking of making button loops at the bottom of the skirt in four places, and 4 buttons on the waistband of this skirt or the potential overdress, so that if I actively plan to go into battle, I can put it up and have less chance of stepping on the hem. I’m not sure yet. I’ll probably just add loops anyway, it won’t harm the hem.

On to the next, the overdress and maybe I’ll make a little light armour out of fake leather, we’ll see.


Productivity, 5.

Lastly, the previous weekend also saw the birth of a refashion. My brother had a pair of pants that he didn’t wear anymore. These jeans are now a skirt for me!

I’ve been working on it for ages, since boy jeans apparently have an angled fly to accommodate the ‘business’. Since I don’t have said business, there was no need to have that extra room there. It took me a couple of nights with the seam ripper, but I eventually figured out how it was put together and how I could put it back together nicely again without the bulge. I have, however, always been scared that I would fail with the sewing. Well Sunday I decided that the time was right (and I wanted to continue the streak) so I took it to the machine. Well both machines, I did some serging on it too. It took a while and frequent running back and forth to the machine and ironing board and pinning stuff together, but it’s finished now.

Skirt front Skirt back

I chose to take in some with in order to accommodate a back vent. I tried slits before, but they tend to break on me and that looks really hideous. So I finished the vent edges with bias tape and created myself a nice vent. I also hand stitched the hem so it would be invisible. Don’t know if that worked but I enjoyed myself while doing it.

OLYMPUS DIGITAL CAMERA OLYMPUS DIGITAL CAMERA

I’m not convinced yet that it will see much wear, me and skirts, not really a fantastic combination. However, I’ll try to wear it this summer. I was planning on wearing it on Monday, but when I looked out my window, it was snowing. Snow and skirts in my opinion don’t go together well.

Productivity, 3.

The other thing I made was a skirt. I already spoke about the larp event we are organising. I quite like to have costumes for that sort of thing, even if I’m not playing myself. However, a month later (beginning of May) there is an event where I will be playing. In case my current character decides to die (or just dies) I would like to have a backup character ready to step back in again.

So while I was at school trying to work on my thesis, I decided to take a break and google for a larp-staff. A piece of equipment I have been wanting to own for years, however, the only ones available are.. well.. ugly. I don’t like them at all. Then, a miracle happened, I founded something I liked! Or at least, liked a lot more than all the other ones out there. It can be found here. Now, the only thing I didn’t like were the metal caps around the bottom. I got a custom order and they will make me one without the caps. It all went fairly smoothly and they are very friendly at Skian Mohr.

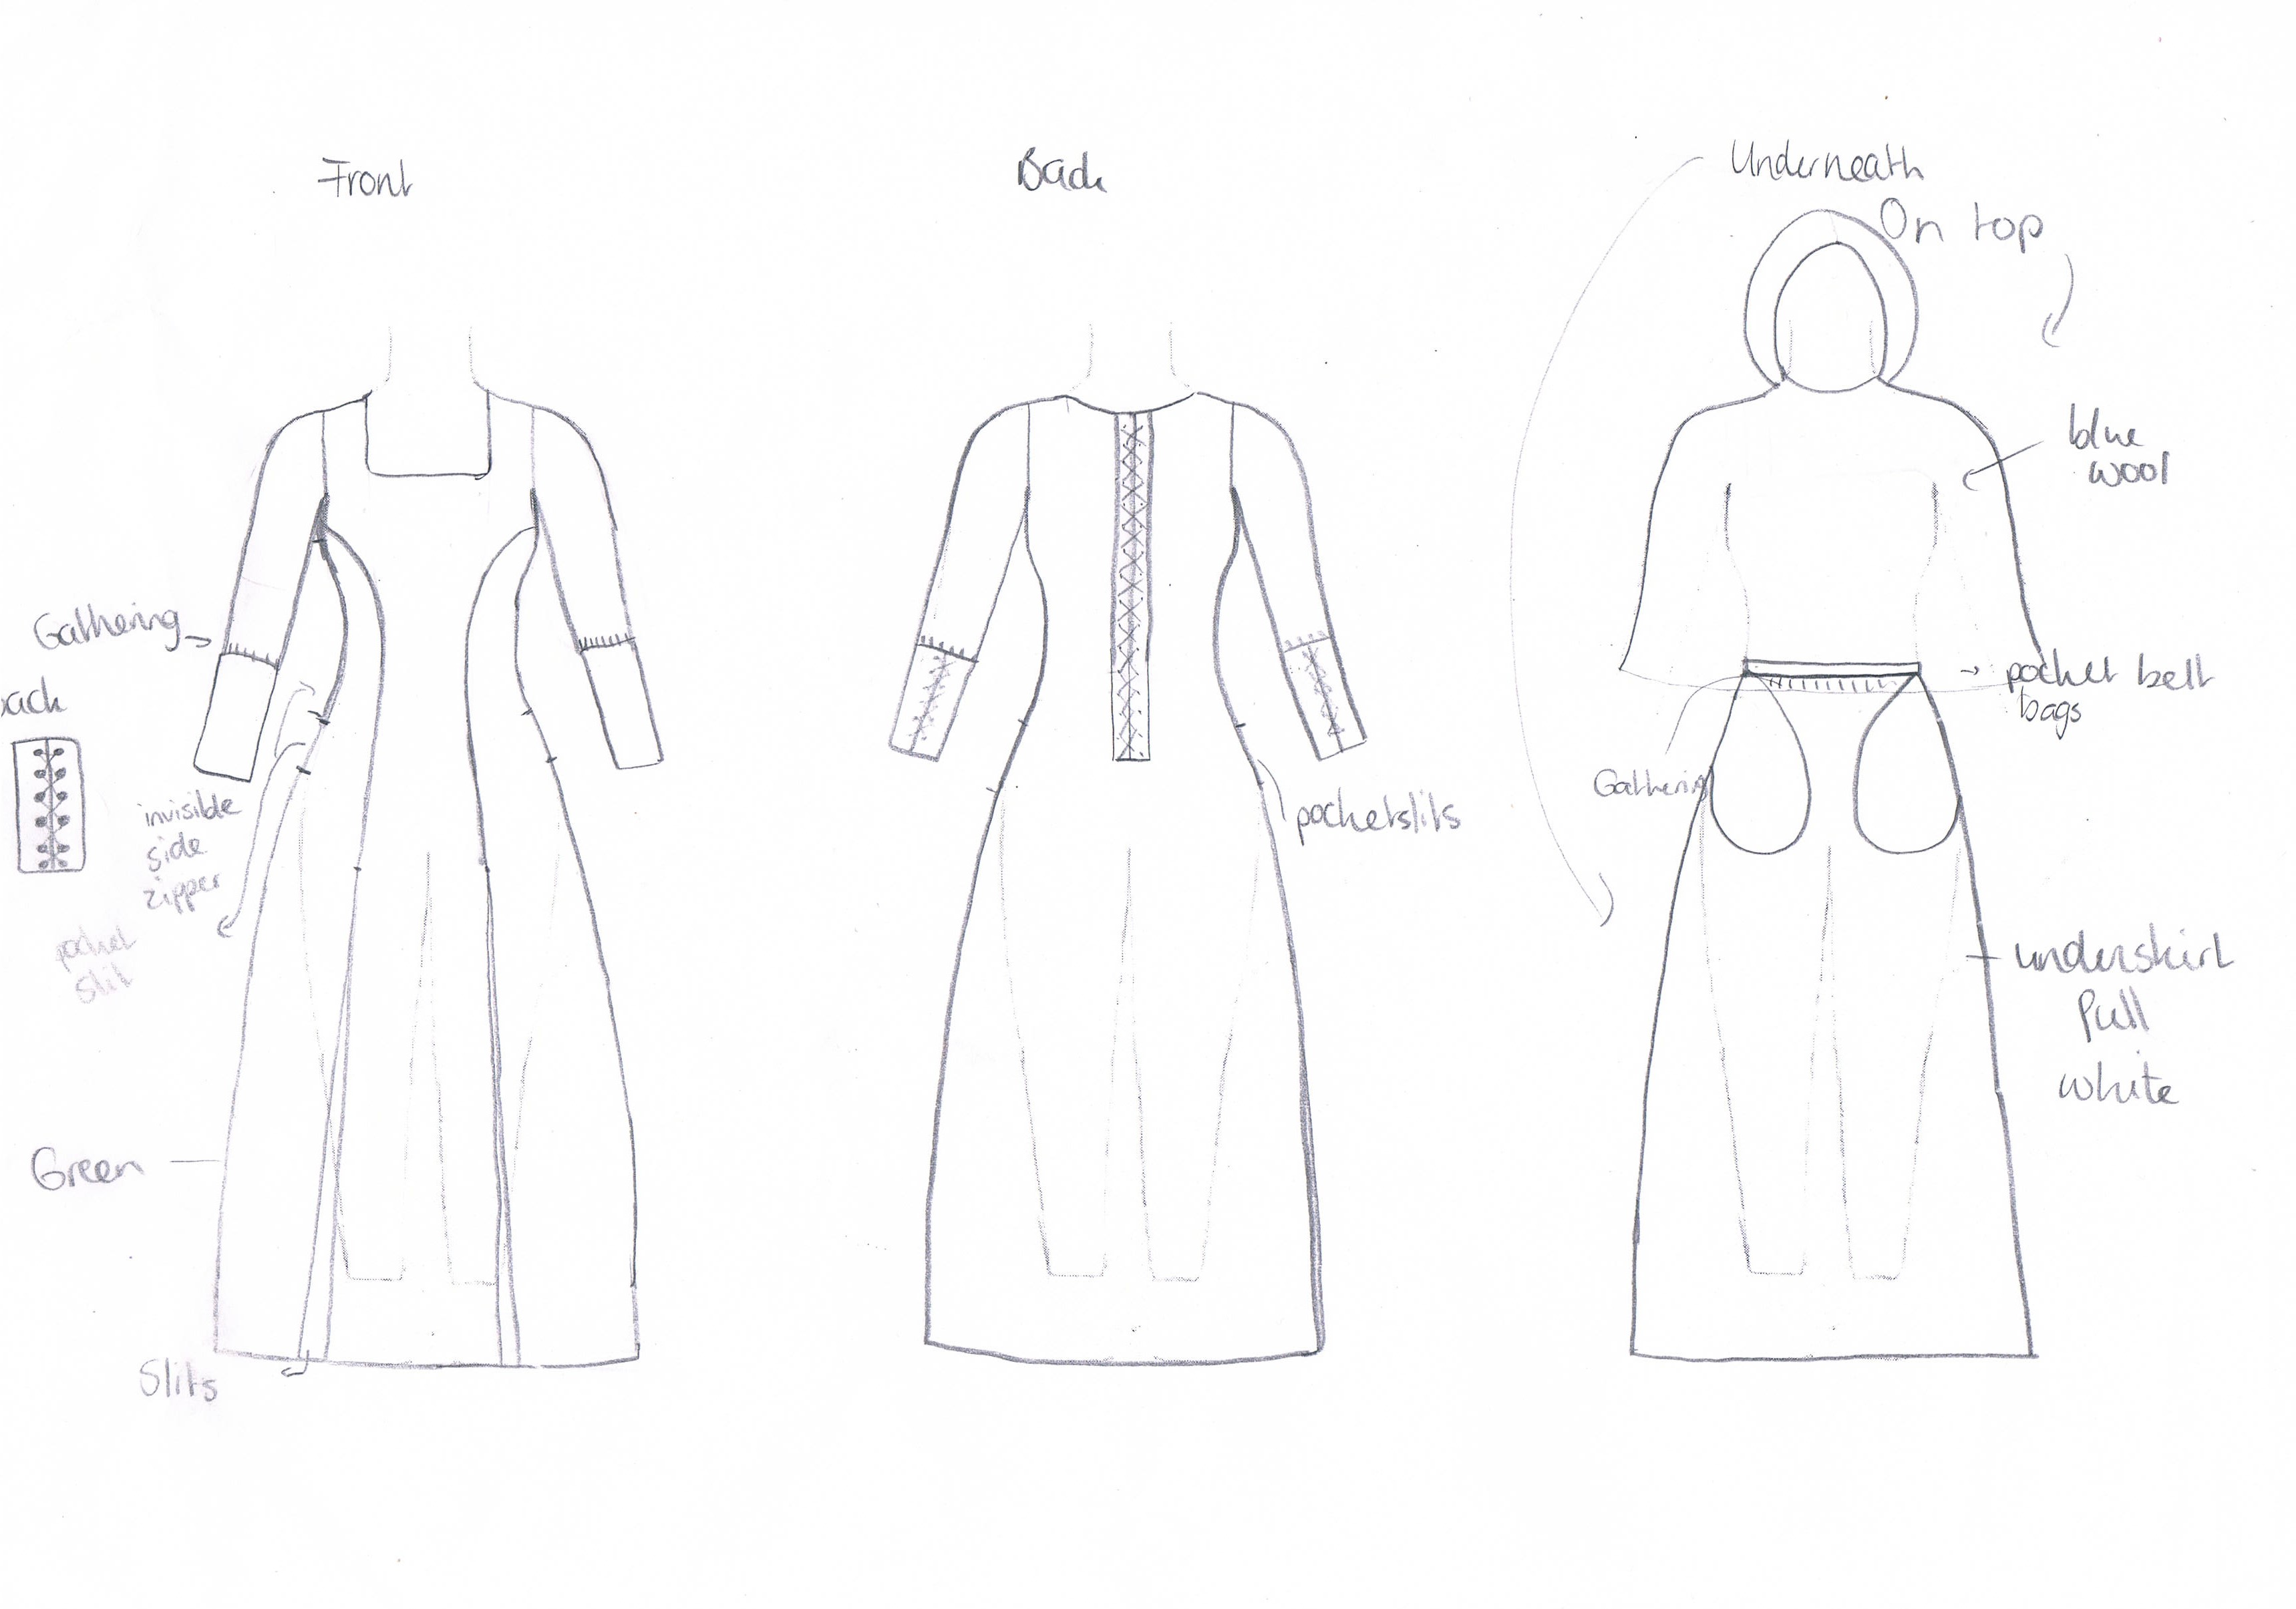
Next, I needed a new costume (of course) so I drew one out:

Fighterdress

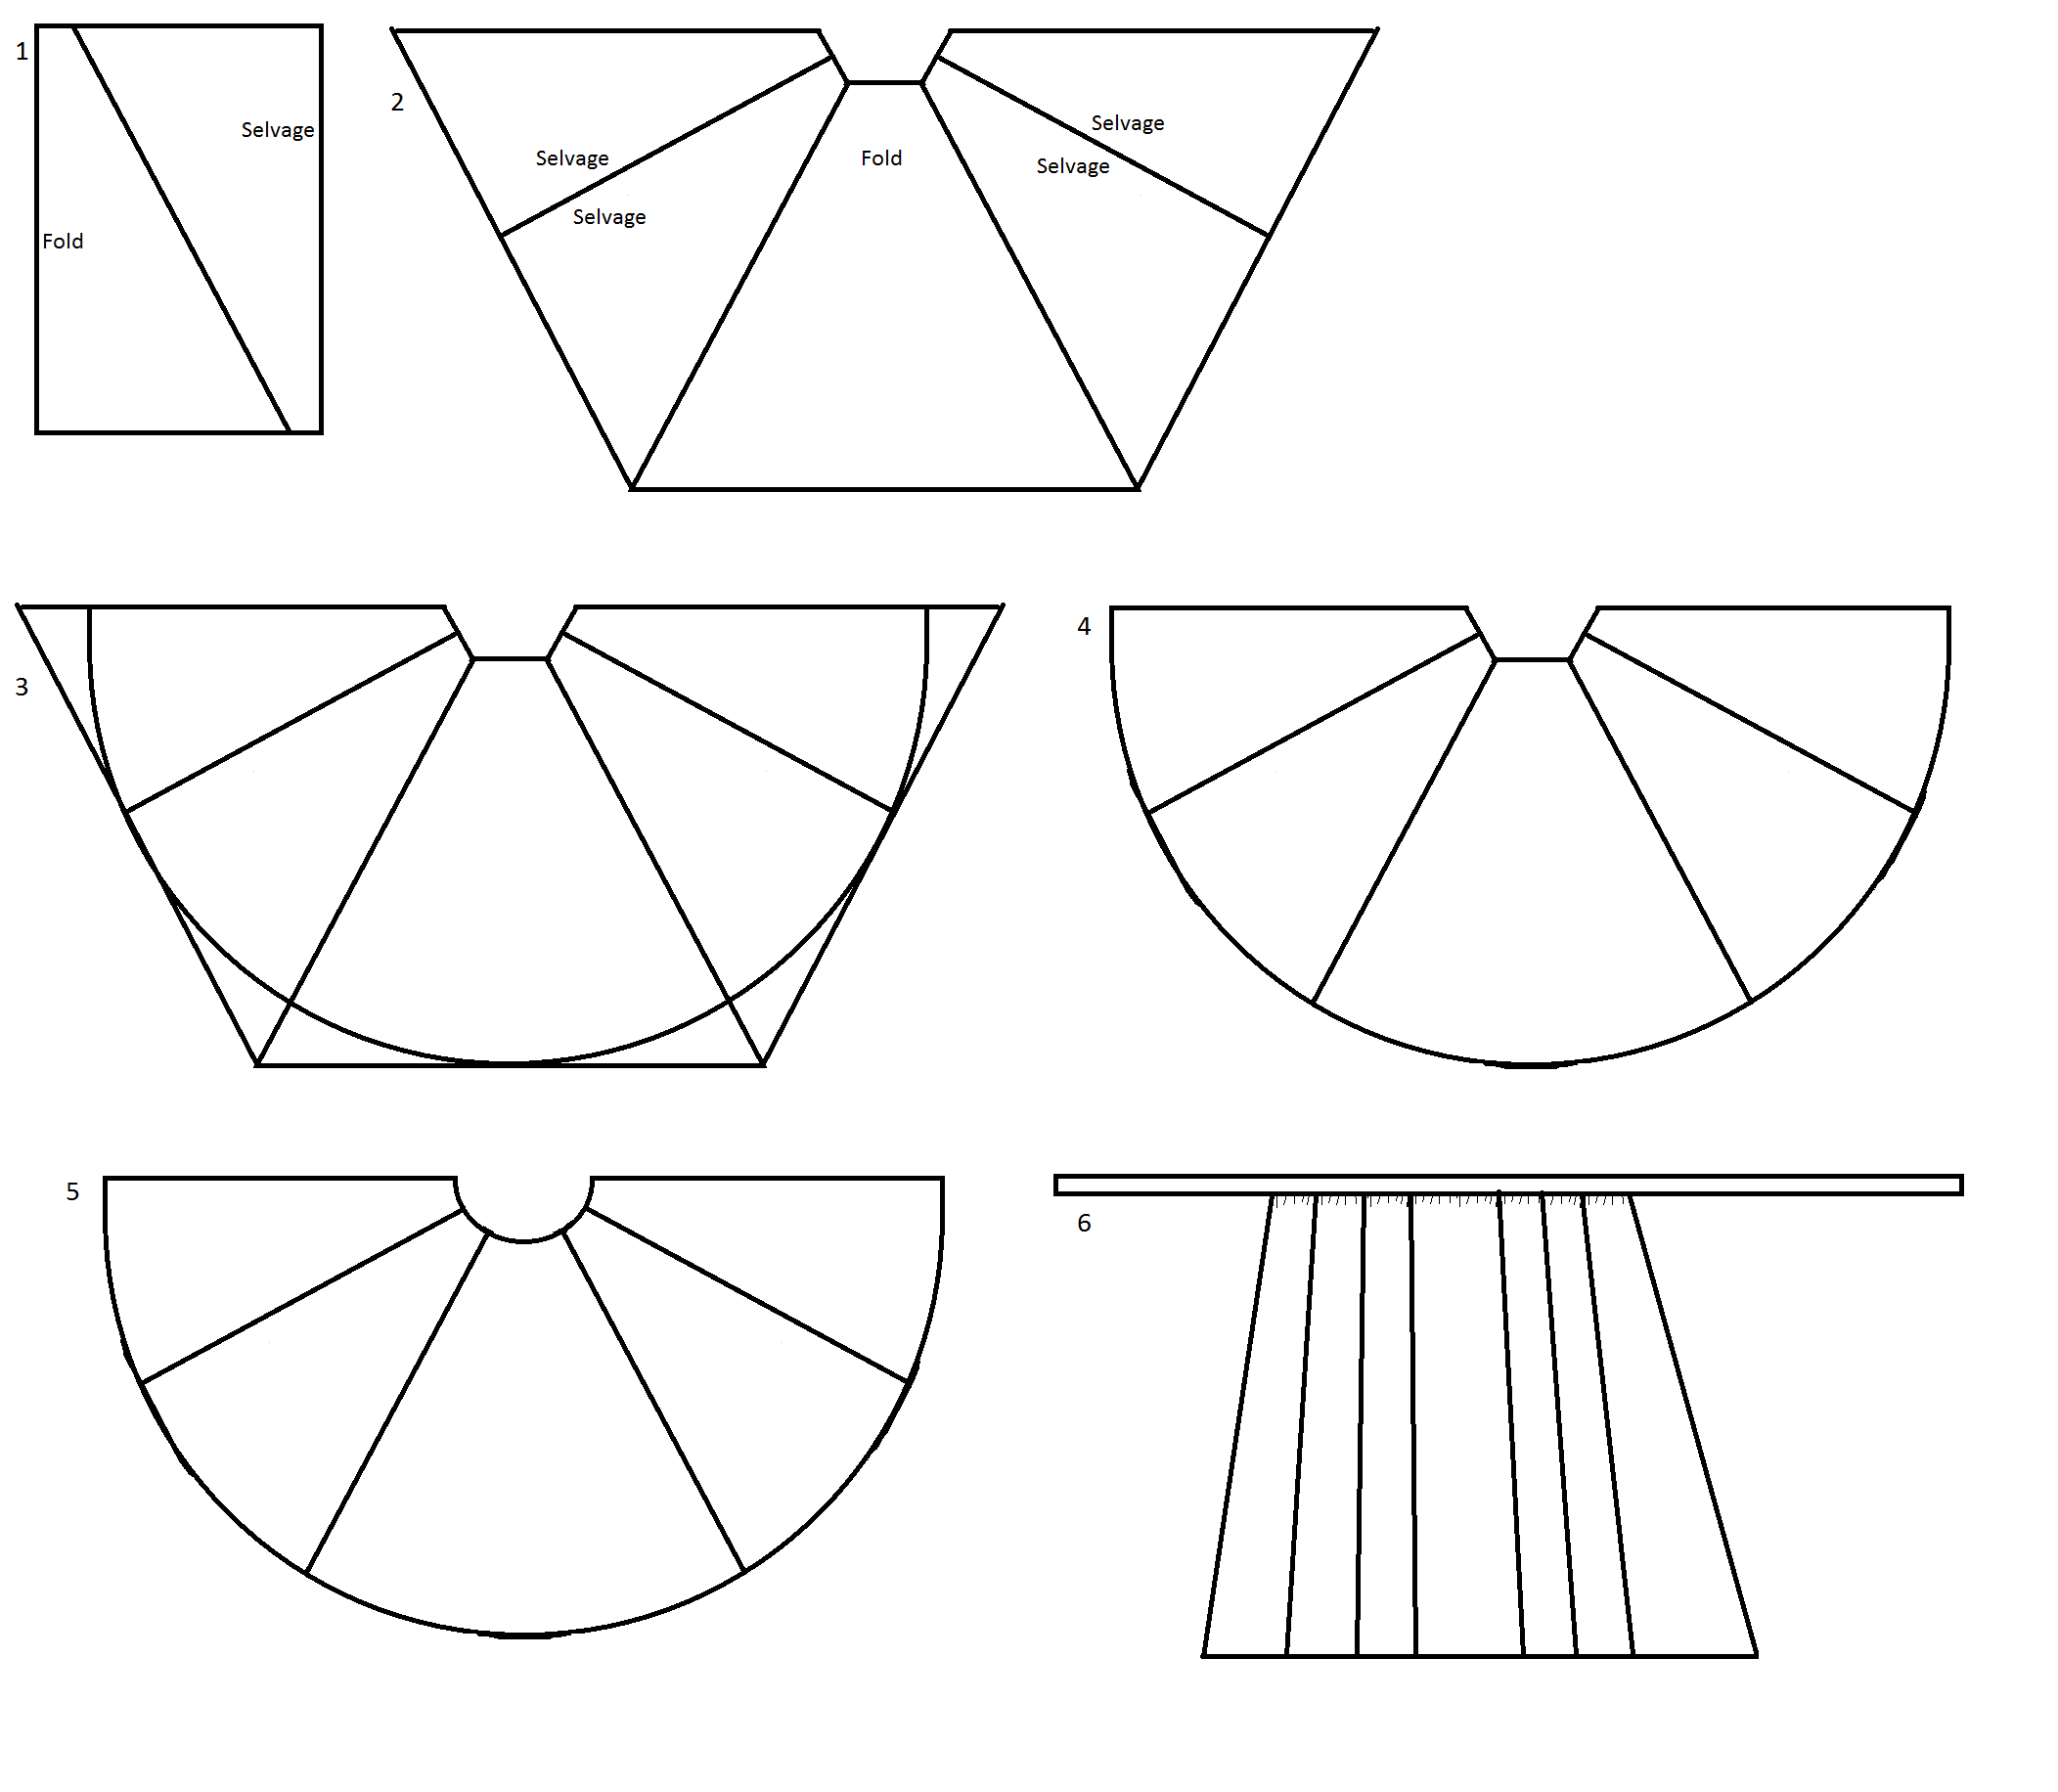
On Saturday I started with the first layer: the white underskirt. I decided to do it simple. I made a little “tutorial” to show what I did. Step 1 consisted of cutting 3 lengths, slightly over one meter (the length from floor to my waist) and then cut them across diagonally. The selvage edges were then sewn together (to end up with 3 pieces with a  selvage seam in the middle). The selvage and fold pieces were then alternately attached to each other using French seams. Number 2 shows half the skirt. The other half would look the same only there would be two fold pieces on both sides and a selvage piece in the middle. At step 3 and 4 I marked and cut the bottom of in more of a circle shape. In step 5 I cut the waist section in a circle shape. Then I cut a very long rectangular piece to be the waistband. I then gathered all the panels onto the waistband (6; yes this drawing makes little sense). All in all there is a lot of fabric at the bottom, the hem is going to be several meters long.

Tutorial

I have not actually hemmed it, which is why it is not finished yet. I felt I should let it hang for a while before hemming it, since the fabric is somewhat stretchy. I attached a little extra waistband to be able to tie it into a bow at the front. It’s actually really comfortable (if much too long). This is what it looks like, without the hem finished.

OLYMPUS DIGITAL CAMERA OLYMPUS DIGITAL CAMERA

As you can see, it’s very wide at the bottom, and much too long. Still I feel it looks nice. It’s also finished on the insides and the ‘getting in’ opening.

OLYMPUS DIGITAL CAMERA OLYMPUS DIGITAL CAMERA

Just hemming to do on these and I will really have been productive!

Refashion

I’ve been experimenting with refashioning clothing I don’t wear because of ‘issues’ I have with them. There was this skirt:

Before

Which was worn by my mother in the picture, as a costume. She’s just a bit taller, and has the elastic higher than I would have it. So when I was wearing the skirt, it would be over the knee really. The style, for me, didn’t look right when it was over the knee. So what I did was take of the elasticated waistband completely. Then I removed the elastic from its fabric wrapper. The fabric was 2 meters long, which I thought was a bit too long to stick in a waistband, so with 20 pleats I made the fabric 1 meter long.

The skirt is reversible with a red and a black fabric, so I did the same for the other bit of fabric. Sewed them together at the top and put the elastic in and sewed beneath that. The skirt is now still reversible, but has also lost about 10 cm in length. It looks more up to date now and I think it’s easier to wear when it warms up a little again. This is the final result, sorry for the crappy pictures. It’s been terrible weather on this bit of the planet.


Larp Skirt

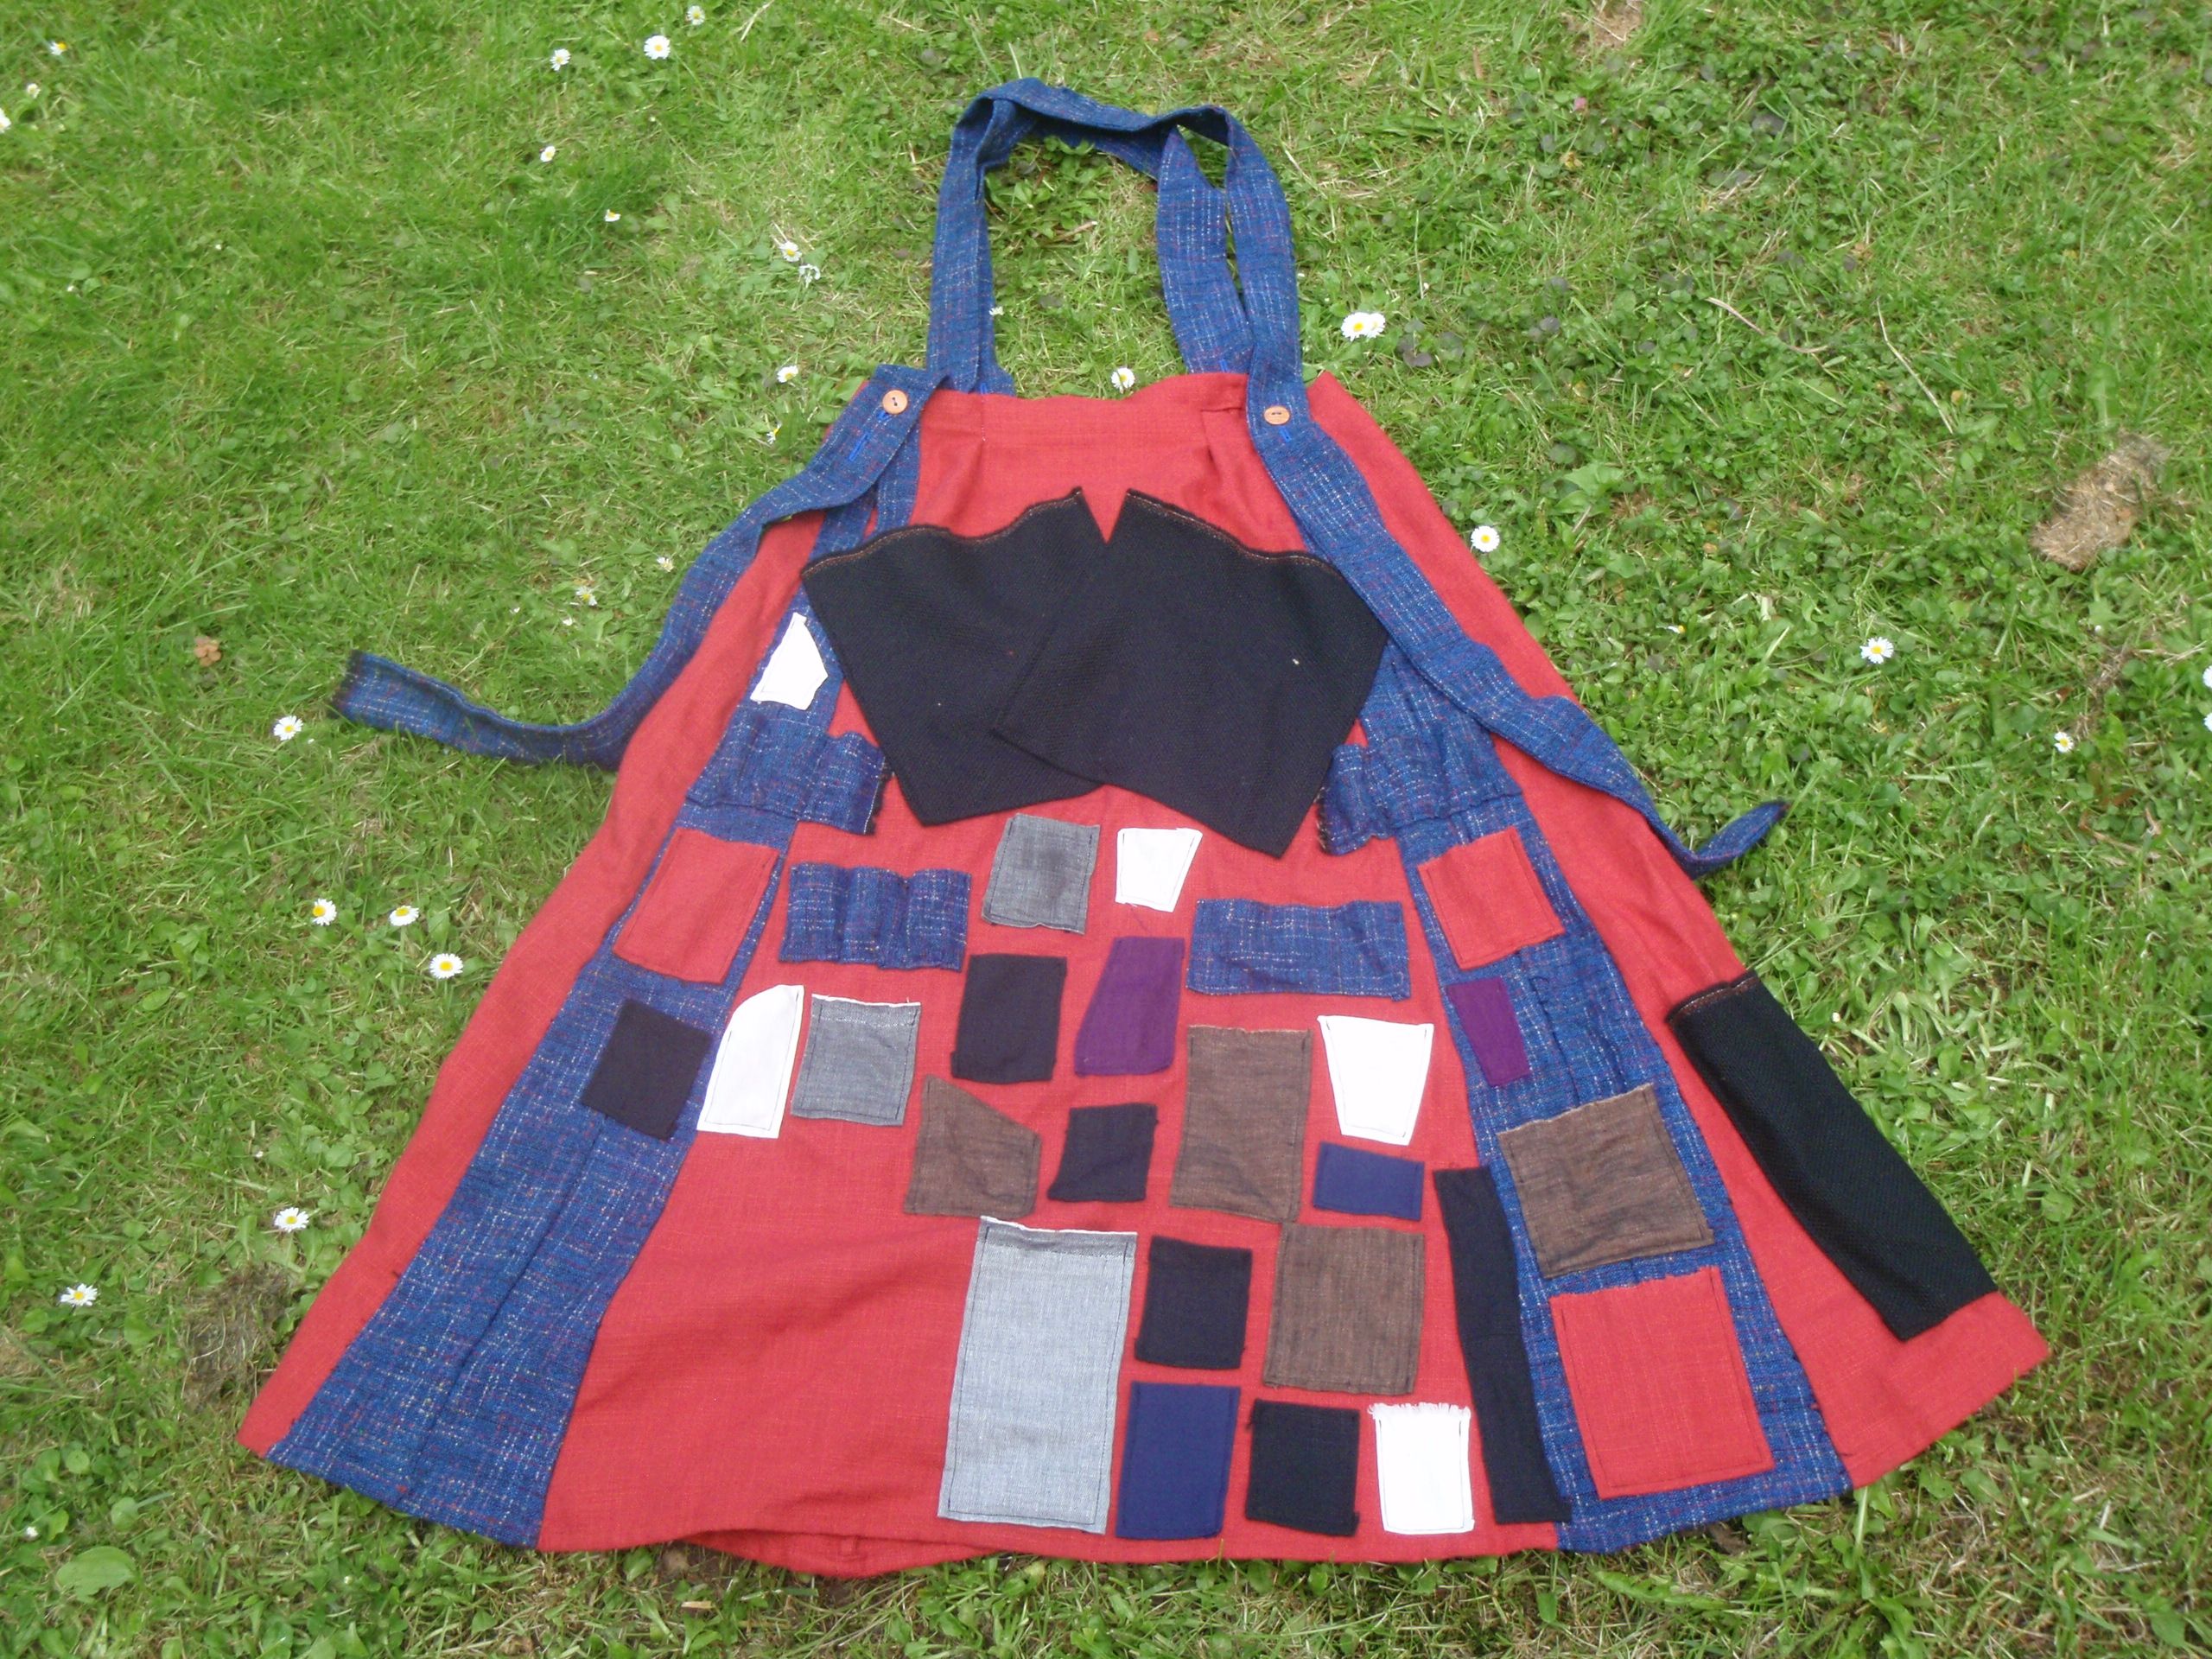
For my bottom half I made a skirt, red with two blue stripes down the front. I also added a gazillion pockets to it. I was playing a character that liked to collect things, preferably shiny things (buttons, coins, helmets..), and had to keep them close.

Eventually I had the skirt finished a couple of hours before I had to leave for the actual event. With all the stuff in the pockets, it would be quite heavy so I added straps to the top to keep it in place, which worked quite well, although they did lengthen a bit over time and I had to open the buttonholes higher up on the straps. There was no pattern for the skirt, just a couple of trapezoid pieces stuck together, I added in the blue because I felt I did not have enough room to move. The blue certainly did help, and I like the pop of additional colour.

Anyway, here is the final result:


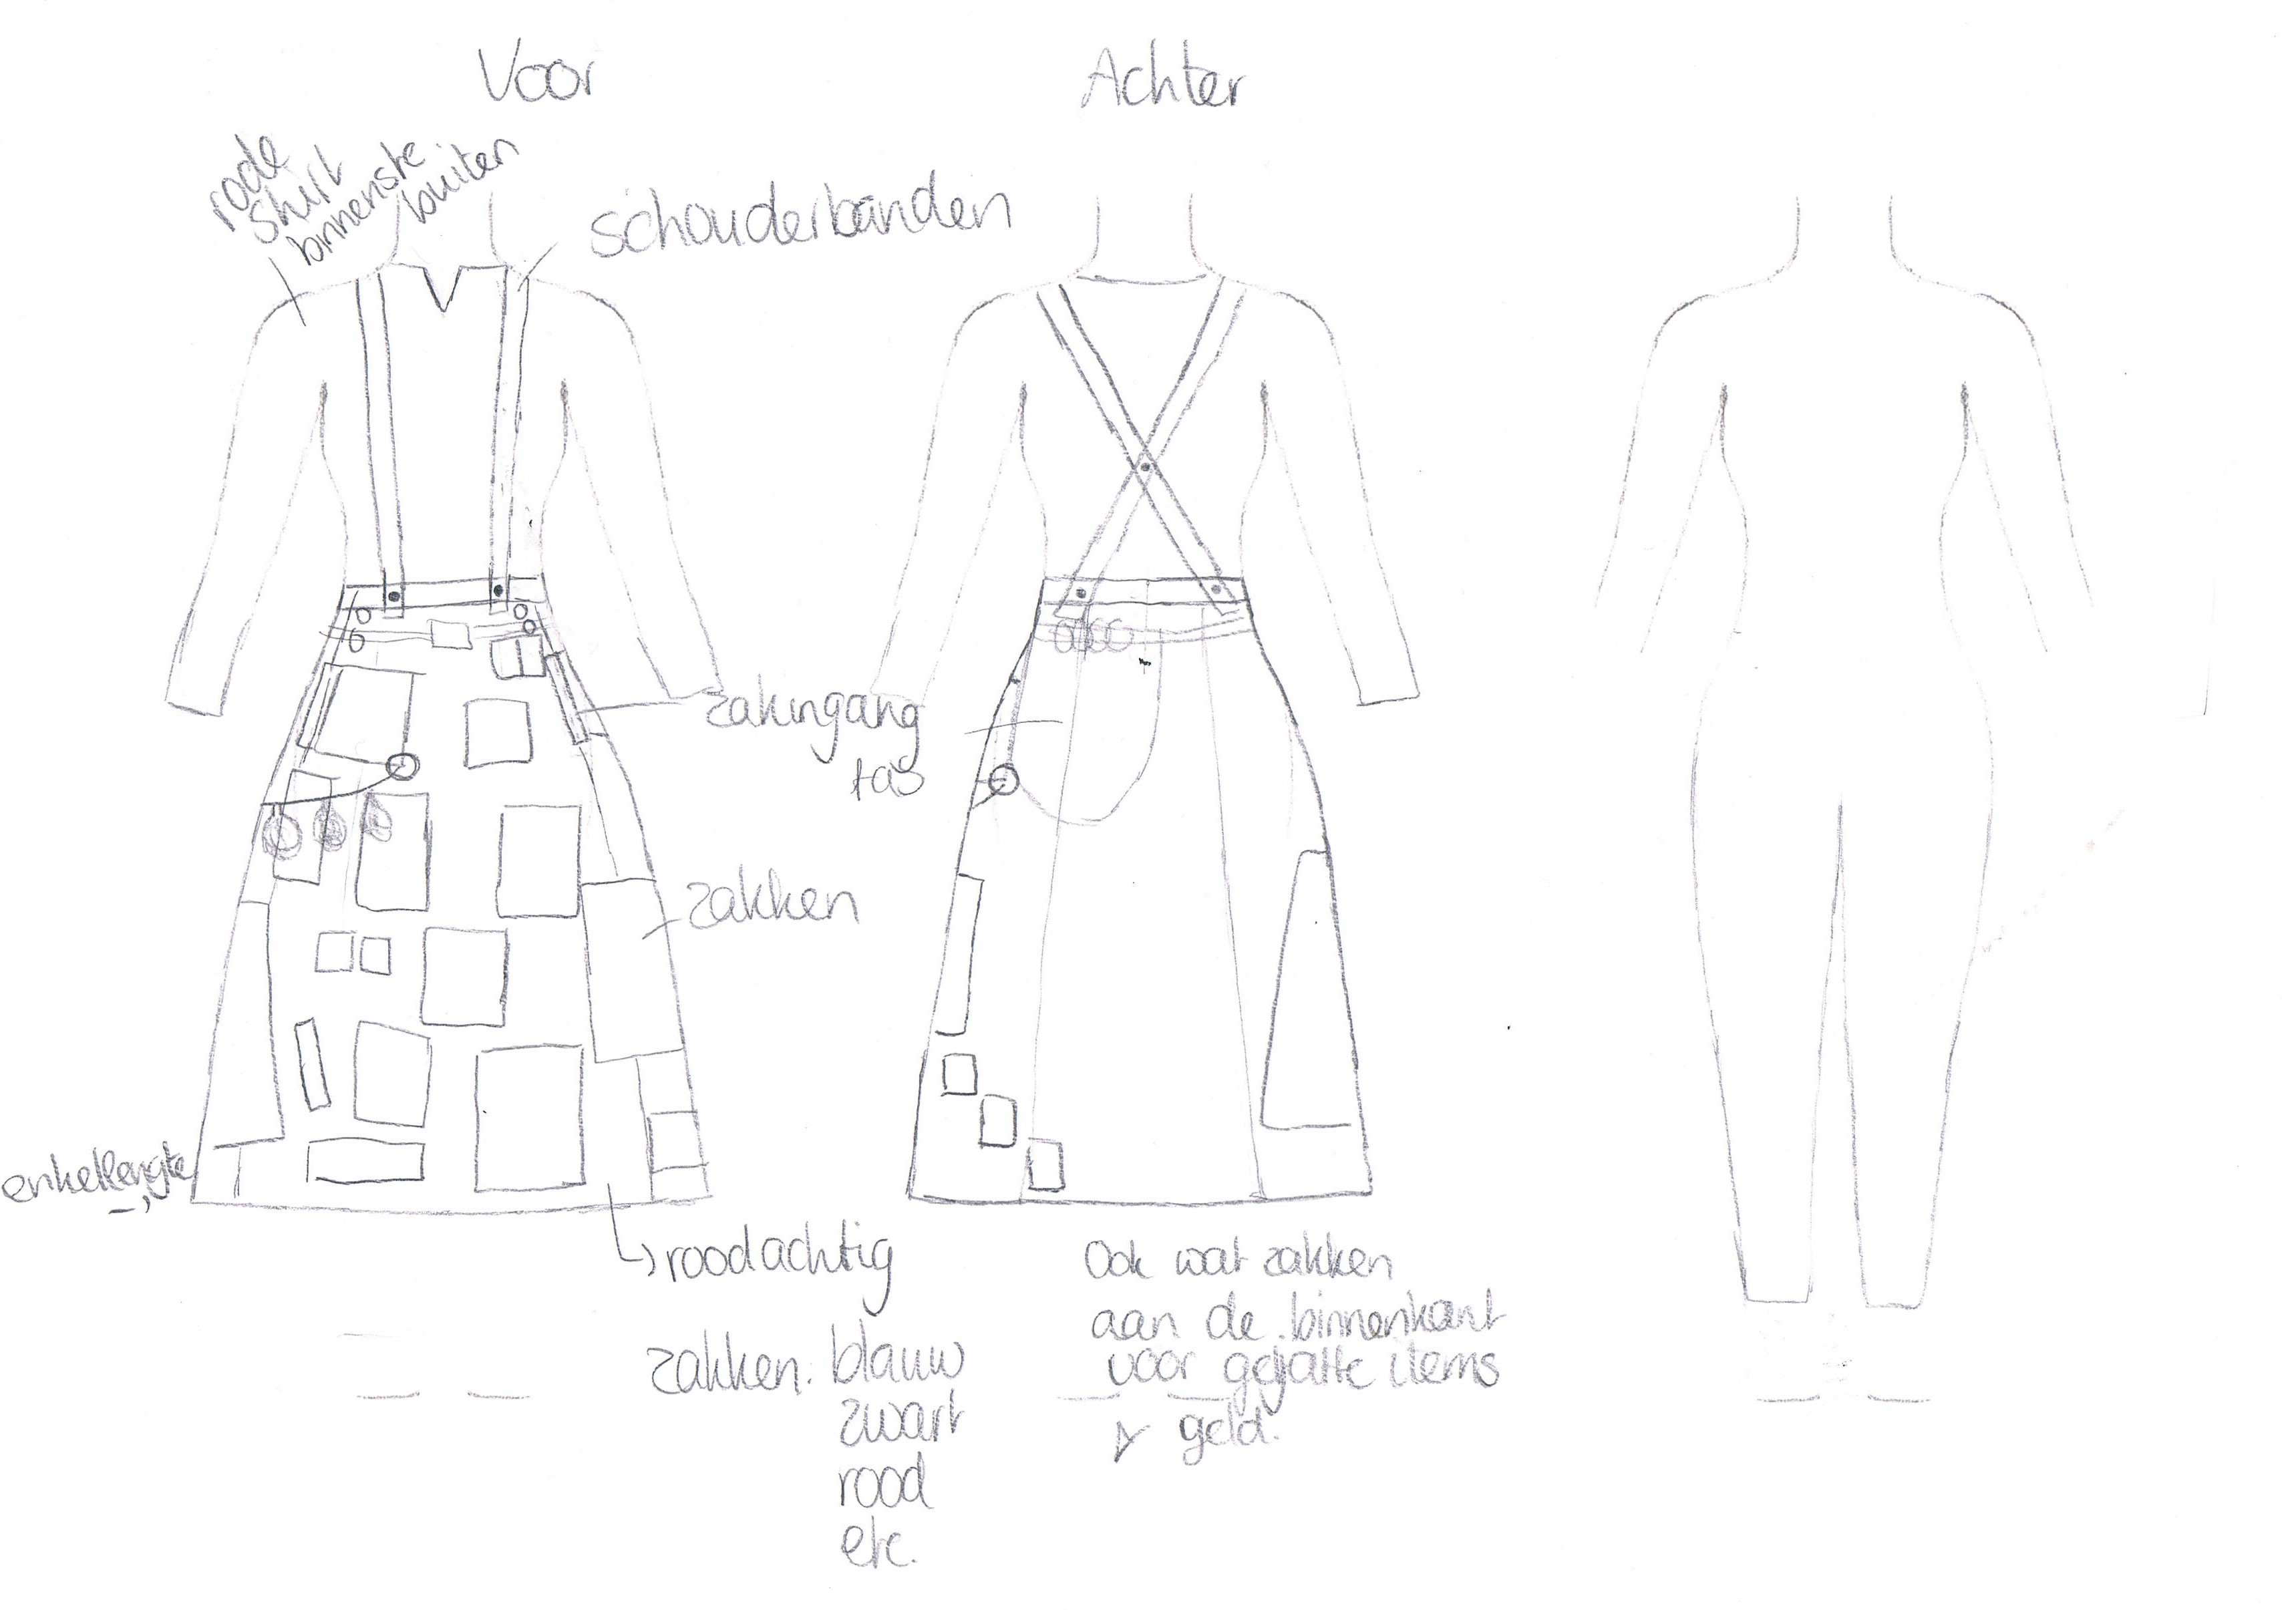
Left the real finished product and right the original idea. They do look somewhat similar right?

I just counted the pockets and there are 40 individual pockets to put things in, although there are only 31 pieces of fabric attached. Some bits were divided up into three to hold small vials of herbs and beads.

The left bottom side (right when I’m wearing it) is still empty, that is because I figured that if I would be really bored I could whip out the needles that were in the white pocket that was the most left one still on the red fabric. From the grey pocket in the middle at the bottom of the skirt I could take the thread and from the big black pocket on the back (you can see a bit to the far right) I’d take a piece of fabric and attach it. It turned out that there was no need for stitching more pockets on, but the bits of fabric did help as towels to clean our bloody hands, after an earth quake.

So the skirt, its pockets and their contents proved useful. Tomorrow we will visit the top under layer: the shirt.


Costume(?) Plan

In May I’m going to go to a LARP with a friend of mine. For this I need an outfit. I have a plan, and it is quite costumey, and I don’t know if it’s going to work, but I hope so.

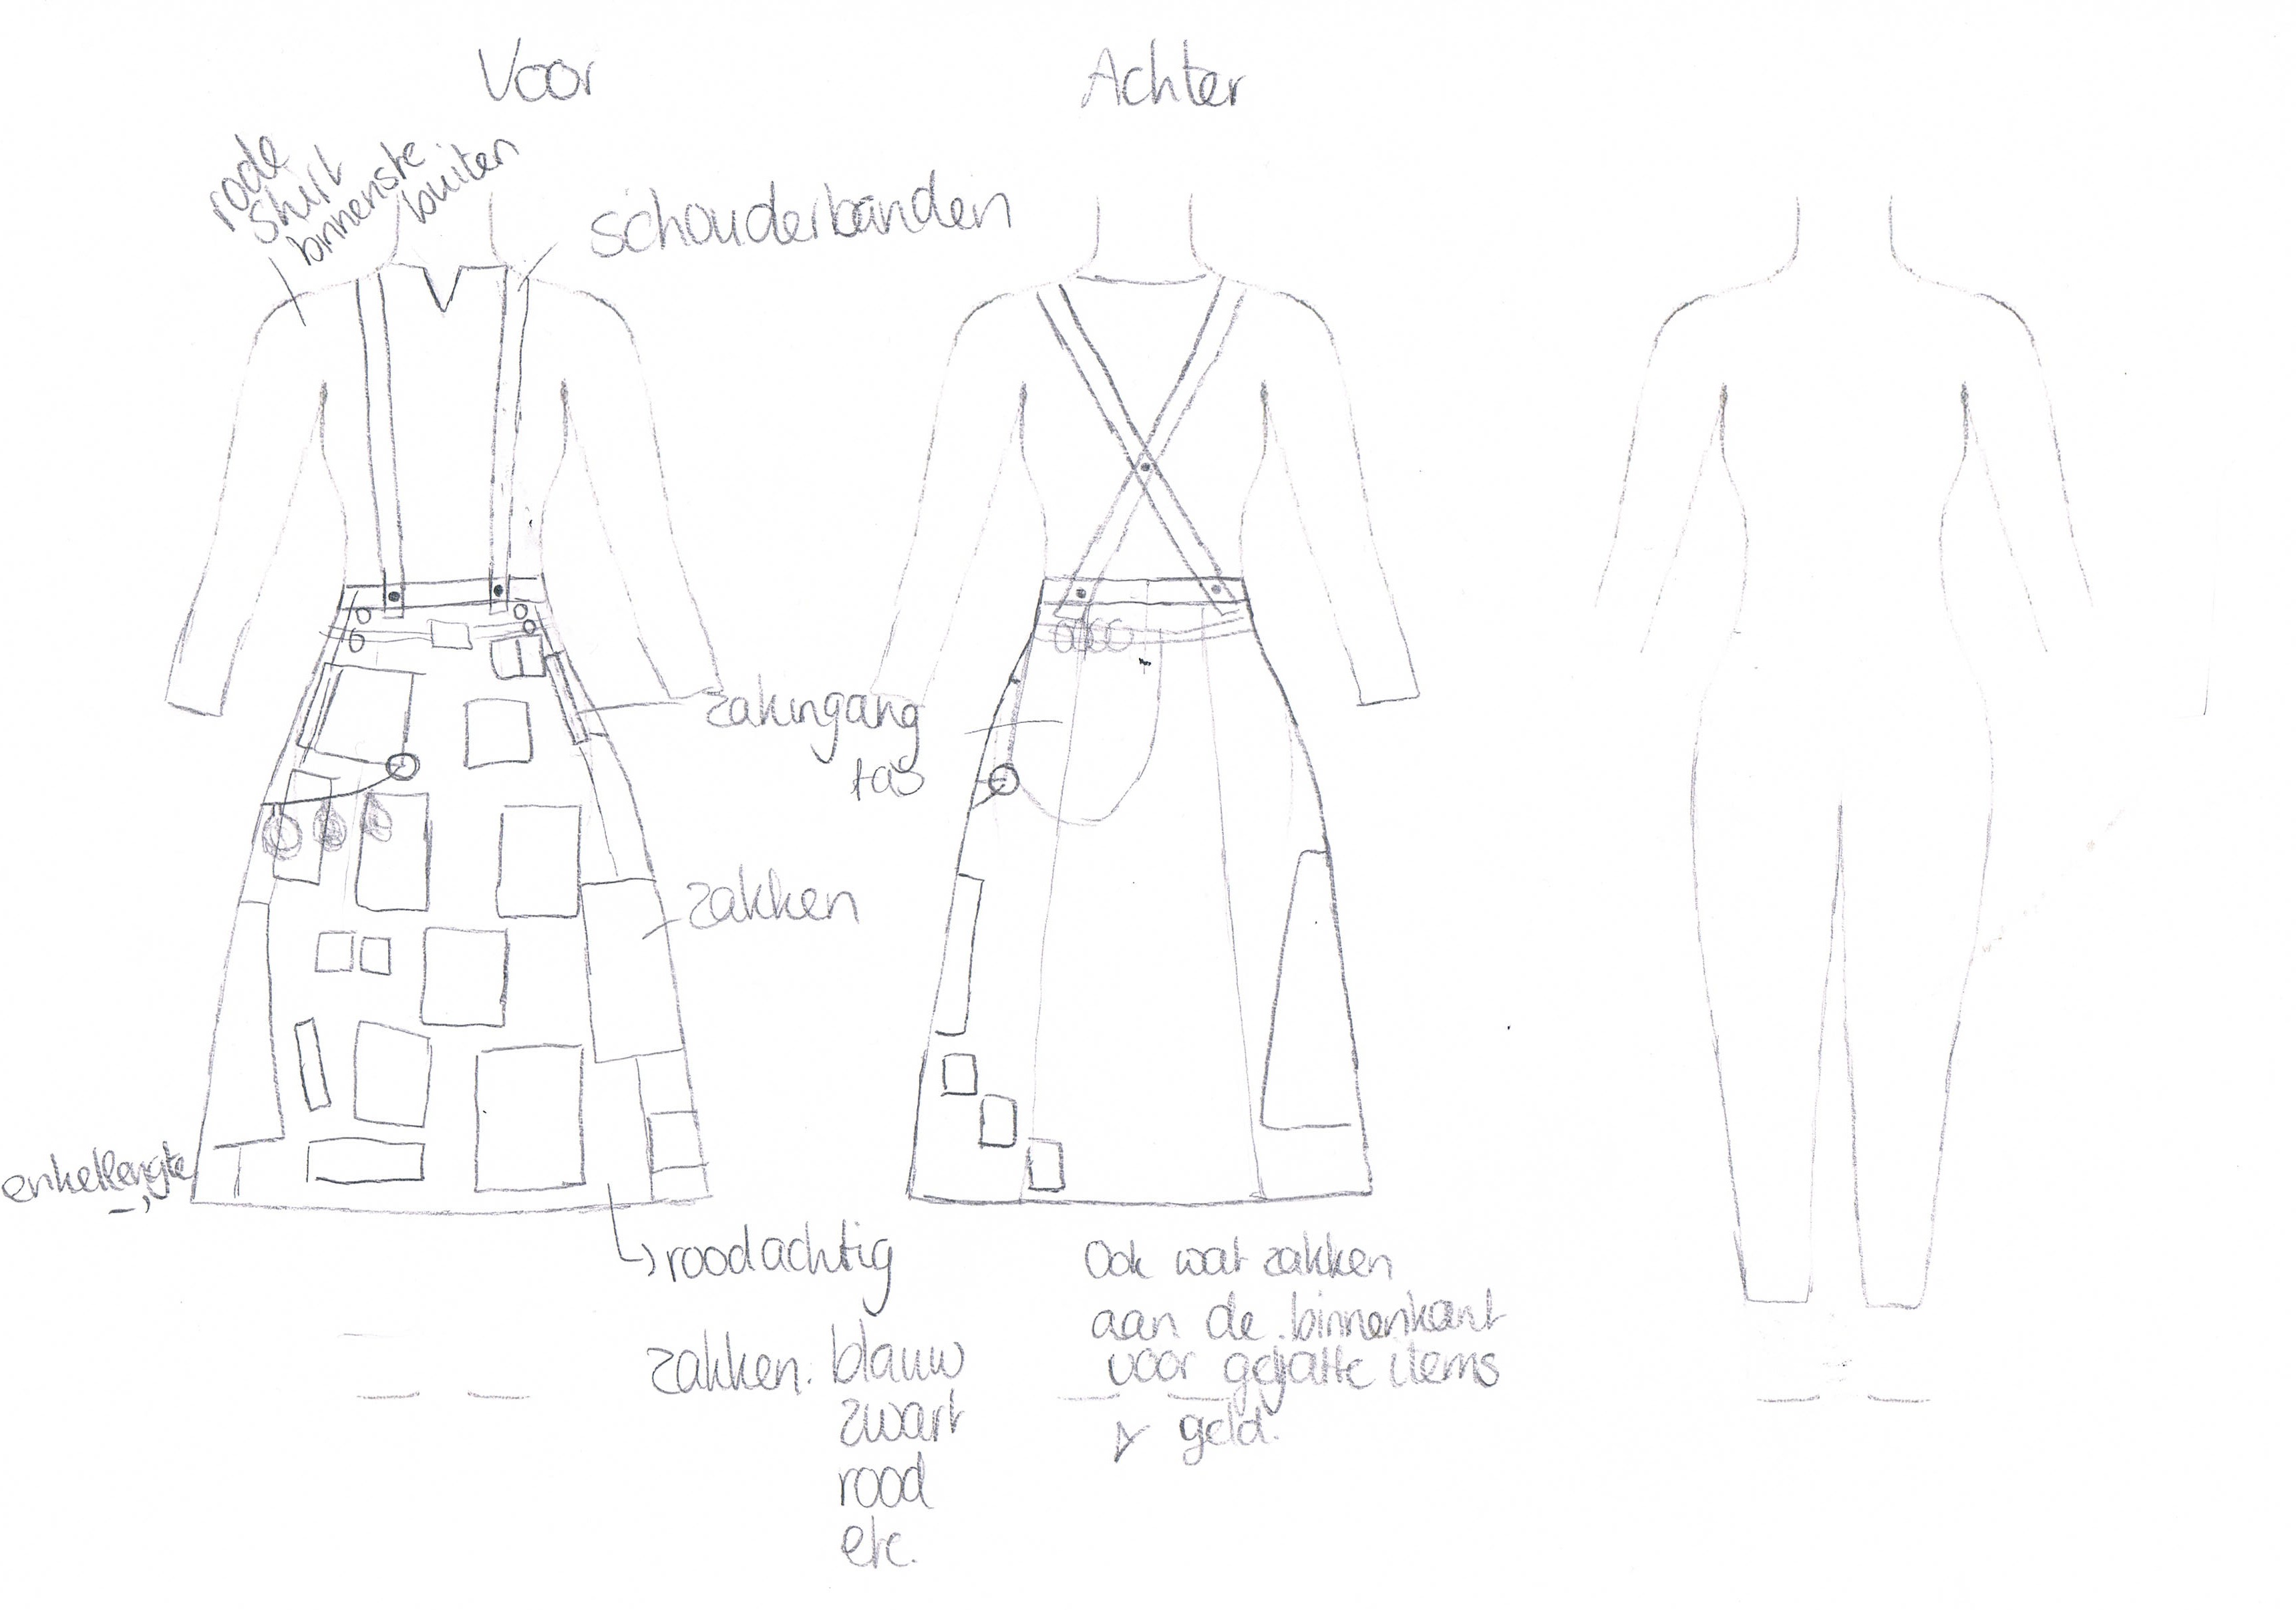
I’m envisioning myself in a skirt that has a lot of pockets. The character I want to play is somewhat like a magpie, always collecting shiny things. And not shiny things, and wanting to know everything (ok, maybe that’s not magpie, but it’s fun). So I want to be able to put all the stuff I ‘collect’ into something, in this case, a skirt. I want to make the skirt out of a red-ish linen that I’ve had for a larp purpose for years (it’s the only bit that is big enough for the skirt I want to make). Then I want to add pockets, a lot of pockets, in different kinds of fabrics. I found bits in blue, red, black, more blue and more red, so that should be fine. I also have some wool left over from my mantle. This could serve well as pouches I think. I have made a sketch (see below), I just haven’t really figured out what to do with the back. I can’t really put stuff in pockets, if I put pockets there. Since sitting comfortably is quite a priority for me, especially if I’m going to be running around the woods for days, I need to be able to sit if I’m tired.

Any ideas?

Here’s the sketch, the text is in Dutch, and also not very interesting:

Sketch

The third figure is empty, because it’s a template since I cannot draw freehand figures very well. I can draw one half of the figure, and than fail at reproducing it, so I scanned it and copied and pasted and voila!

Long Time No See

Yes I know, I’ve not been here for a while. I have no excuses. Well one, my sewing machine broke in December (which is quite the problem), so no sewing related things. I have made some things since the last time I’ve posted. A mp3-player pouch, it’s awful, ugly and crude but I needed one soon and my machine had just broke, and it works, so that’s fine. I’ll update it when I’ve gotten my machine fixed.

I’ve started a skirt that just needs hemming and buttonholes, (it’s almost all done by hand since my machine broke..), however, this was the beginning of January, and I’ve since done nothing to the skirt.

I did make a present for a friend, which was a pouch, this time with a flame embroidery. The pouch from all sides:


The last picture might look weird to you.. white things with dots and stripes on them? They are a couple of pebbles I got from our front garden. I painted dots and stripes on them and put them in the pouch with an instruction leaflet. When playing you can use them as runes or play games with them like Pigs. It is not very useful, but I thought it was fun. He seemed to like it, so I’m happy. I’m going to attempt to write more here, to make me do other things than watch television.

Evening Skirt

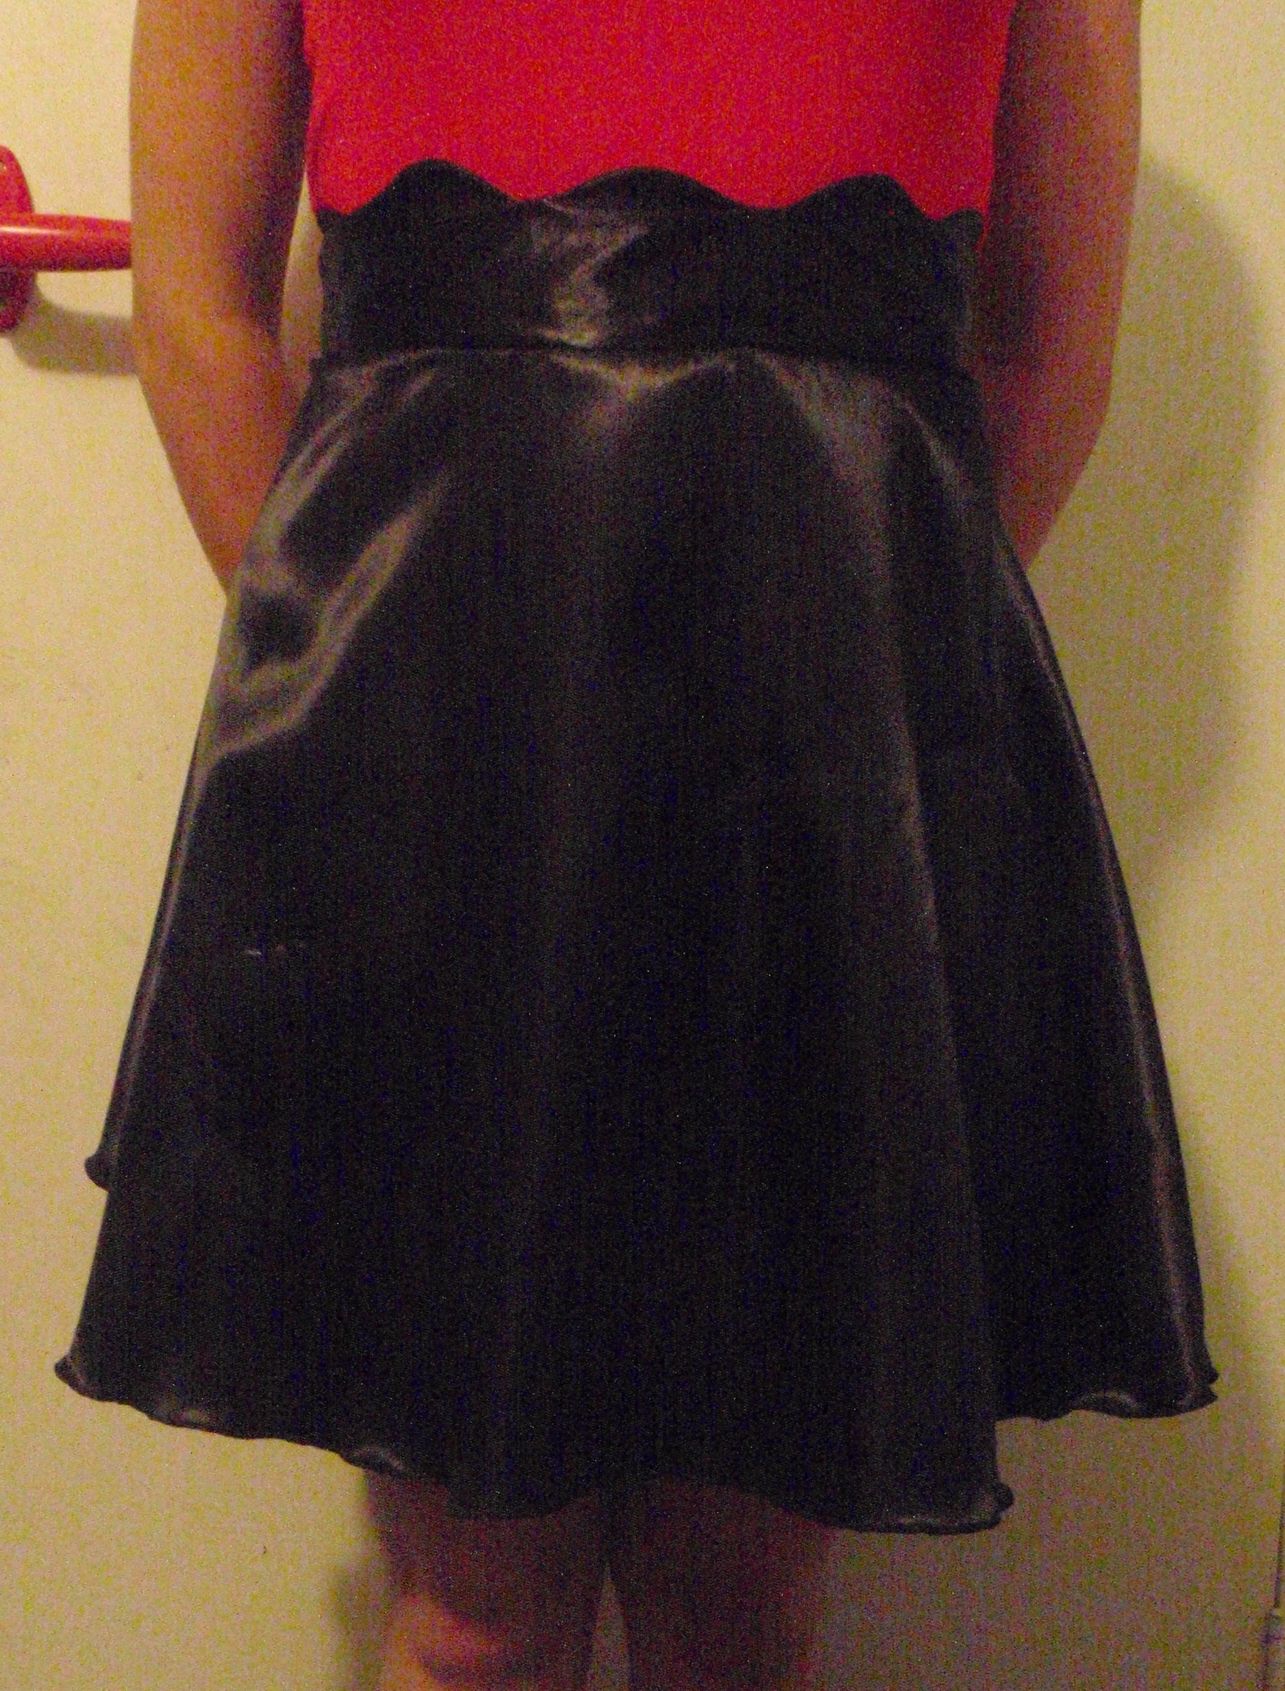
The post title is double true. I made and finished it in one evening (that’s a first for me) and it’s more of an evening type skirt. I made it of the stuff I usually make prom type dresses off. So it’s really shiny and more shiny and quite slippery. Since I half gave up on my pantsuit plan I needed a quick and easy project to make me feel less bad about the defeat.

I used a free pattern from Grosgrain’s free pattern month (link). And I think it turned out pretty well. The reason I chose it was because 1. it was free (I’m Dutch so free is a magic word for me) and 2. it only had 2 pattern pieces and eventually 3 cut pieces. I thought it should not be too hard to put those together. And it wasn’t, easy as pie and fits nicely.

Here’s the finished project:

Scalloped edge skirt

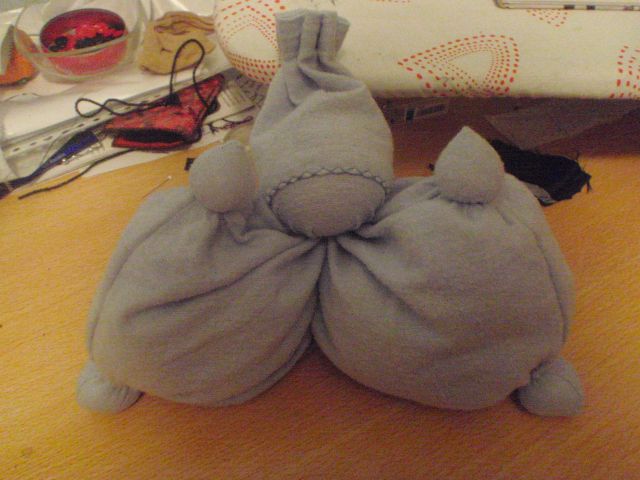
I also made a stuffed puppety thing yesterday which I finished today. I call it a poppy, which is like a cutification of the Dutch word for doll. A co-worker of mine is having a baby soon and it’s going to be her present. I make those quite often since I like them very much. She’s having a boy, which is a good thing since I only have blue fabric. It looks very fat and it is. I have to wash it to unfluffyfy it a bit, but here it is:

Poppy

P.s. Excuse the mess, I have 2 tables in my sewing room, but one has the machines and the other the mini ironing board (which is what the poppy is propped up against). So I really never have enough space. I also need to clear up, but that’s for a later date.