Sir Octopus

The pattern designer from the previous knit gift had a sale on buying three patterns at the same time. So that is what I did, next to GOGEE, I also got a pattern for Dandy Sir Cephalopod and Bonbon. DSC is an octopus with a top hat and a monocle, I had to have it. Bonbon is a cute little rabbit, it will probably see my needles fairly soon.

On to DSC, I used the same yarn as for the GOGEE and got to work. First you knit the eight tentacles, which you finish with a three needle decrease. Once all eight tentacles are knit, you start the body, at some point, the tentacles are three needle decreased onto the existing body. This is a really easy join that only leaves you with eight tails to weave in (YAY!). The remainder of the body is then knit up, eyes are added a moustache is sewn on and then the head is closed up. Before finishing, a length of yarn is glued around one eye for the monocle. The pattern is wonderful and easy to follow. I really enjoyed knitting him.

The most difficult part came with the moustache. I didn’t have a moustache button available. It was Sunday, he had to be completed by Monday and all shops in the vicinity were closed. I had no choice but to bust out my trusted fimo clay. The (metaphorical) cobwebs were wiped from the pasta machine and it was put to work. I drew a moustache on some paper and traced it on my flattened fimo clay. Holes were punched and the clay was baked. I also decided that none of the safety eyes I had in the stash were large enough (see above, he just looks silly with tiny eyes). So with the remaining moustache clay, I made some half domes that I squashed onto smaller safety eyes. These cover-eyes were also baked and then glued to the smaller eyes. I learned again that I cannot be trusted with superglue since I got some on my finger.. again.

Once the eyes and moustache were added, I closed him up and knit the top hat. Since the octopus itself was quite .. busy in his colour scheme, he needed a neutral hat. So I got out some grey and got to work with that. When he was finished he couldn’t really stand on his tentacles, but if you perch him just right on a cup, he looks ever more wonderful. He’s currently living in the office on the desk of the birthday girl, so I still get to see him. She’s still deciding on his name, but it’ll definitely start with Sir.

Interrobangs and Cats

A while ago, I was browsing the internet (and pinterest) looking for interesting earring inspiration. I found a few pins that I really liked, namely this one, this one and this one. And some others, what the heck, here’s my entire board of crafty things. Anyway, a friend of mine had her birthday a while ago and I still wanted to give her a small present. So I delved into the fimo stash and produced ‘inspired’ by earrings from the three pins above.

Let’s start with interrobang. The interrobang is a symbol used to ask a question in an exited manner, expresses excitement or disbelief in the form of a question, or to end a rhetorical question. It was a marketing idea in the sixties and never really took hold (Wikipedia), but I for one love both the name (BANG!) and the idea it expresses. Nowadays, the interrobang still isn’t used, but we do use the two symbols the interrobang is composed of separately. Say what‽ or She’s pregnant?! (Again Wikipedia). I came across the name at some point in the past when I was reading a post about (potentially) useful punctuation marks. That might also be where I learned that the &-symbol is called an ampersand. Which is information I actually regularly use in my day-to-day life.

So, I didn’t make the interrobang, I just really wanted to talk about it. I did make earrings with a loose ? and !, one for each ear. Black & Metal, a good combination right? I deviated from the original by putting the pin through the question mark completely. I actually like this maybe better? Anyway, here they are:

 Bang! Hanging Bang!

The second was an adaptation from the other two pins, one for each ear. So one dangling cat, and one graceful jumping cat. Well, my cat faces aren’t nearly as nice as the inspiration, but I still quite like them. The friend did say they were heavy, so we’ll see if they work out. It was mainly for fun anyway. So the pictures you’ll see will have a plastic cookie box in them. My ears aren’t pierced and I couldn’t find anything that would work well to show they were supposed to look, so a pierced cookie box it was.

Front Side-ish

 Side Butts

I also need to improve on cat faces and I still want to try the biting shark, and maybe mix it with a surfboard or something. For now though, I liked the results and I think my friend was somewhat interested in them. I had to wait until I’d given them to my friend before I could post them, you understand. On a different note, now I can already tell you that my next installment will be about the pants I finished yesterday and test-wore today. Very high waisted, woolen red pants. I love them.

Bats!

What do you do when you have to housesit the building you work in and literally only have to get up every two hours? Do you also race home to collect your fimo stuff and create little bat earrings with your friend? Well I did, in the first weekend of this month.

We found the inspiration here, and decided to make our own versions. Mine are a little cross eyed, which was exactly was I meant them to look like.

I smoothed over the back such that they are one whole. I like them. But I haven’t got my ears pierced, so I think that I will hand them over to a friend. I think I’ll make some more fimo stuff in the future. I forgot how much I liked it, I also found some more inspiration which I’m gathering here. If you’re ever interested.


Gifts – 1

With school over, I’m now (still) enjoying holiday and searching for jobs every now and again. However, I also found that there are a lot of things you can do during holiday that involve getting out of my house. Since I’ve made so many (house-warming) gifts in the past weeks, I figured I’d dedicate multiple blog posts to that. Let’s start at the beginning.

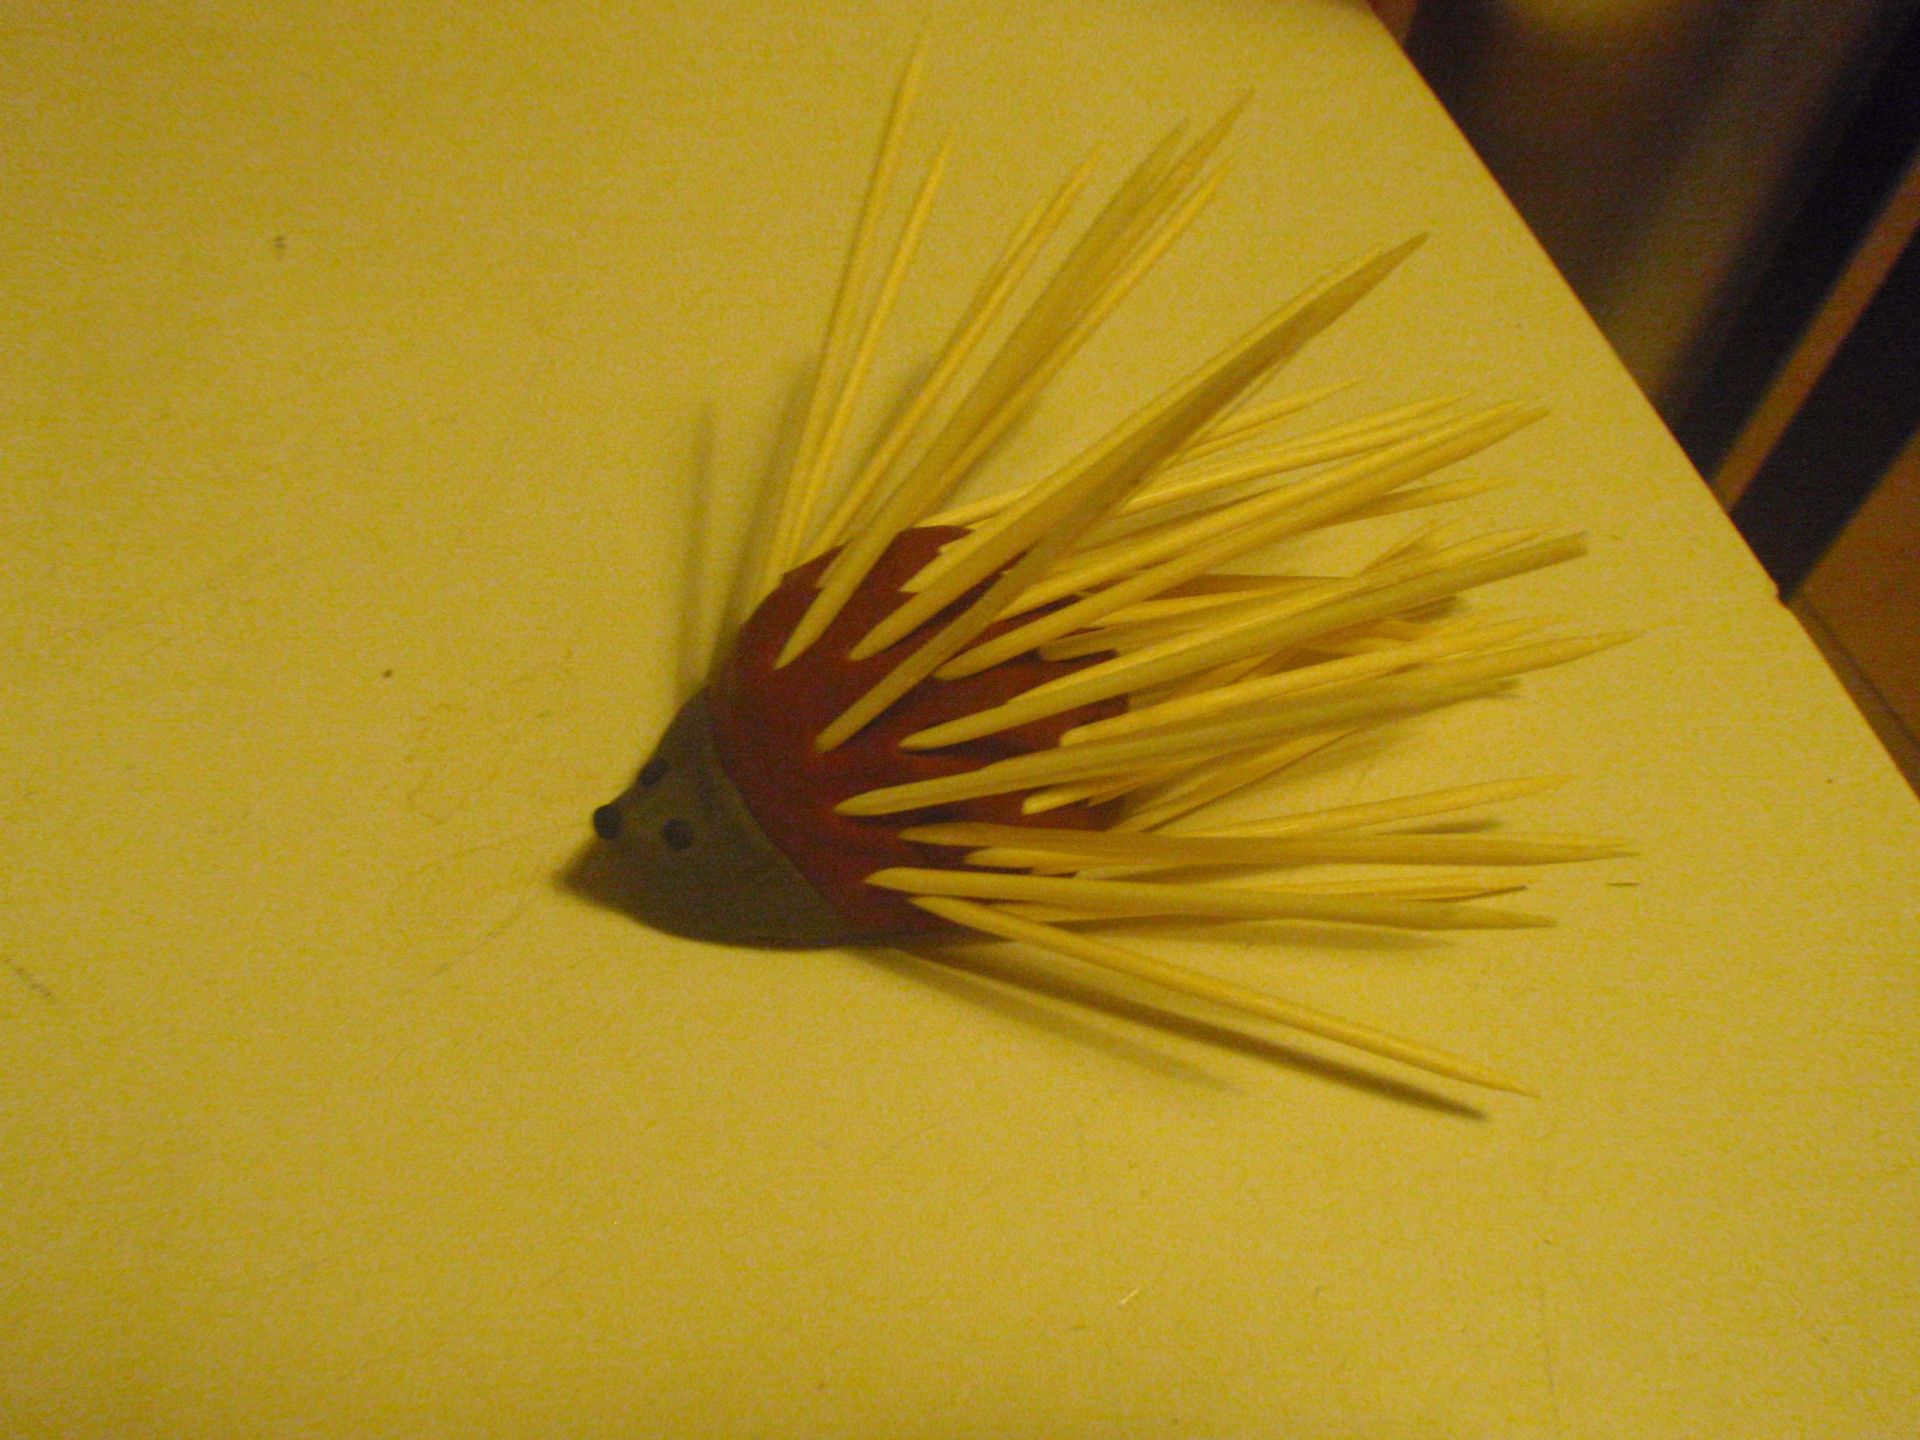
The first gift was meant as a house-warming type gift. I made three cocktail stick hedgehogs/porcupines for three different friends. The first friend just moved with her boyfriend to a new house. As I’d visited her before but that had been unexpected I didn’t have a gift at the time, and I wanted to give one. The second friend also just moved with her boyfriend to a new house, as I’d be visiting the house and them I figured I wanted to bring a little gift. The third friend was celebrating his birthday, and he likes cooking, so I hoped he’d like it (yes, this was all in the same week, I was busy).

I hope you are curious to find out what cocktail stick hedgehogs are, since I’ve got pictures here.

Hedgehog! With sticks

I made three different coloured ones, because I was using my left-over fimo clay. There is an aluminium base in, and it is covered by two different colours of fimo clay that were put through a pasta machine repeatedly. After I’d finished the covering, I googled hedgehog (to get them the distinctive hedgehog face shape) which involved making a little nose that pointed upwards. I added a black nose and eyes and pricked them with a stick. They were baked and were then ready to serve as cocktail stick holders.

Fully sticked 

This is one of them fully stocked with sticks. I personally think that they are super cute. If the recipients don’t fancy them, they can always throw them out.

So this was part 1. Stay tuned for the next instalment.