Backpack (intermediate 3)

After almost finishing the outside of the backpack, I decided to work a little more on the inside of the backpack. I had made the lining first, but found out that it didn’t really fit that well inside so I had to redo some bits.

The lining started out like this: all pockets and a flat bit of fabric. Some markings are present from my first attempt at creating the shape. I did the exact same thing, but made it a little smaller. I forgot to take turn of the cloth into account.

Flat lining

After re-measuring and re-sewing the lining I had a square bag. I reinforced the bottom such that it would hopefully stand up straight. You can see how it looks from the inside on the right.

Lining Inside lining

While having the lining almost ready was great, I couldn’t actually put it in yet. I still needed to add the closing loop to the outside of the backpack, and maybe some more pockets. I would like to have that nicely finished and then drop the lining in, so it’s invisible from the inside. So onto the pocket making!


Backpack (intermediate 2)

I’ve been diligently working on the backpack for a while now. Before starting the embroidery (results here) I managed to close the straps, by attaching the front to the back with an overcast stitch, where I attempted to keep the stitches straight and not angled. After finishing the embroidery I overcast the flap pieces together. Before starting the embroidery I had already made a welt type hole in the front for the closure that I am going to make (I just found out I made it in the wrong direction, not very clever of me, but this way will probably work too). So now I have straps and a flap. If you look closely you can see the stitches.

Backpack back Backpack strap

The straps are connected to the bottom with ribbon. Therefore, they can be tied and retied if the backpack needs to be adjusted. I don’t know yet if this will actually work, but hopefully I’ll see during the April 11-13 road test. Below you see the backpack with the straps attached.

Backpack straps

The straps were based of a backpack that I really like the straps of. So I just copied them and cut them out in the skai leather. Then I cut them in something resembling fake suede. The fake suede was stitched (by machine) right sides together to a piece of flannel and a bit of batting was put inside such that the straps would be comfortable. It was then turned inside out and overcast to the skai bits. I think it turned out quite well.

Now on the the last couple of steps.

Backpack (intermediate 1)

I’ve been working on my backpack since I previously mentioned it (here). I sadly did not finish it by the time I wanted to use it for a Larp special, which was the 15th of March. However, during that special something happened that made me rethink the pack a little, more on that later. The day of and on the way to the special I had been working furiously on the bag. I managed to get the straps on, although the fronts were not sewn to the backs yet. I added the flap in its two parts (front and back). I sort of sewed the lining in. It clearly was not finished yet.

During the special, I found out that they wanted me to become a priest (I did not want that, but they made me anyway). So I figured I’ll embroider a raven (the symbol of the god I was to be a priest of) on the flap. Luckily I had not yet closed the front and back of the flap, so I could easily embroider something on the back. I did a quick Google search, found a magnificent picture and decided that this was so much for personal use that I could use it. On the left you see the original, click it for the link to the source. On the right is my embroidery.

raven_eyes_by_sauceoftheboot-d4lgnq7OLYMPUS DIGITAL CAMERA

Sometime before starting this piece I read a blog post about filling in embroidery using long and short stitches (here), to be able to create directional embroidery. It’s not as clear but I know I’ve used it and I think it works a lot better than stitching willy nilly, which I used to do before.

So on with the rest of the bag. I’m getting there!! The new deadline is the 11th of April. I hope I’ll manage.

Backpack beginnings

As you might now, I wander around a larp field sometimes in a skirt with a lot of pockets (here). Since I also stuff those pockets, at the end of an event my hips are usually not very happy with me. The skirt is heavy and difficult to manoeuver in. So I figured I’d make myself a larp backpack, ages ago. I started well, creating a pinterest board with inspiration for a backpack. Some of the pins are shown below. (Click the picture for the link.)

Backpack

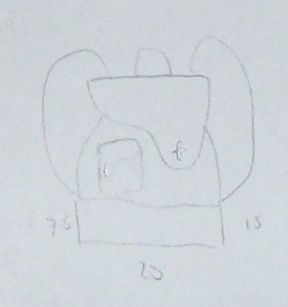
That’s were my plans ended. However, Friday, after I had a meeting with my orthodontist (I hate my teeth), my plans were put back in motion. This is because I went to the thrift store where I found some nice blueish/blackish fake leather and strong light linnenish fabric. I spent the night drawing my new backpack, which will be a combination between the top left pin, the top right pin and the bottom right pin. See the design below (with the ‘pattern’ sketched out to scale). It’s a bit vague, but the light here is crap and the drawing is little. It might not end up like the sketch though, we’ll see.

Backpack Plans

Now the reason  I wanted the backpack was to be able to not overfill the pockets on my skirt. However, I figured that if I would just dump everything into the backpack, I’d never find anything again. Since I do this in real life, I have experienced searching through backpacks, but it’s not very practical, to say the least. So the light fabric was to be the lining of the pack, with a multitude of pockets again. Strips of were added to make pockets with a fold, so that they could be opened up to hold vials and such without distorting the lining shape. Other pockets were flat. I will add some more to the side that’s only got the one line of vial holders.

Lining

Well that’s where I’ve ended now. I’m planning to have it finished by Saturday but the real deadline for it is somewhere in May, so I’d better make that. I am now seriously hoping that the fake leather stuff will cooperate, I’m afraid that that will be the most difficult part.

Armour

This time it’s armour without injuries! Some pinpricks don’t count, of course. So I actually finished my armour in time for Friday. If my character would have died, which thankfully it didn’t, I’d have a new outfit. I’m still doubting whether to put on the shoulder pads, any advise?

Front Back

This is what it looks like on. It’s based on the free vest pattern from Burda, the Franzi. I seem to base a lot of my patterns on that thing. It is really heavily modified though, a lot of fabric was removed from the centre, a more pronounced princess seam curve was necessary, since it gaped in the armhole. I think I should probably have added something strong down the back, to keep it from rippling. The fake leather stuff was attached to the black lining by machine apart from the top, bottom and armholes, which were attached by hand, using a blanket stitch.

These are the outside and inside. I had fun hammering in those 22 grommets.

Outside Inside

I have finished the shoulder pieces, but I’m a bit afraid of attaching them. I’m probably going to hammer two grommets in the front and back of the shoulder pieces and the armour itself. Then attach with rope, so I can take them off if necessary.

Shoulders

Injuries and armour

I’m going to try to make myself an armour. A soft leather armour corset thing. I found some skai, took a meter of it home and found some pictures online that would hopefully give me a nice idea. At the place where I got the skai, I also got some stretchy fabrics that I’m planning on using soon.

I was trying to work with some of that fabric (fleece) and my machine kept skipping stitches. I learned a lesson that day.. Make sure you turn your machine off, or at least keep your foot of the pedal when you put your fingers under the needle..

Finger

You probably can’t see it very well on that picture, but the left arrow is pointing to the entry point of my sewing machine needle, and the right to the exit point of said needle. Needless to say.. it HURT! A lot! It happened about 1.5 week ago, and while it doesn’t really hurt anymore, my finger feels weird still. Luckily this was the first time it happened in about.. 10 years? I’m planning on never having it happen again.

So, back to the armour.. I attempted this pinterest thing again (I fail) but at least it saves my pictures. Here you can find my pins (I hope).  I have two now that I’m basing my design on. The left and the right, the middle one, with the straps, I’m not liking as much. The skai has a white back, so I’m using some black denim like stuff as an under layer to stitch the skai on. I made the black body and then cut out the pieces. I only needed a very small amount of skai:

Skai

I have way over half left, so I haven’t got a clue yet what I’m going to do with it. I also purchased some black thread and hope to pursue this project further soon. I’m now also working on finishing that blue coat that you’ve been hearing about for ages. Finishing one sleeve and adding two buttons, that’s all that’s needed. I’d better go back to that now.. Happy creative activities to you all!