Norah Waugh’s 1901 Corset

The first steps towards a 1902 Wedding Dress in the collection of the V&A. The Corsets and Crinolines 1901 corset pattern.

Sometimes I find an image and just think: I want to have it. That was the case with a 1902 Wedding Dress by Houghton & Dalton that I found in the collections of the V&A. Of course owning the original isn’t truly something I would want, but I have started thinking about how to replicate it based on the seven images from the V&A.

The first steps included finding fabric and starting work on the underpinnings. Those underpinnings are the topic of today. I decided that I wanted another early Edwardian corset because the Black Snail one doesn’t really feel like it allows enough room for the displaced fleshy bits to go. I’d looked at Norah Waugh’s Corsets and Crinolines before, and the 1901 corset in there seemed like it would provide more space. Then I remembered that Ralph Pink had a free hip curve corset available that looked an awful lot like the Norah Waugh one, so I used their pattern pieces.

I’ve made a mock-up before and decided to lengthen the top by 2 cm and shorten the bottom by 2 cm, but those were the only changes I made. For the first attempt, I used a curtain fabric that was the later also used for the pouf. This stuff did not iron down well at all and with the ridiculous amount of seams going on in the corset, it made some weird bumps. So I tried again, cut out all the white coutil, and then found some off-white silk in the local fabric shop that I decided to splurge on. Having never used silk before, I was happily surprised by how much flatter it got than the original fabric I tried.

The boning channels were guessed at (that diagram in C&C makes very little sense.. there are some bones that are differently placed on the front vs the back view) and then created by sewing the two layers together. Next, I had a hell of a time putting the bones through because there were so many seamlines crossed. Some real curses were thrown out. Lastly some vaguely matching bias tape was sewn to the inside and whipped to the outside. From the last corset I learned that hand sewing through coutil is a real pain in the butt, so I did it in reverse.

This part, the corset stage, is now mostly finished. Couple of things that are still bugging me a bit. Should I have added the garter things to the front? Is the busk not stiff enough? It is a bit bendy now. And lastly, did I make it too big, it almost closes in the back, which I did not expect. It does definitely require some more wearing before it’s truly comfortable, I think. For now, I’m going to gather the courage to actually start making the pattern for that V&A wedding dress. Hopefully that’ll manifest soon!

1880’s Corset

I made a start on a dream costume with an 1880s corset

A while time ago, I found THE outfit that I need in my life to fulfil my newly developed ultimate Victorian Librarian fantasies.

Walking Suit – ca. 1889, House of Worth, Accession Number: 2009.300.73a, b from the Met Museum

Of course I’ve since been scouring the internet for fabrics like this. Cut velvet dotted stuff for the skirt and jacket, and lace for the blouse and sleeve cuffs. I’ve not been able to find anything that’s remotely similar and in my price range for either. I did find one fabric at Mood that seems possibly close for the cut velvet but it’s in the United States (i.e. shipping is exorbitant) and it wasn’t there in any nice colours. For the lace, I haven’t even figured out what I’m supposed to use as a search to get what I’m after. So the only thing I’ve got going in that area is RSI from scrolling through Etsy stores. If you’ve got any suggestions, please let me know!

However, since old-timey outfits should start from the foundations outwards, I have made some progress in this project. I made the corset. The pattern I planned to use is a corded late 1880’s spoon busk corset from Norah Waugh’s Corsets and Crinolines. I had it all drawn out, copying and enlarging and generally faffing about. Then I discovered that Ralph Pink has a number of the corsets in the book available as free patterns, with seam allowances and everything. So I quickly printed that out, made a mock-up and decided to add some width, between 0.5 and 0.7 cm, to each panel, and cut a bit off the bottom.

It was constructed using a single layer red and silver (?) on black coutil with boning channels made of some vague synthetic fabric that was reinforced with interfacing. I used exactly 0.5 m of the coutil and basically have none left. Especially since I was also taking care to mirror the panels exactly, such that the corset is symmetrical. Next, the cording was sewn to the front two panels. Then I put the project on hold for months because I was scared to continue. During Eurovision I got myself to cut the boning channels and iron them to size. Then I waited a few more weeks before finally stitching them down, cutting and installing the boning and grommets and binding the edges.

It’s not perfect. The bottom edge sticks out too much in front. I had to unpick some of the boning channels because they were to narrow for the boning to fit through. The cording is close but not exact. It’s just a tad bigger than I thought it would be. All mostly nit-picky things. I think it would certainly improve from doing some more seasoning (i.e. wearing). However, I’m still pretty proud of myself for actually finishing the thing, especially after the amount of procrastination I’ve been doing on it. The one thing that is still missing is flossing, but with 14 bones per side, I’m not sure I’m up for that yet.

S-Bend Corset

Getting started (again) on corset making, this time an S-bend from the Edwardian era.

The combinations from last time weren’t actually finished yet when I started the main part of the project, an S-Bend corset. I googled for a while and then found a pattern by BlackSnailPatterns #1015 Edwardian Straight Front Corset, which I purchased from Etsy. I also got two Victorian/Edwardian skirt patterns at the same time, but you’ll hear about at least one of those later.

I set out to make a mock-up from some green canvas type stuff. Put a separating zipper in the front and used zip ties for the boning. I put on the first draft and it was very crooked. It’s unclear to me why this was the case. Options include: 1) I’m just crooked, 2) the stiffer boning channels on the one side pushed the front askew, 3) I sewed something wrong? Anyway, it stayed a little crooked in all my fittings. However, the lacing gap in the back seemed accurate enough, while the waist was a little bunchy. I made another mock-up in a size smaller but that was a Bad Idea™ and I quickly reverted to the original size. I then decided to remove half a cm from the waist and that seemed to do the trick.

After getting hold of some coutil from the UK, I cut out the pattern and got sewing (on the treadle!). This coutil stuff is so weird, it honestly felt like handling cardboard… Anyway, this is a single layer corset with boning channels made from the same coutil and a waist stay. There are two metal bones on either side of the lacing and five synthetic whalebone bones per side. It’s finished with some white bias tape along both top and bottom and some lace along the top. The pattern indicated that the first two bones needed flossing to keep them in place. Flossing is the name for additional stitches that anchor the bone and also serve a decorative purpose – the stuff in blue below.

Because the fabric is so very tightly woven and stiff, it’s hard to push your needle though without completely bending it. So I took a different approach and pre-punched holes with pins. In order for the flossing to stay similar along all bones, I used pins in different colours so that I was sure to go from one hole to the next correctly. From yellow to yellow, red to red etc. Depending on the slant of the bones, the flossing points in a different direction.

You might see that the bones in the front end before the end of the boning channel. This does make sitting a lot easier and is why the flossing was required. I finished the flossing on the first two bones quite early and then got to sewing on the lace along the top. After that was hand-sewed on, I added the same blue ribbon as in the combinations. I can tie the ends into a bow and it looks very cute. If I do say so myself. The aim of this type of corset is to create a straight front and to allow the butt to stick out. This is to do with the ideal shape in the 1900’s. Mine’s not as pronounced because I’m not using any padding whereas true Edwardian people would most definitely have done so.

This pattern is also based on more modern bodies and therefore doesn’t exaggerate the shape nearly as much as an authentic Edwardian S-Bend corset would. After finishing a mock-up of this one, I made a mock-up of an original S-Bend from Corsets and Crinolines, which was way too big at the top and way too big at the bottom. But I might finesse it to fit me without padding by taking out a whole panel and taking in the hips a little. There isn’t much space between the last of my ribs and the top of my hip bones, which also means that my body literally cannot compress as much in the waist as would sometimes seem ideal. This thing reduced my waist measurement by 4 cm compared to normal. I wished in the past that I had a more squishable middle, but I’ve given up on that and I can’t be bothered by it too much anymore.

Next up, the skirt (which is wrong, it should have been a petticoat, but that isn’t finished yet…)

Graduation Skirt

At the end of January, there was a graduation ceremony again. So I wanted to make something nice. This time I decided to go for a skirt. I had found some blue sparkly stiff stuff that I figured would work nicely. I wanted to try the vintage Simplicity 1076 pattern again. I’d traced it before and used an adapted those to get the pattern to fit my body. The fabric was quite weird and the sparkly threads got caught by the needle and partially ripped out sometimes, but I don’t think anyone could see. I also added some more adornments to the skirt. I started with adding loops to the back to create a corset closure.

I bought two types of ribbon to thread through the loops, and in the end decided to use the black ribbon because I thought it looked better. After finishing the whole thing, I thought that the front was a little boring. So I searched through my stash and found some buttons that I harvested from a jacket and added those to the front.

The skirt is fully lined and the lining doesn’t have the pleats. The skirt also has pockets, because otherwise skirts are not useful. They are nice and large and manage to hold my phone and the schedule for the day and all kinds of other stuff without showing much.

\

On the day, I wore it with the cut out shirt and a blue scarf that I bought ages and ages ago. Quite a few people said they liked it. It was a lot of fun to twirl around in it. Since then, I have started a button-down shirt but haven’t managed to finish it, perhaps I’ll get around to that soon-ish.


Tighten the Tape

The plan to make a well fitting corset has been there for a long time. Collecting different items has been going on for a long time, buying a busk here, some closures there, a box of grommets etc. However, to get the whole thing together, I also needed a lot more things.. Of to the shops & the internet for:

  • Spring steel boning
  • Spiral steel boning
  • Boning end caps
  • Bolt cutter
  • Large ruler
  • More grommets

And probably more, but I may have forgotten the other things. I wanted to draft the thing, so again, on the internet I went. Two tutorials from Katafalk were in the final product: the pattern and the sewing method. It involved a lot of measuring, a lot of line drawing and quite some cutting out. However, I think it worked in the end.

Since I didn’t know whether it would actually fit, I first made a sort of muslin from an old tablecloth. I cut out the pieces and sewed them together. Then I pinned in the boning channels (I don’t know why I didn’t sew them) and added plastic ties. I also used the Bridges on the Body tutorial for lacing strips, so I could try it out semi properly.

I only pinned in the boning on the left side of the corset (right on the first picture), and the difference is clear, to me at least. I decided it fit and cut my pattern out in a green stiff fabric. I cut two layers of that and sewed the thing together. Most of the bones were flat steel, only the ones next to the side were spiral steel. I finished it with black bias tape and black ribbon.

The grommets were the hardest. I had to hit them very hard with the hammer, and I don’t think my neighbours liked me very much at 23:30… The grommets are spaced about 2 cm apart. It’s also quite hard to evenly lace something by yourself, so I was quite happy to get as far as I got. I think it may be a little to long as I need to sit up quite differently from normal, but it does seem to fit.

I’ve also drafted an overbust using a different method, but I need to figure out how to get the bust to actually fit, because it is a little spiky now, bullet bra like. However, so many more projects to start and finish, so I don’t know when I will get to it.

Armour

This time it’s armour without injuries! Some pinpricks don’t count, of course. So I actually finished my armour in time for Friday. If my character would have died, which thankfully it didn’t, I’d have a new outfit. I’m still doubting whether to put on the shoulder pads, any advise?

Front Back

This is what it looks like on. It’s based on the free vest pattern from Burda, the Franzi. I seem to base a lot of my patterns on that thing. It is really heavily modified though, a lot of fabric was removed from the centre, a more pronounced princess seam curve was necessary, since it gaped in the armhole. I think I should probably have added something strong down the back, to keep it from rippling. The fake leather stuff was attached to the black lining by machine apart from the top, bottom and armholes, which were attached by hand, using a blanket stitch.

These are the outside and inside. I had fun hammering in those 22 grommets.

Outside Inside

I have finished the shoulder pieces, but I’m a bit afraid of attaching them. I’m probably going to hammer two grommets in the front and back of the shoulder pieces and the armour itself. Then attach with rope, so I can take them off if necessary.

Shoulders

Injuries and armour

I’m going to try to make myself an armour. A soft leather armour corset thing. I found some skai, took a meter of it home and found some pictures online that would hopefully give me a nice idea. At the place where I got the skai, I also got some stretchy fabrics that I’m planning on using soon.

I was trying to work with some of that fabric (fleece) and my machine kept skipping stitches. I learned a lesson that day.. Make sure you turn your machine off, or at least keep your foot of the pedal when you put your fingers under the needle..

Finger

You probably can’t see it very well on that picture, but the left arrow is pointing to the entry point of my sewing machine needle, and the right to the exit point of said needle. Needless to say.. it HURT! A lot! It happened about 1.5 week ago, and while it doesn’t really hurt anymore, my finger feels weird still. Luckily this was the first time it happened in about.. 10 years? I’m planning on never having it happen again.

So, back to the armour.. I attempted this pinterest thing again (I fail) but at least it saves my pictures. Here you can find my pins (I hope).  I have two now that I’m basing my design on. The left and the right, the middle one, with the straps, I’m not liking as much. The skai has a white back, so I’m using some black denim like stuff as an under layer to stitch the skai on. I made the black body and then cut out the pieces. I only needed a very small amount of skai:

Skai

I have way over half left, so I haven’t got a clue yet what I’m going to do with it. I also purchased some black thread and hope to pursue this project further soon. I’m now also working on finishing that blue coat that you’ve been hearing about for ages. Finishing one sleeve and adding two buttons, that’s all that’s needed. I’d better go back to that now.. Happy creative activities to you all!

Christmas

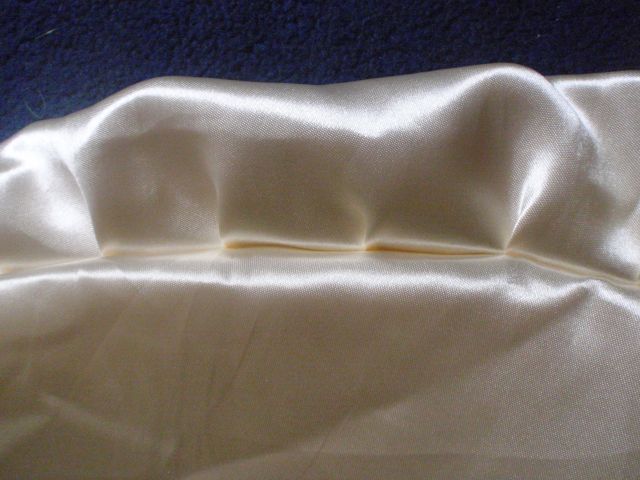
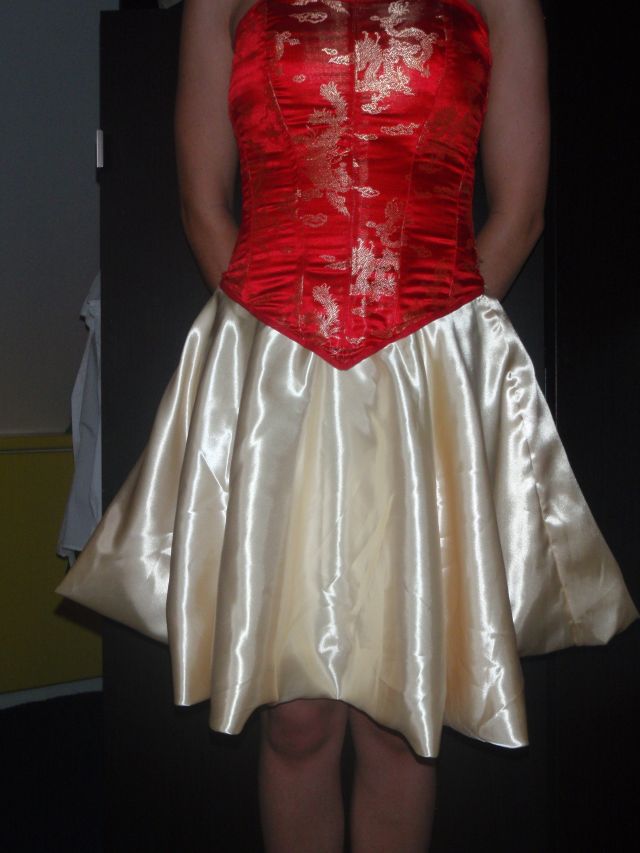
Yesterday I finished what was supposed to be my Christmas outfit for 2010; it obviously was not worn then, since it was not finished. I made a corset of red with light gold fabric with dragons and phoenixes on it. So I wanted to make a skirt to go with it, I chose a light gold-ish fabric for it. I wanted to make a circle skirt, so I did that, but figured it was a little too see through. So I made another identical layer from the same fabric to go as a lining. This was done before Christmas, but the thought of having to hem it all, 2 whole circle skirts, got me down a bit. So I delayed.. and delayed .. and delayed some more. And finally decided to work on it last week or the week before, but I figured that I did not want to hem two circle skirts. So I did a balloon type skirt. But it’s a circle skirt so the outer layer has more fabric, and I needed some folds. It looks like this on the inside:

Folds close up  Full circle

Left is the close up of the folds, right the complete skirt from the inside. So I sewed it 2 weeks ago, but finished it yesterday. How come? You may ask. I had to do 10 more centimeters and wasn’t feeling like it at that time, so again postponed it. Finally got around to doing it yesterday, 10 minutes, I was done. why did it take me 2 weeks? I guess I’m just a bit lazy. But eventually the skirt was finished half a year after I started it. However, I think I made a mistake with the fabric. It really is too shiny to actually wear outside of costume parties, and I don’t know what costume it could make. Anyways, here is the finished product, including the corset and I hope Pentecost was fun for you too.

Finished outfit

Corset

Not very long ago I added another project to my to do list: a corset. I’ve made one from the Dutch pattern journal Knipmode, and it looks really nice. But a couple of days ago I found a pattern for an underbust corset and instructions at BurdaStyle, for free. .
So currently I’m making a muslin out of some funky children’s curtainish fabric. It’s got pink, orange and yellow stripes (quite wide, I’d say 20 cm?) and green frogs and red ladybugs. It’s really cute but not something you really want your clothes made out of.  I think I might have printed it out incorrectly because it seems really small. But we’ll see when it’s finished.