To get the look ‘right’, so you sometimes need some unnatural enhancements..
I never thought I had a super small butt, but apparently the ‘fashionable silhouette’ of the turn of the previous century had a much different waist to hips ratio than I possess. This needed to be remedied. The pattern from the purple skirt also included a bustle pad. Effectively a flat-ish pillow that you tie around your waist to make your butt look bigger. So in addition to making a petticoat for the purple skirt, I also made myself a spare butt. I used the same fabric as the petticoat and 2 layers of 1cm padding and 1 half layer of 2 cm padding.
Without Pad
With Pad
If I look at the images, it really does make a difference to add the pad. It feels a little bulky so I’m wondering if I should make a smaller one too. These pictures where taken way back when I first posted the white shirtwaist. The bustle pad was mostly completed at that time, it just needed eyelets. The pattern calls for metal eyelets to be inserted, but I really didn’t feel like doing that, so I handmade some eyelets after taking literal weeks to get round to it. I think it’ll work perfectly fine like this.
Tie
Eyelet
Bustle Pad
Only the corset cover (and a hat?) to go until I have a full outfit. Maybe socks? Who knows what I’ll end up doing.
Making a turn of the century bicycle skirt for the non-car owning people among us.
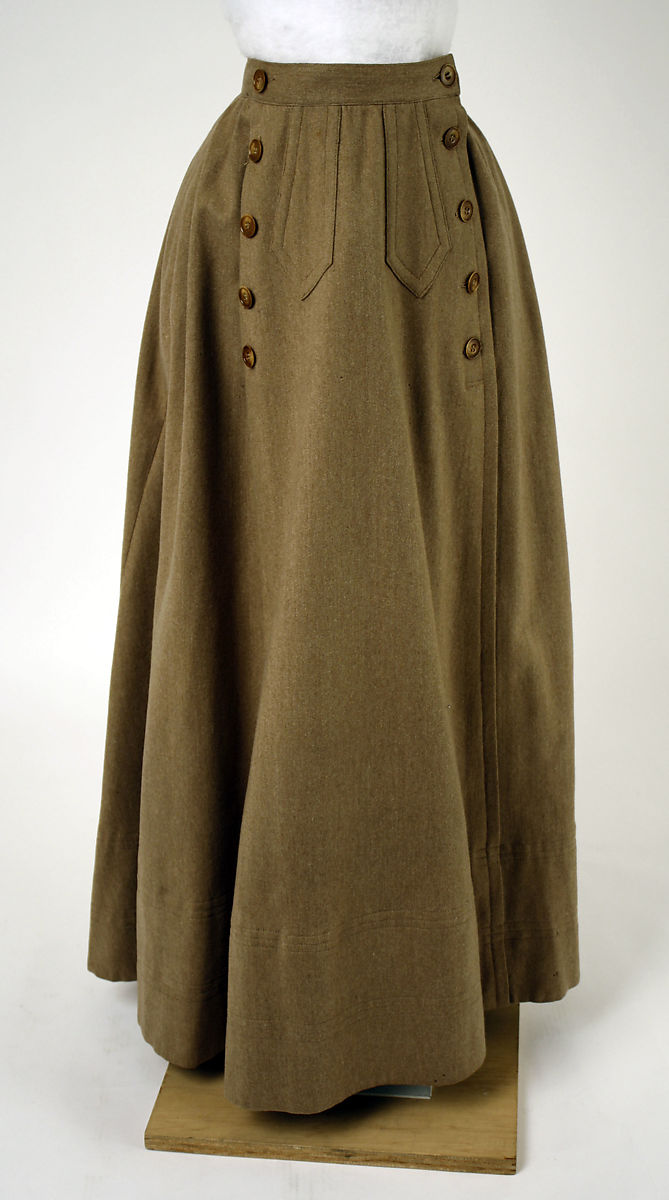
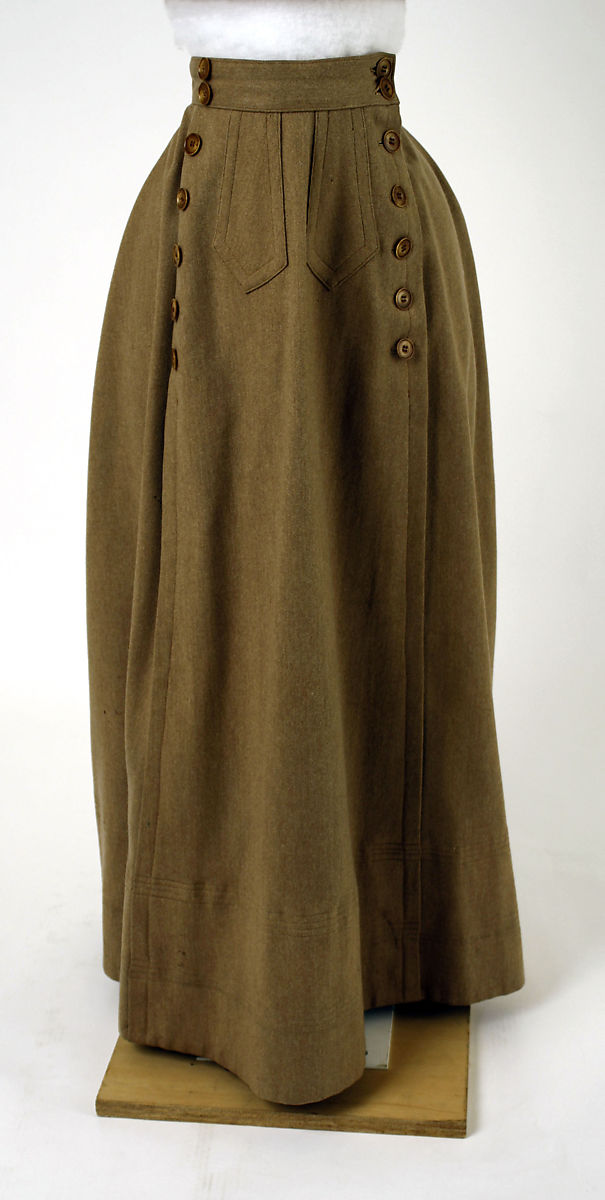
During the pattern buying spree of 2020 (that rhymes!), I also got Black Snail Patterns #0714 Bicycle Skirt about 1900. At some point when the corona lockdown wasn’t as bad as it was now, I’d purchased 5-6 meters of a sand coloured (no, it’s beige but I hate that word) fabric. I think it might be a sort of twill, but I’m not certain at all. I’d also found some sand and white checked fabric that I thought would work well for a blouse to go with the thicker twill stuff. While the paper pattern has been cut out for a while now, getting started on it proved to be a little more difficult.
Back
Side
Pocket
Front
Eventually, however, I managed to get going and once I did, the thing was done in three days. I chose to make the third size but once I’d cut it out and was measuring everything, I got scared and wanted to have some more space in the waist. So I moved all the markings on the side – front seams over by a centimeter. The seam allowance was 2 centimeters so that wasn’t too big of an issue. I think that this was probably a good call as I can now wear the skirt without foundation garments too. I also took 8 cm out of the hem and disregarded their instructions for the spacing of the hem-stitching. Most of it was sewn on the treadle, with certain bits being hand-sewn on.
Buttonholes and decoration
Button stitching
Back decorations and bar tack
The appliques where sewn on using a thicker thread, the same that was used for the hand-worked buttonholes. I’m very proud of these. It was the first time making a keyhole opening for the buttons and using a technique that actually seemed to work. I also used it to secure the buttons in an aesthetically pleasing manner. The buttons on the left are functional for putting the skirt on and the ones on the right are just decorative. There is one pocket in the skirt and this sits on the right side. Once I’d finished it and put my phone in the pocket, the entire skirt pulled out of alignment and I decided that I needed to add a pocket-holding strap. That’s since solved those issues entirely.
Pockets and insides
Hem stitching
I’m fairly certain that this thing is based of a Cycling Ensemble in the Metropolitan Museum of Art, from around 1900. Otherwise it’s an incredible coincidence… The details seem to fit even if the actual seamlines might differ a little. The Met version also has a friend which is so similar that I actually had to look very carefully to spot any differences. The only real obvious changes I can find is that the second one has more buttons? I have made my very first bicycle test drive with this skirt and it seemed to work very nicely. I hope to get some wear out of it and finish a nice blouse to match.
Using the bits discarded from a previous project to make a quick and easy petticoat turned out to work quite well.
The Edwardian Adventure (previously here, here and here) continues with the petticoat. There is no real reference for this petticoat. It’s literally just the lining that was cut out of the purple skirt, with an added bit along the bottom. The waistband is some made up weird construction of two bits to tape sewn together along the top. There’s a hook and eye at the end, and there’s a little bit of overlap. I think I had a brilliant idea about that at the time, but I have forgotten what it was, so it might not have been that brilliant.
Front
Side
Back
The bottom is finished with a very long strip of the same fabric, gathered down to make a ruffle of sorts. I pressed it, stupidly, which means that it is not nearly as ruffly as I would have liked it to be. However, it does do its job.
Waistband
Closure
Flat gathers
A while ago, I was feeling eccentric and decided to walk to the supermarket while wearing the purple skirt, those low heels from the pictures, my red coat, and the dragon. While walking there, I kept hearing some strange noises. Turns out that the hem was actually hitting the pavement.. With the petticoat underneath, I no longer hear noises when I walk about. I call it a success!
The Edwardian outfit is extended by a purple fan skirt.
The next part of my Edwardian outfit was a purple fan skirt. I used another pattern by Black Snail Patterns, #0414 Fan-Skirt about 1890. I felt this was probably similar enough to make do for 1900-1910ish times. It’s basically one front piece and two ENORMOUS back pieces, a waistband, placket and pockets. The instructions say to flatline the outside fabric, so I cut out the giant pieces from a purple/black striped fabric and from a white poly-cotton stuff. Followed the rest of the instructions and sewed it together, wrangling this enormous heap of fabric. After essentially getting winded from sewing a single seam, I decided that it might be time to weigh the whole thing; 1.5 kilos, oof. That was too much. I kept 30 cm of the cotton stuff around the hem, stuck it down with steam-a-seam and cut out all the rest, essentially having to remake my skirt again.
Placket and pleat
Skirt circumference
It’s got a giant inverted pleat in the back, and closes with a placket and hooks/eyes. I chose to do the subtly pointed waistband (because I love pointed waistbands). This pattern actually includes pockets! As no good skirt is without pockets, I really appreciate that. These ones are a little deep though, I’m not sure I can reach the bottom of the pockets while standing straight. At least that means that I might not need a backpack… The hem is so large that it took me three episodes of Crime Scene Investigation to hand sew it down. I think I may also need to make the bustle pad that is included with the pattern, that would make the back stick out a little more.
Front
Side
The waistband is based on a corseted waist, which means that it’s not too nice to wear without. However, wearing the corset is nice because it distributes the weight. The one remark I have about the pattern is that I didn’t understand the dart in the front. It looked to me that I was supposed to cut it on the lines. That doesn’t seem to be the case, however, since the waistband didn’t fit when I did that. I tried it on the flatlining fabric first, and then decided not to cut the dart on the outside fabric. I still have the pieces of the flatlining that were cut out, so I think I’ll try to make a petticoat from them – I have been thinking that for a few weeks and still haven’t started on that…
Getting started (again) on corset making, this time an S-bend from the Edwardian era.
The combinations from last time weren’t actually finished yet when I started the main part of the project, an S-Bend corset. I googled for a while and then found a pattern by BlackSnailPatterns #1015 Edwardian Straight Front Corset, which I purchased from Etsy. I also got two Victorian/Edwardian skirt patterns at the same time, but you’ll hear about at least one of those later.
I set out to make a mock-up from some green canvas type stuff. Put a separating zipper in the front and used zip ties for the boning. I put on the first draft and it was very crooked. It’s unclear to me why this was the case. Options include: 1) I’m just crooked, 2) the stiffer boning channels on the one side pushed the front askew, 3) I sewed something wrong? Anyway, it stayed a little crooked in all my fittings. However, the lacing gap in the back seemed accurate enough, while the waist was a little bunchy. I made another mock-up in a size smaller but that was a Bad Idea™ and I quickly reverted to the original size. I then decided to remove half a cm from the waist and that seemed to do the trick.
Mock-up
Not fully flossed yet
After getting hold of some coutil from the UK, I cut out the pattern and got sewing (on the treadle!). This coutil stuff is so weird, it honestly felt like handling cardboard… Anyway, this is a single layer corset with boning channels made from the same coutil and a waist stay. There are two metal bones on either side of the lacing and five synthetic whalebone bones per side. It’s finished with some white bias tape along both top and bottom and some lace along the top. The pattern indicated that the first two bones needed flossing to keep them in place. Flossing is the name for additional stitches that anchor the bone and also serve a decorative purpose – the stuff in blue below.
The flossing along the vertical measures the same from bottom pin to top pin for all synthetic bones.
The flossing along the wider metal bones has an additional stitch.
Because the fabric is so very tightly woven and stiff, it’s hard to push your needle though without completely bending it. So I took a different approach and pre-punched holes with pins. In order for the flossing to stay similar along all bones, I used pins in different colours so that I was sure to go from one hole to the next correctly. From yellow to yellow, red to red etc. Depending on the slant of the bones, the flossing points in a different direction.
Inside
Outside
You might see that the bones in the front end before the end of the boning channel. This does make sitting a lot easier and is why the flossing was required. I finished the flossing on the first two bones quite early and then got to sewing on the lace along the top. After that was hand-sewed on, I added the same blue ribbon as in the combinations. I can tie the ends into a bow and it looks very cute. If I do say so myself. The aim of this type of corset is to create a straight front and to allow the butt to stick out. This is to do with the ideal shape in the 1900’s. Mine’s not as pronounced because I’m not using any padding whereas true Edwardian people would most definitely have done so.
Front
Side
Back
This pattern is also based on more modern bodies and therefore doesn’t exaggerate the shape nearly as much as an authentic Edwardian S-Bend corset would. After finishing a mock-up of this one, I made a mock-up of an original S-Bend from Corsets and Crinolines, which was way too big at the top and way too big at the bottom. But I might finesse it to fit me without padding by taking out a whole panel and taking in the hips a little. There isn’t much space between the last of my ribs and the top of my hip bones, which also means that my body literally cannot compress as much in the waist as would sometimes seem ideal. This thing reduced my waist measurement by 4 cm compared to normal. I wished in the past that I had a more squishable middle, but I’ve given up on that and I can’t be bothered by it too much anymore.
Next up, the skirt (which is wrong, it should have been a petticoat, but that isn’t finished yet…)
Active filters:
Category
Tag
Post Type
·
No results found. Try a different search.
No results match these filters. Try clearing some, or searching for something else.
No results match these filters. Try clearing some, or searching for something else.