Empire Skirt

Wearing a 1900s skirt in 2022

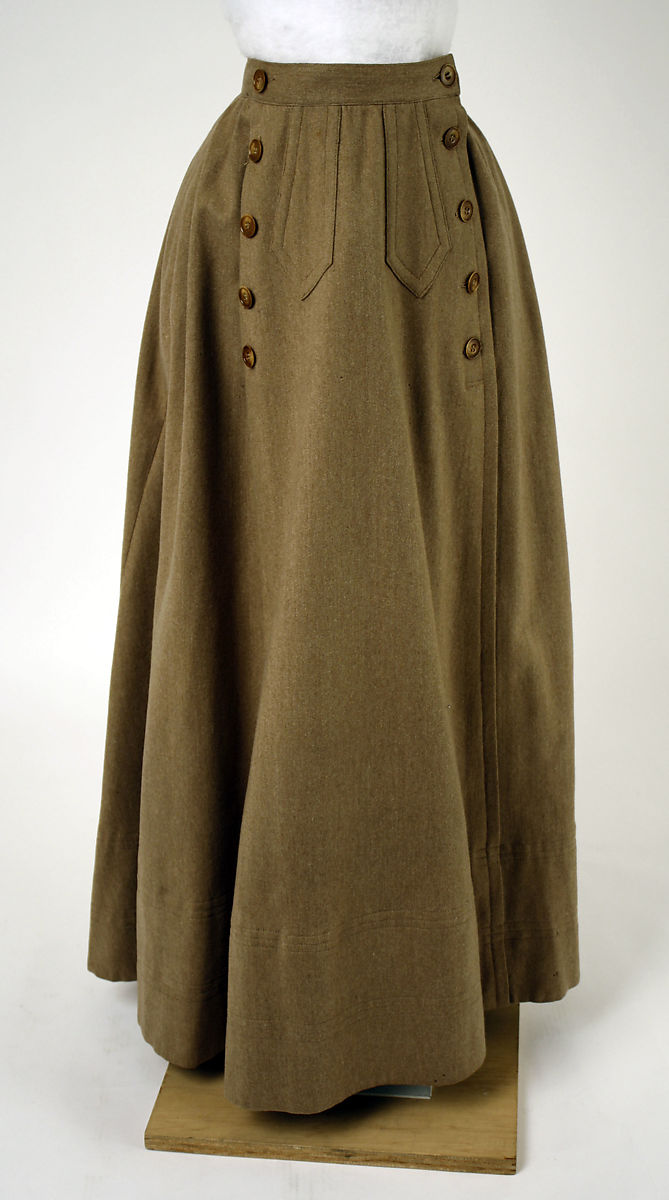
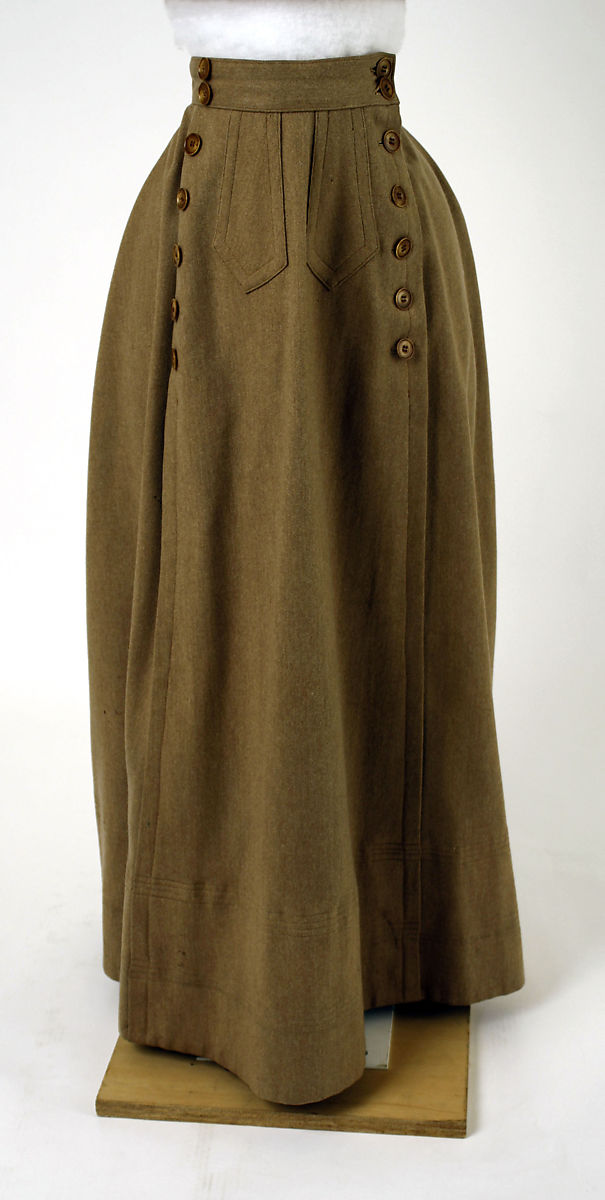
A while ago, I found an image on Pinterest of the ‘Keursrok’ or corseted skirt from an old Dutch book called ‘Ik kan kostuumnaaien’ by Henriette J. van Wessem. I searched all over for that book and most of the time didn’t find or find quite expensive versions. I yet again ran a google search for it some day and lo and behold, there now was a digital version available! It is the 1908 version of the book and is available on Delpher. I had already found a physical copy on an auction site, put in an offer and forgot all about it, so I now also own a physical copy of the book.

Based on the mostly legible image of the keursrok in the book (page 142), I drew out the pattern as is on grid paper. The pattern indicated a waist of approximately 66 cm, which I figured was close enough to mine if I added enough seam allowance. I made a mock up of only the top part and made quite a few changes. Contrary to Edwardian bodies, my waist and underbust measurements are the same, so I had to remove a lot of the flare at the top of the skirt. I’m also short, so I had to take off some height. The side back part was really wrinkly, so I played around a lot with that and ended up with something that fit better.

The skirt pattern was cut from some 2 euro/meter wool fabric (I don’t know, Utrecht fabric market is weird) for the outside and I wanted to interline it with some cotton and chose some dark brown as that was what I had in the stash. After basting the different layers together, I picked it up and promptly started removing all my basting again. The thing was way too heavy for comfort. I settled on adding the mock up as a lining for the top part only and attached some rigilene to it in lieu of boning. I did use some of the brown in the deep hem.

I pinned it up on my mannequin to hang and droop as the full skirt is basically half a circle and might sink a bit on the bias. The length of the skirt was taken up and I had to remove so much. People from 120 years ago may have been a little shorter, but clearly not as short as I am. While the modern zipper wasn’t invented yet in the early 1900s, it was much easier to install one of those than the faff around with hooks and eyes in the crook of my back. So I settled for an invisible zipper, which is really quite invisible this time around.

I also added pear-shaped pockets to the seams between the two side panels because I don’t think skirts are wearable without pockets. Normally I also add belt loops, but since this one doesn’t have a belt or waistband, I added a little loop to the right pocket for my keys. While I started the project in October, I only finished it yesterday. There was so much procrastination happening the last couple of months. However, to celebrate the thing being finished, I wore it to work today and it held up great! The pockets work, the boning isn’t so aggressive that I can’t wear it for a full day, and I feel lovely and swooshy in it! I call it a success!

Norah Waugh’s 1901 Corset

The first steps towards a 1902 Wedding Dress in the collection of the V&A. The Corsets and Crinolines 1901 corset pattern.

Sometimes I find an image and just think: I want to have it. That was the case with a 1902 Wedding Dress by Houghton & Dalton that I found in the collections of the V&A. Of course owning the original isn’t truly something I would want, but I have started thinking about how to replicate it based on the seven images from the V&A.

The first steps included finding fabric and starting work on the underpinnings. Those underpinnings are the topic of today. I decided that I wanted another early Edwardian corset because the Black Snail one doesn’t really feel like it allows enough room for the displaced fleshy bits to go. I’d looked at Norah Waugh’s Corsets and Crinolines before, and the 1901 corset in there seemed like it would provide more space. Then I remembered that Ralph Pink had a free hip curve corset available that looked an awful lot like the Norah Waugh one, so I used their pattern pieces.

I’ve made a mock-up before and decided to lengthen the top by 2 cm and shorten the bottom by 2 cm, but those were the only changes I made. For the first attempt, I used a curtain fabric that was the later also used for the pouf. This stuff did not iron down well at all and with the ridiculous amount of seams going on in the corset, it made some weird bumps. So I tried again, cut out all the white coutil, and then found some off-white silk in the local fabric shop that I decided to splurge on. Having never used silk before, I was happily surprised by how much flatter it got than the original fabric I tried.

The boning channels were guessed at (that diagram in C&C makes very little sense.. there are some bones that are differently placed on the front vs the back view) and then created by sewing the two layers together. Next, I had a hell of a time putting the bones through because there were so many seamlines crossed. Some real curses were thrown out. Lastly some vaguely matching bias tape was sewn to the inside and whipped to the outside. From the last corset I learned that hand sewing through coutil is a real pain in the butt, so I did it in reverse.

This part, the corset stage, is now mostly finished. Couple of things that are still bugging me a bit. Should I have added the garter things to the front? Is the busk not stiff enough? It is a bit bendy now. And lastly, did I make it too big, it almost closes in the back, which I did not expect. It does definitely require some more wearing before it’s truly comfortable, I think. For now, I’m going to gather the courage to actually start making the pattern for that V&A wedding dress. Hopefully that’ll manifest soon!

Second Combinations

Always good to finish a project that has been hanging out in the sewing box since last year.

In my first post about Edwardian combinations, I talked about a pattern drafted from the American System of Dressmaking that I hadn’t gotten to work for me. It’s been hiding in my box of projects since that time and I recently decided to finally get it done. Main reason being that I want to empty the project box, with added benefit of ending up with combinations with wider straps. The other combinations have straps that keep slipping off my shoulders which is quite annoying. So I set to work.

I had the top mostly finished and was mainly stuck with attaching the leg pieces. To start, I added some buttons and buttonholes to the top.Then I sewed down the facings that I’d already made for the legs. I grabbed Tropical and started pinning some pleats into the legs that I already had. In the end, I cut a 15 cm high triangle of the top of the back leg pieces because it just wouldn’t work as drafted. Then I needed to finish the bottom of the legs and decided to grab all the cut offs from the first set of combinations and a bit of lace. I wouldn’t be able to use those for anything else and I didn’t want to throw them away. The length of the bottom ruffle was determined by the length of the bottom lace. The transitions between different sections of fabric were made using some more of the triangle insertion lace.

This thing was effectively one big problem solving mess. I needed to add insertion lace to the top because it was just too small, so that’s why there is some on an angle and in the back. The original pattern for the drawers created such a weird shape that I couldn’t get it to do what I wanted at all, so I had to cut bits off. I would normally gather those legs to the top, but it was easier to do pleating as I wasn’t sure where the end of the legs would even go. It took some head scratching, but I’m very glad I finally got it finished and my project box that little bit more empty.

Corset Cover

The corset cover with mistakes at every turn. Luckily you can’t see those on the outside.

Sometimes simple projects take for ever to finish. I’m not sure what my issue with this one was, but it took me many a day and many a night to get myself into gear enough to get this little cover finished. I seemed to make it difficult for myself at absolutely every turn.

It of course started with deciding on a pattern. This took weeks, maybe even months, depending on how you count. I’d been sort of looking ever since I finally chose the blouse pattern. In the end I settled on the Wearing History E-pattern of a 1910’s Camisole or Corset Cover. I want to stay in the 1900-1908 with my Edwardian project, but this thing claimed it could work for before 1910’s so I decided it would do. Printed it out, taped it up and cut out the size 28 waist.

For fabric, I chose a white fabric with tiny leaves that I also used as the lining for my plaid jumpsuit (I still love that jumpsuit). I didn’t have a lot of that fabric so I figured that corset covers didn’t need much and it was a good way to use up scraps. I chose to cut it with peplum but without sleeves. So far so good. Now came the bad choices. It started when I sewed the bodice together and only then determined that I needed to finish the seams. I agonized over that and in the end decided to double fold the seam allowances (that were quite large) over and stitch them down. Ok, that turned out well.

Then, in my infinite wisdom, I decided to only sew the row of gathering stitches along the edge of the body and forget the one about an inch above. This was a problem because sewing gathering stitches evenly is much easier when the fabric is flat. However, I skipped that step and went to gather the bottom and attach the peplum to the inside of the waist. Next, I stitched a line at the seam allowance of the outside of the peplum and folded it over using the iron. However, sewing single layer had shortened the peplum so it wouldn’t fit into the waist anymore. I had to take my thread back out again. Luckily it stayed nicely folded over. Then I positioned the lace on top of the outside peplum on top of the regular peplum seam and sewed that down. Because this meant invisible sewing, it’s not neat on the inside, but it’s sewn down and that’s all that matters right? The top of the lace still needed to be attached, so I had to hand sew gathering stitches as there was no way to do that by machine anymore. I did manage to get it done.

Next I needed to figure out how to finish the armholes and neckline. The pattern called for beading lace, so I went to get some and didn’t get enough. I also didn’t love it enough to go back. So I gave up, cut 3 cm wide bias tape from some scraps and folded one edge in by a centimeter. I then attached the bias to the outside of the armholes and neck edge, stitched it down and turned it all inside and stitched it down again – effectively creating tunnels. I sewed little eyelets in the top of the neck for a drawstring and once completed, figured out I made them in the wrong spot. With an overlapping button band, you cannot put two exits on the same side where they overlap. It won’t work. So I made another eyelet at the back of the overlap. I’m calling the useless one a Design Choice.

Now the cover was mostly done, just the buttons and buttonholes to do. Cue days of staring at the thing as if it had done something wrong. Eventually I came up with another solution. I grabbed some of the tiny bit of ladder tape that I had left and created an ‘invisible’ placket. In built buttonholes, so no fiddling about with that. Adding the buttons to the other side went fine. They are spaced 5 cm apart. Then I tried it on and it gaped at the bottom. Solution, attach two ribbons so you can tie the bottom together. It might not be pattern but it works.

If you choose to make this, please don’t use my terrible construction as a guide. Think ahead and choose one of the countless methods that are faster and actually nice. I may have to make another just to prove that to myself..

5 Minute Hair Accessory

Sometimes you just have to impulsively make a 1900s hair accessory, I guess.

After waking up with something resembling curls this morning – damp hair twisted into buns on top of my hair had that effect – I decided to try a new hairstyle. ‘New’ might not actually be the right term as it was inspired by the turn-of-the-previous-century styles. What extensive Pinteresting and YouTubing in the past has taught me is that you need a hair rat. That rat can then give you the kind of extra volume around the crown of your head that is needed for the look. I did not own a hair rat, so I set of to make one.

In came my stash of old pantyhose and tights where I grabbed a black one. Since my hair is dark brown with grey, I figured black would be easiest to camouflage with the hair I have. I used about 70 cm of a tights leg, stuffed it and sewed the ends together. This turned out way too big, my hair could not cover that amount of tight. So I wandered over to the treadle and zigzagged a seam about 4.5 cm from the edge. Turned it right side out and started stuffing it again. This attempt was better, but because I have bangs, there is much less hair at the front of my head and the coverage was scarce at best. So I took out almost all the stuffing, just leaving the ‘seam allowance’ (i.e. half the width of a tights leg) of the front 12 cm section. This worked wonderfully well.

I walked around with the tights on my head for most of the day, taking a sweater off too a couple of times. Edwardians seem to love the messy look, so that wasn’t a problem. For the majority of the day, there was just a hair tie on the bun and nothing else. After a while, I added a few pins to the back of my head to keep some strays up. Is it historically accurate? I doubt it with polyfill innards. Does it get the job done? Yes it does, especially when you would add a hat. All in all, a successful spur of the moment project!

Cycling Skirt

Making a turn of the century bicycle skirt for the non-car owning people among us.

During the pattern buying spree of 2020 (that rhymes!), I also got Black Snail Patterns #0714 Bicycle Skirt about 1900. At some point when the corona lockdown wasn’t as bad as it was now, I’d purchased 5-6 meters of a sand coloured (no, it’s beige but I hate that word) fabric. I think it might be a sort of twill, but I’m not certain at all. I’d also found some sand and white checked fabric that I thought would work well for a blouse to go with the thicker twill stuff. While the paper pattern has been cut out for a while now, getting started on it proved to be a little more difficult.

Eventually, however, I managed to get going and once I did, the thing was done in three days. I chose to make the third size but once I’d cut it out and was measuring everything, I got scared and wanted to have some more space in the waist. So I moved all the markings on the side – front seams over by a centimeter. The seam allowance was 2 centimeters so that wasn’t too big of an issue. I think that this was probably a good call as I can now wear the skirt without foundation garments too. I also took 8 cm out of the hem and disregarded their instructions for the spacing of the hem-stitching. Most of it was sewn on the treadle, with certain bits being hand-sewn on.

The appliques where sewn on using a thicker thread, the same that was used for the hand-worked buttonholes. I’m very proud of these. It was the first time making a keyhole opening for the buttons and using a technique that actually seemed to work. I also used it to secure the buttons in an aesthetically pleasing manner. The buttons on the left are functional for putting the skirt on and the ones on the right are just decorative. There is one pocket in the skirt and this sits on the right side. Once I’d finished it and put my phone in the pocket, the entire skirt pulled out of alignment and I decided that I needed to add a pocket-holding strap. That’s since solved those issues entirely.

I’m fairly certain that this thing is based of a Cycling Ensemble in the Metropolitan Museum of Art, from around 1900. Otherwise it’s an incredible coincidence… The details seem to fit even if the actual seamlines might differ a little. The Met version also has a friend which is so similar that I actually had to look very carefully to spot any differences. The only real obvious changes I can find is that the second one has more buttons? I have made my very first bicycle test drive with this skirt and it seemed to work very nicely. I hope to get some wear out of it and finish a nice blouse to match.

Very White Blouse

Part of the Edwardian plan was a plain shirtwaist. This back-buttoning blouse is the result of the plan.

The Edwardian Endeavour is still going on. I’m not aiming for true historical accuracy and am slowly making all of the parts of the full outfit. This means that I also required some clothing to cover the top half of me. Off to the google I went and eventually discovered the Beatrix Shirt Waist Pattern from Sense & Sensibility Patterns. I purchased it, got to work on the printing and started with some white fabric. I chose to make a size 14, back closing, front gathered, long-sleeved shirtwaist. Fiddling with the front top edge took about 15 centuries, because I originally wanted to pleat it to this example. However, I couldn’t get it to work without having to recut the pattern, so I decided to leave that until next time. Took it in along the side seams and shoulders and figure that I should make a size 12 next time.

I looked at my stash of buttons and decided on a small yellowish button. Added two along the bottom edge of the sleeves and 18 along the back. I had 20 in total so that worked out perfectly well. The buttonholes are all hand-worked, which took absolutely forever, as you can imagine.

Next to the buttons there are two straps to tie the blouse in front, allowing some blousing to happen over the skirt. I actually really like it. I did place the straps about 2 centimeters further down than the pattern indicated. The pattern seems to work pretty well, it has lots of options, of which I’ve only tried this one. I do expect to make another version of this – front closing this time. Reason being that back closing means that I need to do an actual workout when trying to put it on. I need to undo four buttons to get it over my head and then trying to do them up slightly out of reach while wearing a corset and other associated layers is difficult!

The things left for this outfit include making a corset cover and a hat (maybe), however next up, a cycling skirt!

Purple Skirt

The Edwardian outfit is extended by a purple fan skirt.

The next part of my Edwardian outfit was a purple fan skirt. I used another pattern by Black Snail Patterns, #0414 Fan-Skirt about 1890. I felt this was probably similar enough to make do for 1900-1910ish times. It’s basically one front piece and two ENORMOUS back pieces, a waistband, placket and pockets. The instructions say to flatline the outside fabric, so I cut out the giant pieces from a purple/black striped fabric and from a white poly-cotton stuff. Followed the rest of the instructions and sewed it together, wrangling this enormous heap of fabric. After essentially getting winded from sewing a single seam, I decided that it might be time to weigh the whole thing; 1.5 kilos, oof. That was too much. I kept 30 cm of the cotton stuff around the hem, stuck it down with steam-a-seam and cut out all the rest, essentially having to remake my skirt again.

It’s got a giant inverted pleat in the back, and closes with a placket and hooks/eyes. I chose to do the subtly pointed waistband (because I love pointed waistbands). This pattern actually includes pockets! As no good skirt is without pockets, I really appreciate that. These ones are a little deep though, I’m not sure I can reach the bottom of the pockets while standing straight. At least that means that I might not need a backpack… The hem is so large that it took me three episodes of Crime Scene Investigation to hand sew it down. I think I may also need to make the bustle pad that is included with the pattern, that would make the back stick out a little more.

The waistband is based on a corseted waist, which means that it’s not too nice to wear without. However, wearing the corset is nice because it distributes the weight. The one remark I have about the pattern is that I didn’t understand the dart in the front. It looked to me that I was supposed to cut it on the lines. That doesn’t seem to be the case, however, since the waistband didn’t fit when I did that. I tried it on the flatlining fabric first, and then decided not to cut the dart on the outside fabric. I still have the pieces of the flatlining that were cut out, so I think I’ll try to make a petticoat from them – I have been thinking that for a few weeks and still haven’t started on that…

S-Bend Corset

Getting started (again) on corset making, this time an S-bend from the Edwardian era.

The combinations from last time weren’t actually finished yet when I started the main part of the project, an S-Bend corset. I googled for a while and then found a pattern by BlackSnailPatterns #1015 Edwardian Straight Front Corset, which I purchased from Etsy. I also got two Victorian/Edwardian skirt patterns at the same time, but you’ll hear about at least one of those later.

I set out to make a mock-up from some green canvas type stuff. Put a separating zipper in the front and used zip ties for the boning. I put on the first draft and it was very crooked. It’s unclear to me why this was the case. Options include: 1) I’m just crooked, 2) the stiffer boning channels on the one side pushed the front askew, 3) I sewed something wrong? Anyway, it stayed a little crooked in all my fittings. However, the lacing gap in the back seemed accurate enough, while the waist was a little bunchy. I made another mock-up in a size smaller but that was a Bad Idea™ and I quickly reverted to the original size. I then decided to remove half a cm from the waist and that seemed to do the trick.

After getting hold of some coutil from the UK, I cut out the pattern and got sewing (on the treadle!). This coutil stuff is so weird, it honestly felt like handling cardboard… Anyway, this is a single layer corset with boning channels made from the same coutil and a waist stay. There are two metal bones on either side of the lacing and five synthetic whalebone bones per side. It’s finished with some white bias tape along both top and bottom and some lace along the top. The pattern indicated that the first two bones needed flossing to keep them in place. Flossing is the name for additional stitches that anchor the bone and also serve a decorative purpose – the stuff in blue below.

Because the fabric is so very tightly woven and stiff, it’s hard to push your needle though without completely bending it. So I took a different approach and pre-punched holes with pins. In order for the flossing to stay similar along all bones, I used pins in different colours so that I was sure to go from one hole to the next correctly. From yellow to yellow, red to red etc. Depending on the slant of the bones, the flossing points in a different direction.

You might see that the bones in the front end before the end of the boning channel. This does make sitting a lot easier and is why the flossing was required. I finished the flossing on the first two bones quite early and then got to sewing on the lace along the top. After that was hand-sewed on, I added the same blue ribbon as in the combinations. I can tie the ends into a bow and it looks very cute. If I do say so myself. The aim of this type of corset is to create a straight front and to allow the butt to stick out. This is to do with the ideal shape in the 1900’s. Mine’s not as pronounced because I’m not using any padding whereas true Edwardian people would most definitely have done so.

This pattern is also based on more modern bodies and therefore doesn’t exaggerate the shape nearly as much as an authentic Edwardian S-Bend corset would. After finishing a mock-up of this one, I made a mock-up of an original S-Bend from Corsets and Crinolines, which was way too big at the top and way too big at the bottom. But I might finesse it to fit me without padding by taking out a whole panel and taking in the hips a little. There isn’t much space between the last of my ribs and the top of my hip bones, which also means that my body literally cannot compress as much in the waist as would sometimes seem ideal. This thing reduced my waist measurement by 4 cm compared to normal. I wished in the past that I had a more squishable middle, but I’ve given up on that and I can’t be bothered by it too much anymore.

Next up, the skirt (which is wrong, it should have been a petticoat, but that isn’t finished yet…)

Edwardian-esque Combinations

A pair of Edwardian-esque combinations with lace and blue ribbon.

I became somewhat obsessed with early-ish Edwardian underwear lately. I’m not sure how it happened, but I did decide that I wanted to make an S-Bend corset. Now, what I’ve learned from following all kinds of historical and costume sewists in blogs and on YouTube, is that one does not wear a corset on bare skin. So off I went to make a pair of combinations. A pair of combinations, in this case, is a set of open-crotch drawers connected at the waist to a top of some sort. I’d been googling and reading a lot of projects from other people including Sew Historically and Amelia Marie. Next to that, looking at images on Pinterest, collected here.

Eventually I got to work using the book Amelia Marie recommened, The American System of Dressmaking. I had a lot of attempts, first to try and draft the top (which did not work as planned as it was too small), then I drafted a pattern from a few pages earlier which I haven’t gotten to work yet (still working on it). Next I did use the drawers pattern from page 502, but increased it along the back and raised the ‘crotch point’ up by a decent amount. I cut out my original top draft from about armpit level down and added more width to the sides. Once it was mostly sewn together, with some ladder lace along the waist, and a lace with holes along the top and insertion in center back, I needed to decide on the legs. I chopped off about 10 centimeters and added a ruffle of about 10 cm with lace at the bottom and ladder lace at the top. The center front has a facing and then hand worked buttonholes and mother of pearl buttons. The majority of the project was sewn on my treadle sewing machine (I love that thing!).

Normally one of these would be worn directly on the skin, but with the sheerness of the fabric, I did not want to expose the internet to that.. So I wore a black camisole and underwear underneath it. It’s really quite comfortable to walk around in and I do understand why ladies wanted to wear open crotch underwear under their corsets now. Still the overlap ‘covers’ enough that it’s ok to sort of wear it. Not outside by itself mind you. I also used blue ribbon in most of the lace with holes so that it could theoretically also count for ‘blue things’.

Next, the corset.