Injuries and armour

I’m going to try to make myself an armour. A soft leather armour corset thing. I found some skai, took a meter of it home and found some pictures online that would hopefully give me a nice idea. At the place where I got the skai, I also got some stretchy fabrics that I’m planning on using soon.

I was trying to work with some of that fabric (fleece) and my machine kept skipping stitches. I learned a lesson that day.. Make sure you turn your machine off, or at least keep your foot of the pedal when you put your fingers under the needle..

Finger

You probably can’t see it very well on that picture, but the left arrow is pointing to the entry point of my sewing machine needle, and the right to the exit point of said needle. Needless to say.. it HURT! A lot! It happened about 1.5 week ago, and while it doesn’t really hurt anymore, my finger feels weird still. Luckily this was the first time it happened in about.. 10 years? I’m planning on never having it happen again.

So, back to the armour.. I attempted this pinterest thing again (I fail) but at least it saves my pictures. Here you can find my pins (I hope).  I have two now that I’m basing my design on. The left and the right, the middle one, with the straps, I’m not liking as much. The skai has a white back, so I’m using some black denim like stuff as an under layer to stitch the skai on. I made the black body and then cut out the pieces. I only needed a very small amount of skai:

Skai

I have way over half left, so I haven’t got a clue yet what I’m going to do with it. I also purchased some black thread and hope to pursue this project further soon. I’m now also working on finishing that blue coat that you’ve been hearing about for ages. Finishing one sleeve and adding two buttons, that’s all that’s needed. I’d better go back to that now.. Happy creative activities to you all!
Productivity, 3.

The other thing I made was a skirt. I already spoke about the larp event we are organising. I quite like to have costumes for that sort of thing, even if I’m not playing myself. However, a month later (beginning of May) there is an event where I will be playing. In case my current character decides to die (or just dies) I would like to have a backup character ready to step back in again.

So while I was at school trying to work on my thesis, I decided to take a break and google for a larp-staff. A piece of equipment I have been wanting to own for years, however, the only ones available are.. well.. ugly. I don’t like them at all. Then, a miracle happened, I founded something I liked! Or at least, liked a lot more than all the other ones out there. It can be found here. Now, the only thing I didn’t like were the metal caps around the bottom. I got a custom order and they will make me one without the caps. It all went fairly smoothly and they are very friendly at Skian Mohr.

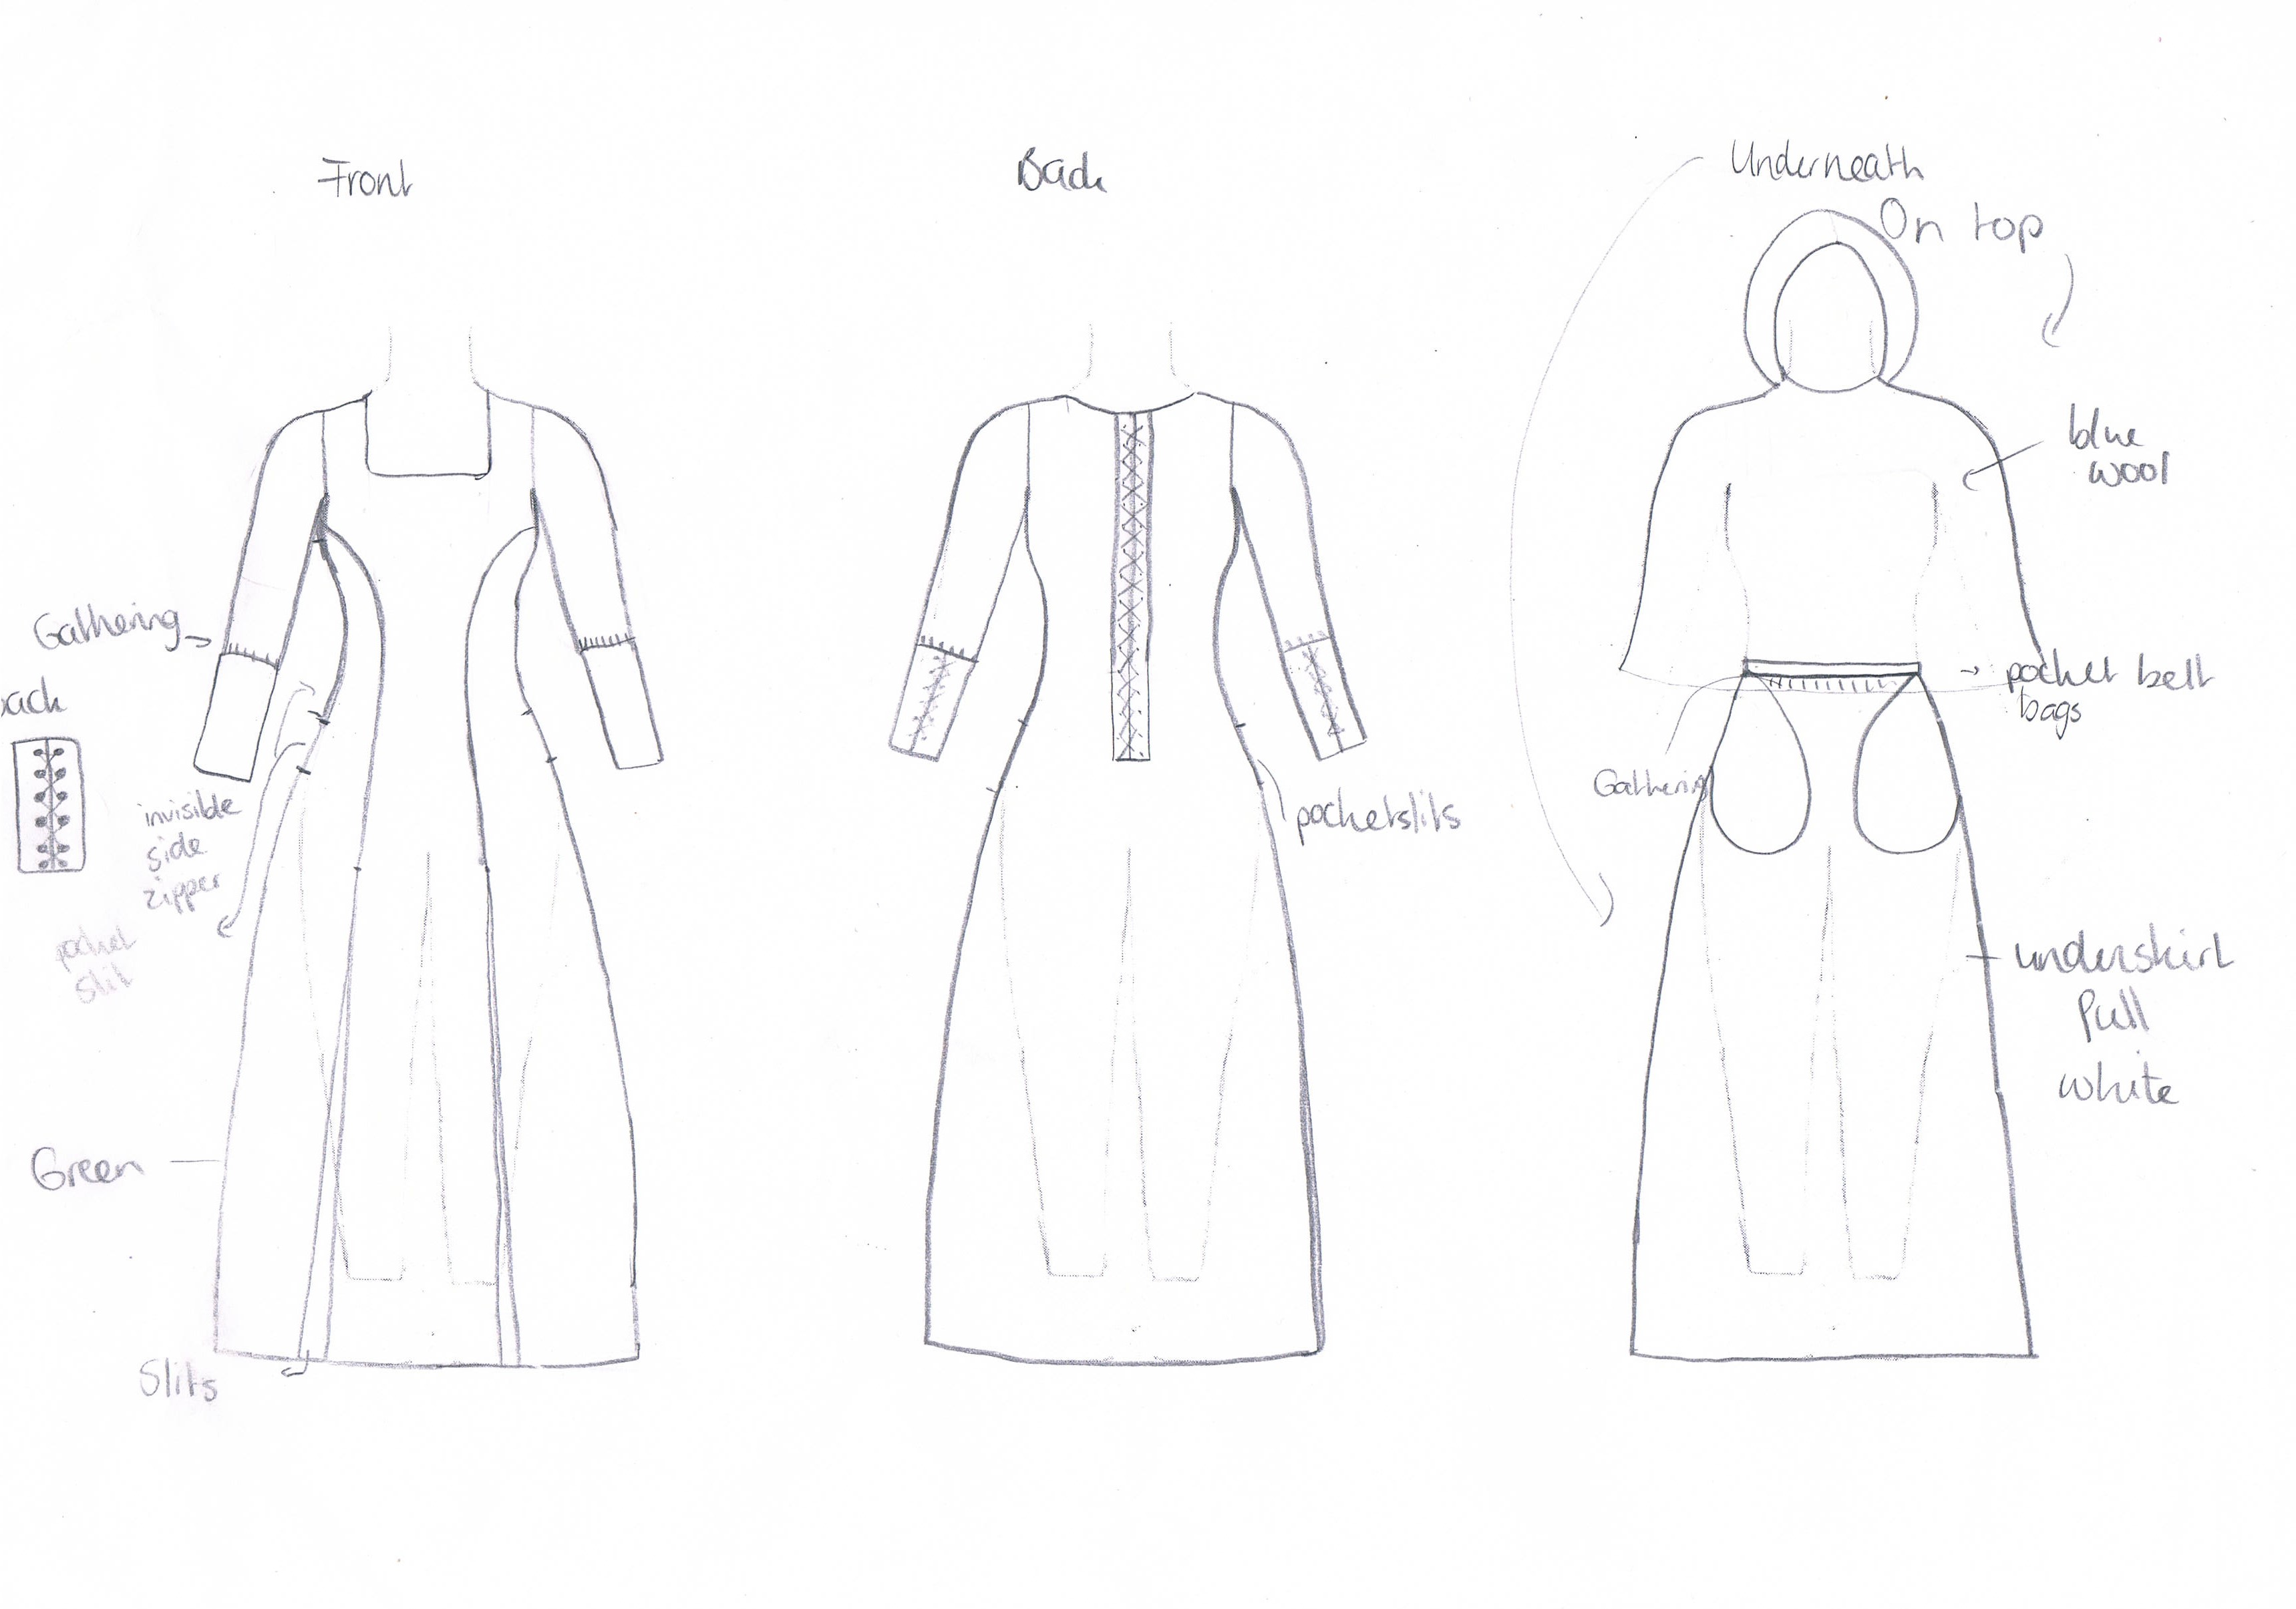
Next, I needed a new costume (of course) so I drew one out:

Fighterdress

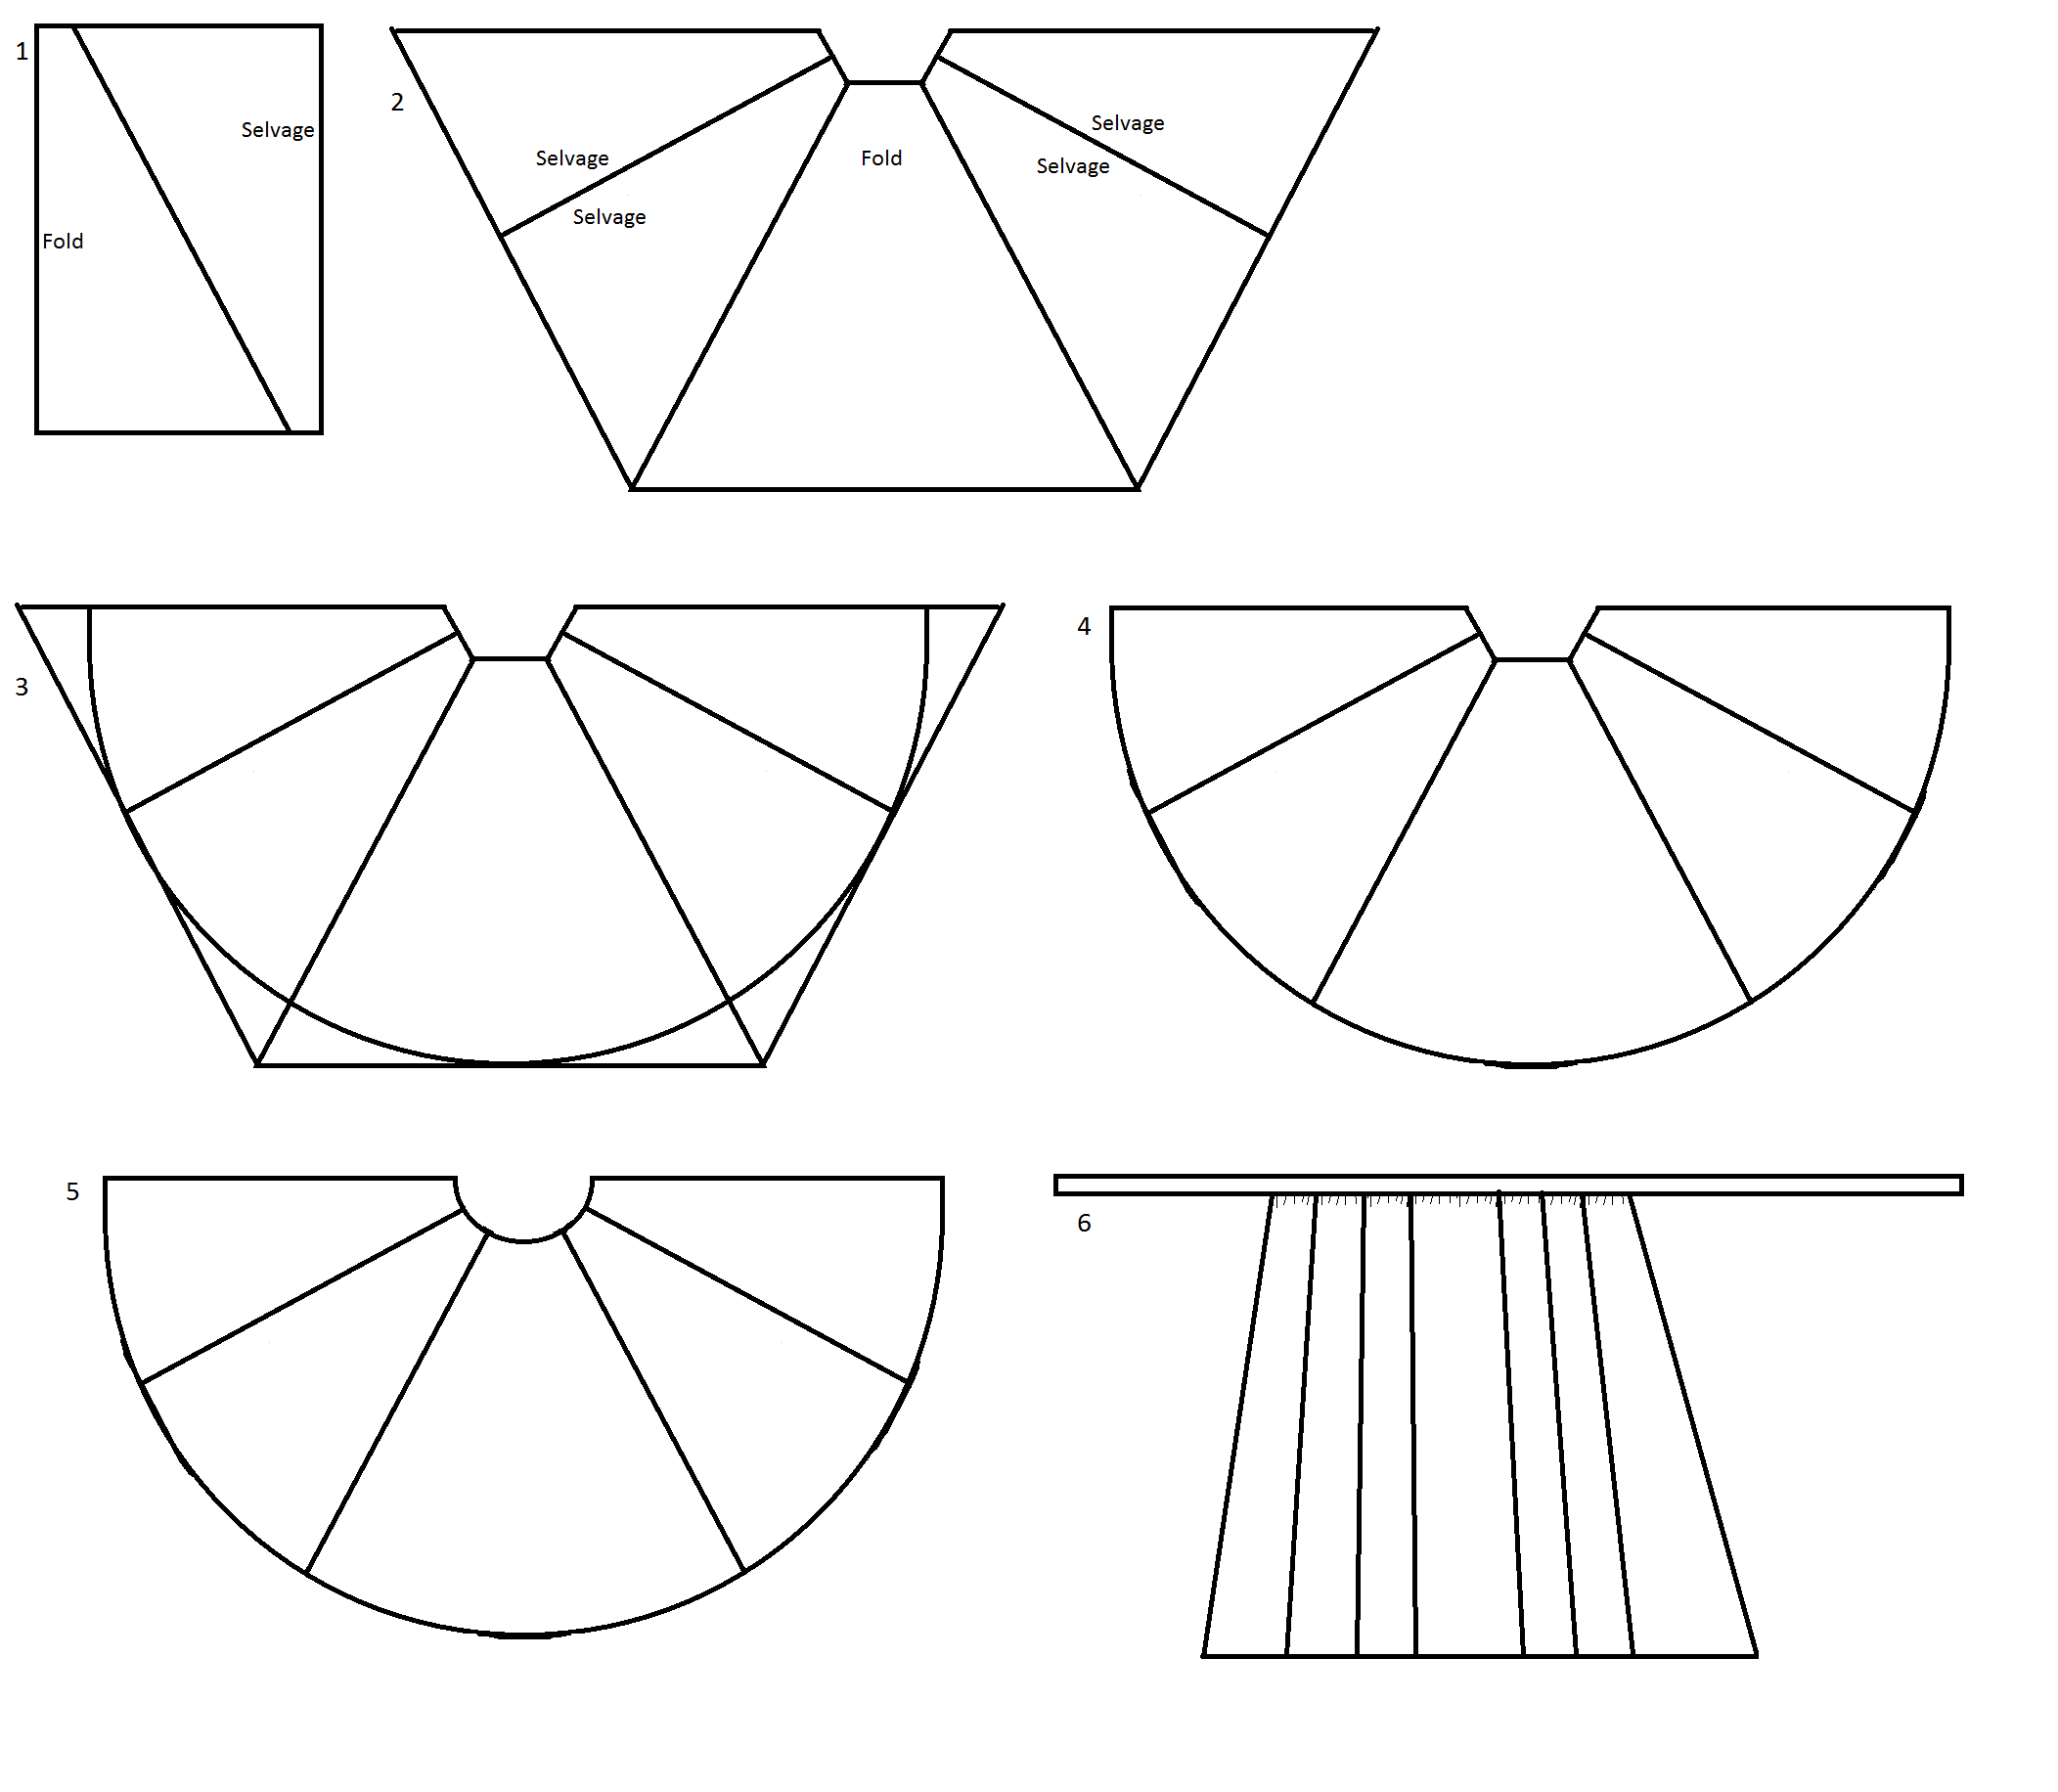
On Saturday I started with the first layer: the white underskirt. I decided to do it simple. I made a little “tutorial” to show what I did. Step 1 consisted of cutting 3 lengths, slightly over one meter (the length from floor to my waist) and then cut them across diagonally. The selvage edges were then sewn together (to end up with 3 pieces with a  selvage seam in the middle). The selvage and fold pieces were then alternately attached to each other using French seams. Number 2 shows half the skirt. The other half would look the same only there would be two fold pieces on both sides and a selvage piece in the middle. At step 3 and 4 I marked and cut the bottom of in more of a circle shape. In step 5 I cut the waist section in a circle shape. Then I cut a very long rectangular piece to be the waistband. I then gathered all the panels onto the waistband (6; yes this drawing makes little sense). All in all there is a lot of fabric at the bottom, the hem is going to be several meters long.

Tutorial

I have not actually hemmed it, which is why it is not finished yet. I felt I should let it hang for a while before hemming it, since the fabric is somewhat stretchy. I attached a little extra waistband to be able to tie it into a bow at the front. It’s actually really comfortable (if much too long). This is what it looks like, without the hem finished.

OLYMPUS DIGITAL CAMERA OLYMPUS DIGITAL CAMERA

As you can see, it’s very wide at the bottom, and much too long. Still I feel it looks nice. It’s also finished on the insides and the ‘getting in’ opening.

OLYMPUS DIGITAL CAMERA OLYMPUS DIGITAL CAMERA

Just hemming to do on these and I will really have been productive!

Update

I’m still knitting, I’ve just turned the heel of the first white sock, and have ‘basted’ together my sweater and am thinking of how to best knit the collar, such that I don’t feel overly exposed and it still looks nice. It fits well, although the sleeves are made for a monkey, and I’m not a monkey. However, if I turn back the ribbing it fits fine (the lazy (wo)man’s solution).

Next to that I’ve been tracing two of my shirts, in order to make them again. Tracing is a cheap way to make a pattern and since you already know how the things fit, it’s easy to change what you want style wise. I’ve even started to figure out how to place the pattern on the bit of stretchy fabric I got a while ago. So I am trying to be productive ‘creatively’, but I find it difficult, to muster up the energy to work after being at school for 8 hours.

For the larp event I am part of I made a pair of enormous pants. I could fit in the one leg, and my friend could fit in the other (it was quite funny). So while I feel fairly useless, I may actually be doing more than I think. Let’s hope I can keep up with doing some work!

Coat update

Yes, another update can be made on the coat. After ripping it all out again, since I was not happy with having the interlining as a second layer and feeling it was extra bulky. I took it all out and treated the outerfabric and interlining as one. Yes, I know I should have done that from the start, but hey, I’m not so fantastic at this and mistakes are what you learn from, right?

Anyway, before sewing the thing together I figured I’d make the pockets differently, since I was not happy with them in the first iteration. I now had my heart set on slanted, middle-of-the-side-front-panel-pockets, with a zipper and a thingy over the top. I didn’t really know how to do this, but I figured it would be sort of similar to making bound buttonholes. Admittedly, before this coat, I’d never done those before.

However, I figured that they would make the coat more “work”-proof. If I’m going to graduate this summer, I need to do job interviews this fall and possibly winter, and I need a coat that isn’t made for children and has pretend paint spatters all over it. Yes, it’s true, I wear a children’s ski jacket at present, and I love it, even though it’s not very professional.

So I set about re-finding the tutorial for bound buttonholes that I was sure I’d seen somewhere on the 100 blogs/comics I follow. I did find it and used it to make very nice buttonholes (this tutorial). If I do say so myself.

OLYMPUS DIGITAL CAMERA (5 of these)

I did do it a bit different since I couldn’t get the folds to be equal so I just sewed a line of basting stitches to get it to close and then press it and sew the sides to the little flappy bits (yes, this probably makes no sense).

Anyways, following the first couple of steps, I sewed around a long rectangle a little smaller than my zipper, proceeded to cut it like >—< so, and then sewed the end of the zipper right side on right side to the bottom triangle. Folded the whole shebang inside, lined the edges of the zippers and long sides of the box together, sewed along that and pressed. I had to hand do the top, since my zippers were too long and I hadn’t figured out how to keep it closed and sew it at once. But it worked!

Zipper OLYMPUS DIGITAL CAMERA

I then also attached the pocket bits to this contraption, aligning them such that they would lay flay and sewed that one. I only had to reposition one once, which is a vast improvement on my normal pocket skills (read, at least 5 attempts are needed). Then I sewed the flap on it, and hand stitched the sides. The flap was done! Then I had to put the thing together again. From the  first iteration I learned that there was practically no waist and I looked like a Michelin man. So I put all but the underarm and side seams together and then pinned the side seams to my liking. That’s why the right seam next to the pocket is nice and flat and the left one all ugly and puckery. It’s not actually sewn yet. Still pins in there.

OLYMPUS DIGITAL CAMERA

However, I seems I am making progress on this project. Hopefully it’s done soon!

Coat cuffs

Although I am supposed to be very busy with school, I have decided that I should not do any work after say 11 or 11:30 at night. It’s just too late and it won’t work. Therefore, I started making the cuffs for my coat yesterday. I knitted some inner cuffs that won’t show on the outside, but should keep my wrists warm and covered, and prevent the wind from flying up my sleeve. They are very simple, just 34 stitches on 20 or so rows, knitted flat and attached together. I used a ‘drunken German cast on’ (using this site) to keep them stretchy, and another stretchy bind off (from this movie) to keep them stretchy on the other side. Not very interesting, but there is progress!

Cuffs

I also unpicked my pockets because I decided I want them somewhere else, since it didn’t feel right before. I also want zippers in them (don’t know how I’m going to do that, but I’ll figure that out later). Hopefully, I will have my coat done by Monday and I can wear it for the remainder of the winter. Hopefully!

Wish me luck on that one (and the mass of homework still to do). Good luck crafting too!

Coat progress

My coat has taken a spot on the back burner. School is getting in the way, and there is so much yet to do that it is starting to be really daunting. Before I felt like that I did do some work in it. It’s been cut out (the outer fabric and a form of interlining of which I’m not sure yet how to put it in) and the outer fabric has been sewn -> without the interlining, a slight miscalculation. Now I have to solve that, but there isn’t really time to think about it right now.

While I was cutting out the coat, my dad thought it would be a fantastic picture moment. This may have been because I did not want to use pins and therefore took all the mugs and bowls from my parents cupboard to put on the tissue as pattern weights. Our pottery (can I call it that?) collection is fairly.. colourful, so it made a nice picture as evidenced below:

Cutting layout

I also made a fairly large length of bias tape from the orange stuff (here), and although it didn’t really go as planned (there was a lot of cursing involved), I can now probably salvage a long enough length for it to work. The project is now in a laundry bin in its entirety and I’m afraid it will stay there for a while. School comes first.

Coat

I need a new winter coat. So Saturday my dad and me went to the fabric market in Utrecht and located some nice fabrics. I need, need, need to make this coat quickly, since it’s cold and my current coat is fugly.

I’ve got navy blue wool, a bright blue for  the lining and some orange for piping the lining-facing divide. I hope I can start and finish it soon, because I’m craving a nice looking winter coat, wish me luck!

Fabric Shirt fabric

On the left are the coat fabrics, dark blue, orange and lighter blue. I also bought a length of stretch stuff for a shirt. If you don’t see a post about this appearing within a couple of months, remind me about it.. I need to destash.

Fronts Fronts Fronts Fronts Fronts!

Sing the title and you’ll know what I mean. I have finally finished the fronts of my cardigan! Yay!

I know it’s the start of the new year and people tend to make ‘achievement’ lists of the past 366 days, but I refuse to do that. After all, nothing really changed between the 20th of December and now. The passing from the 3rd of January to the 4th is equally special as from the 31st of December to the 1st of January. Maybe I’m wrong. If you want to see what I did this year you can look in Finished projects, it should all be sorted there.

Back to the cardigan. I still need to make the collar thing, which involves picking up and knitting, something I’ve never done before, but youtube is very helpful in this. However, I think I should first iron or press or something, the side on which I need to pick up those stitches, because right now it’s impossible. It doesn’t help that the yarn is black, and I barely see the v’s that I should pick up. I tried and frogged (?) it about 4 times before I gave up and went to sleep. However, in theory I could now put it together and wear it. It should look something like this:

Cardigan

Although it should then be attached together, buttons added, with a collar and without all the loose threads. Still it’s starting to come together and I’m quite happy with it, it seems to fit without being overly enormous on me.

So now onto the collar, I can possibly wear this thing during this winter!

Cardigan 2

I’ve also started working on my cardigan again, the black with white stripes one. I’ve finished to sleeves a while ago although they are not sewn yet. (I tried them on by tying all the ends of the white bits together in little bows)

See, those are my sleeves, I still need to futz with getting them sewn up and stuff, and getting rid of all the loose ends, but I’m happy with them so far.

I have also started the fronts now, I’m knitting them in tandem so I know for sure that they’ll be symmetrical. I’ve also knitted my first buttonholes, ever! Ok, it may have taken several viewing and reviewings of youtube clips and ripping out (frogging I think it’s called?) and starting over but I did it. Admittedly, the bottom one is crap, but the two others I have finished so far actually are not too shabby, if you ask me. So now I just need to finish it, preferably in time for like.. January or February, you know, Winter.

Anyways, here are the buttonholes and fronts. The green thing is my monsterbag in which I currently store the whole knitting business.


Projects; always nice to see some progress!

Busy

I’ve found myself a summer job. I clean the homes of old people who cannot do it themselves anymore. So for 4 weeks now, and one week more, I hop on my bike every morning and afternoon and work for 2-3.5 hours at a stretch. Vacuuming, cleaning bathrooms and toilets, making spider webs go away etcetera. It’s been quite a lot of fun actually. The cleaning itself is boring, but the conversations with the people are really nice.

I have found out that there are two things that connect practically all old people together.. They all have barometers and orchids, and are generally offended if you do not want a cookie with your tea/coffee (they also do not approve of drinking just water, it’s got to have flavour). If I’m not hungry I feel like I’ve upset their whole day by not wanting the food they offer. Still, I’ve enjoyed myself, some people I like better than others (and can hear me better).

With all that work (5-6 hours a day), I’ve felt quite busy. Although, really, I’m not very busy, I have all nights off so I should not complain. I’ve knitted a little, my sleeves now have 8 stripes, with the ninth being the next two lines, and I’m supposed to have 14 I think, so I’m at least halfway done now.

Well that was project 1. Project 2 is a medieval type dress for larp (inspiration) that I’m putting together using a light fabric with brown and silver swirls for the bodice and front, a dark brown for the skirt and top of the sleeves, and a lighter brown for the bottom of the sleeves (the fabrics were perfect, but there was only 3 and 2 meters left of them). I don’t have that pattern but I’m trying to make it work by adapting other patterns and some divine inspiration (or just normal inspiration really). It’s going quite well, although the light fabric is printed really really off grain, so I’m having to do some strange damage limitation. When it’s finished, I’ll try to show that. The personal deadline for this project is September 6th.

So it’s one more week of helping old people, then school again. That in combination with attempting to finish my projects, and all should be well. Now, further with the second project, since its deadline is closer. Enjoy the creatives too!