Summer Shirts

I seem to have cultivated a preference for thin fabrics with prints on them in the past while. I found I had four pieces of thin fabric next to the cycle stuff (here). So in two nights/days of frantic cutting and sewing I created three additional shirts following the pattern from the cycle top. All these tops now have different necklines and hem treatments, one also has ‘shorter’ sleeves due to fabric shortage. Moreover, during this fascinating time, I discovered the handiness of spray starch for creating self made bias tape, which is used in many of the shirts. 

The first is the dotted one. It’s white with small light grey dots. Four dots (that are printed pretty well on the bias) is the perfect width of neck-edge bias tape. This one has a scoop neck and a high-low hem. It’s all French seams again, but this iteration had the unfortunate luck to be the one where I forgot to trim the French seams before the second stitching, so some threads come out the side seam. I’ve decided that I don’t care enough to redo everything. You can see from the pictures that it’s quite sheer, which is why it is a good thing that I always wear a tank top under my clothes.

Front Back

The second one was made from a narrow fabric with paint splatters. I had already made a scarf out of this in the past, so one of the edges already had a rolled hem. I figured, why not use this. This shirt has slightly less wide sleeves and the hem is shorter and straight. The neckline is straight at the bottom and then comes up at angles to connect to the rounded back. I can’t really explain it, the pictures lower down in the post should show the difference clearly.

Paint front Paint back

Last but not least, the cat fabric. This fabric has little cats all over it, I think it’s cute. This one has a v-neck and a hem that is long on both the front and the back, but shorter at the sides. The fabric is not printed on grain, which made it difficult to get the neck to look ‘right’.

Cats front Cats back

Now, as these shirts were all made shortly after each other, I could still picture them all together. Below you can clearly see the differences in necklines and hem treatments (if you look carefully).I liked making these, and I’ve found that I also like wearing them, which is a plus as I have four now.

Necklines Hems

One shirt only requires about half of the cuts of fabric that I have. This means that there is room for some other things that could be made from these fabrics. I’m curious to see what I will come up with…

Baby Dinosaurs

Some time ago, we did a one day table-top session in our larp. At some point I got the knitted Allosaur I was (am, it’s been thrown in a corner) working on out to show. I also had the book, Knitting Dinosaurs, with me. I then got a request for a Triceratops. Now, I didn’t feel like knitting the full size Triceratops, as that one is large! However, the book also has a pattern for Troodons, very small dinosaurs. I figured I could improv the additional features around a Troodon base and have them done quickly. That’s exactly what I did.

First, a Triceratops (purple and red). The defining elements were its four equally long legs, its collar and the horns. The legs were created by simply making four back legs and attaching those. The collar was improvised from the Triceratops pattern in the book, but smaller. It’s a little big, but who cares! The horns were short icords attached to the head, because a Triceratops without horns would just be a Cera, right!

Triceratops Triceratops

Triceratops

The second was a Parasaurolophus (white and red), which completely the normal Troodon with the addition of one horn on its head. There was some shaping involved and the person who received this Dinosaur thought it was a duck at first, when it was upside down.

Parasaurolophus Parasaurolophus

Parasaurolophus

The last was a Tyrannosaur Rex (green). It’s a Troodon body, Troodon back legs and shortened Troodon front legs. I made a little ridge along its back to make it stand out a little. I also added the teeth to make it more intimidating and T-Rex-y. I don’t know if that worked.

T-Rex T-Rex

T-Rex

All dinosaurs have safety eyes with white felt behind them to mimic real-ish eyes, see the last picture for all the dinosaurs for a close-up of their faces. Their legs are attached in such a way that they can still move. That’s why the dinosaurs can both sit and stand. This was a successful project and I still have two Troodon bodies lying around that can still become dinosaurs!

All

Accidental Harry Potter Sweater

Red and yellow seem to become Harry Potter colours really easy and really quickly. I only found this out after I’d finished most of my sweater though. Truth be told, I don’t mind. I like the sweater, it is comfortable, warm, pretty and it has stripes. Those stripes were a complete pain in the ass to finish, but that’s the life of a (somewhat new) knitter, I guess.

The original pattern is $5 in Paris which is free on Ravelry, you can see my very limited notes here. I now also remember why I thought I’d blogged about it, I did post the pictures on Ravelry. Sometimes you’d think I’d forget my head if it wasn’t stuck on. I did already show quite a few pictures of me wearing it, just see the MMM ’15 posts.

For the sweater, I basically fudged a bit and math-ed with the stitch counts to suit my gauge and called it a day. Also, the stripes were sort of supposed to continue along the arms too, but I’d ran out of white yarn, and so made them completely red. I actually like it like this, so happy accident!

OLYMPUS DIGITAL CAMERA OLYMPUS DIGITAL CAMERA

You’ve now seen the front and back, and they were so pretty, weren’t they?! But the nicest bit is the neck. In it is this cute little tag I bought from a shoppy. I finished the neck with elastic, as it became a bit stretched out during the day and sank further and further off the shoulder. I hate off the shoulder everything, so that was not an option. This solution works, and it’s a nice pop of bright red on the insides.

OLYMPUS DIGITAL CAMERA

I will write about the graduation dress when I have some nice(r) pictures. And once the day is over so I can tell all about the possible thunderstorm coming our way.

Alice’s Tea Party Skirt

A while ago I found some purple and white border print fabric on the market. I couldn’t help myself and bought it and of course showed it of to my coworkers immediately. The plan was to finish the skirt in a week or so. This was a good plan, although I managed to screw it up royally, naturally.

The plan was a simple gathered shirt with pockets with a waistband. I had one cut of fabric which consisted of two bits sewn together, I’m thinking it was the end/beginning of a new roll or something. I first removed the stitching and cut the bits into the height I wanted. I then seamed the bottoms with sticky iron on stuff, serged all the edges and attached them. I found some old slanted pockets and put those in. I then tried to make the waistband, that was a complete disaster. Enter the ‘unfinished projects box’. It was balled up and dumped in there.

I took it out a while later and gathered the whole business. This made it look even more hideous. Back it went into the unfinished projects box.

Then I took it out at the beginning of the month. First things first, discard the waistband idea and cut square pockets from the fabric. This worked, I only later found out that I completely failed in making the pockets sufficiently deep for putting my hands in if I wanted to have the waistband all along the edge. I took out the gathering and redid it using the lining. Eventually sewed a casing to pull the elastic through. Almost all the gathering is in the back now, with pockets on the front. Because the elastic kept twisting, it’s been sewn on at regular intervals.

During the last session of this skirt the aim was to finish it before going to bed. This did mean that due to exhaustion and frustration, several parts had to be redone twice or three times. Conclusion, this is not a smart idea. Moreover, I haven’t completely solved the ‘if I put something heavy in my pockets my skirt fall down’-problem, but I’m thinking of ideas, and it was 2:30 and I HAD to sleep. Anyway here it is, front and back.

OLYMPUS DIGITAL CAMERA OLYMPUS DIGITAL CAMERA

So why is it called Alice’s Tea Party? Because there are teapots and rabbits and butterflies and mushrooms and cupcakes and all kinds of cute Alice in Wonderland themed bits on it, if you ask me. Below the pockets and a close up of the back, with all the gathering.

OLYMPUS DIGITAL CAMERA OLYMPUS DIGITAL CAMERA

I am very happy that it is finished. I like it a lot, because of the print on the bottom. I think it’s really cute. That one problem still needs to be solved, but I’m thinking of some sort of waist stay concoction that could solve the issues. Lastly, it’s all nice and finished on the inside with lining and everything.

OLYMPUS DIGITAL CAMERA OLYMPUS DIGITAL CAMERA

Next up is a larp present, basically a copy of something I use myself. You’ll see…

‘Keep-the-hair-out-of-my-face’-device or Caul

For my larp character I wanted something easy to keep the hair out of my/her face. Since I cut my hair it’s much more difficult to braid it out of the way. While the events aren’t for a while yet, I figured it smart to start in time. Especially since I’ve been dreaming about a completely new costume. So I wandered around the internet, as you do, and found this. It seemed easy, I had a bit of fabric I didn’t mind trying a trial run in but also liked for a final product if it would work, so I got to work.

I first .. read the instructions. I know, the deal is to ‘if everything else fails, read the instructions’, however, I’ve never been that type of person. I put ikea furniture together using the actual instructions, even if there are only 2 pieces and it’s obvious how they go together. Anyways, I got out a plate and cut a circle-ish shape out. The fabric was very, very shifty so it was an approximate circle, which didn’t matter much. I did have to place it partially on two of the stripes in the fabric, but I don’t mind the effect.

Sewed it up following the tutorial until I needed to sew about 3/5 of the whipstitched edge. Then I figured I needed to go get hair clips of some kind to keep the thing on my head and deserted the total project. (I do that way to often, abandon something very close to the end.) Well yesterday I decided to pick the project up again and in the time it took to cook my meal and a little more I finished my cowl. Check that puppy out below:

OLYMPUS DIGITAL CAMERA OLYMPUS DIGITAL CAMERA

These are the front and back on my head. They are held on by clips as can be seen below:

OLYMPUS DIGITAL CAMERA OLYMPUS DIGITAL CAMERA

Also, no exposed seams within this thing, which is pretty neat if you ask me. It’s also supremely comfortable and it will keep my hair on the back of my head if I put it on correctly. This makes it much easier to run around than with hair flying everywhere. Lastly, below the stripes on the sides, these run vertical as you can also see in the right picture(s) above.

OLYMPUS DIGITAL CAMERA OLYMPUS DIGITAL CAMERA

Left is left for me and right right (I thought about that).

I seem to be in a head-cover mode lately, have a look tomorrow at the creation I finished today.

Larp Top

Hi there, it’s been a while. I have been doing things though. I made a top/bra that could theoretically be used for a larp when it isn’t raining and extremely cold. I made it from a semi-larp approved fabric and it’s fully lined. I did the buttonholes myself. It’s not very special, but I figured I’d show you what I’ve been up to. It was inspired by this, but I was too lazy to do the embroidery I wanted to do. I’m going to make it again some time, but then place the straps closer to the middle, so they (hopefully) don’t slide of as easily.

Front Back


So this is front and back, and below are the fully linedness and handmade eyelets. I enjoy doing eyelets, I find it a nice skill to have.

Fully lined Eyelets

This thing was made from the remnants of that fabric out of which I also managed to get the top for another vintage simplicity dress. I hope that I can finish that soon. It will be a bit nautical, with white on top and navy on bottom, with maybe some navy details on top too. But we’ll see how that goes.

Skirt

The skirt I started here, finally got hemmed on Tuesday. I decided to also redo the top. Gather it a little more. Since last time I messed up my calculations and made it wide enough for my hips and it had to cross over in the back. This made the hem all weird and crooked. So before attempting to actually hem it, I had to unpick the top and do it all again. Luckily it went a little faster than the first time.

Skirt front Skirt back

Front and back respectively. It is a narrow hem, therefore it doesn’t stand out as much as it could do. There is approximately 6 meters of circumference in the hem, so imagine how long it took to hem it.. (pin, iron, sew, iron, iron, cut, iron + pin, sew, iron, iron… I saw each piece way too often).

Skirt

Yes, I pulled my shirt over my sweater, I know, it’s silly, but it keeps up the sweater really quite well. I’m thinking of making button loops at the bottom of the skirt in four places, and 4 buttons on the waistband of this skirt or the potential overdress, so that if I actively plan to go into battle, I can put it up and have less chance of stepping on the hem. I’m not sure yet. I’ll probably just add loops anyway, it won’t harm the hem.

On to the next, the overdress and maybe I’ll make a little light armour out of fake leather, we’ll see.


Productivity, 3.

The other thing I made was a skirt. I already spoke about the larp event we are organising. I quite like to have costumes for that sort of thing, even if I’m not playing myself. However, a month later (beginning of May) there is an event where I will be playing. In case my current character decides to die (or just dies) I would like to have a backup character ready to step back in again.

So while I was at school trying to work on my thesis, I decided to take a break and google for a larp-staff. A piece of equipment I have been wanting to own for years, however, the only ones available are.. well.. ugly. I don’t like them at all. Then, a miracle happened, I founded something I liked! Or at least, liked a lot more than all the other ones out there. It can be found here. Now, the only thing I didn’t like were the metal caps around the bottom. I got a custom order and they will make me one without the caps. It all went fairly smoothly and they are very friendly at Skian Mohr.

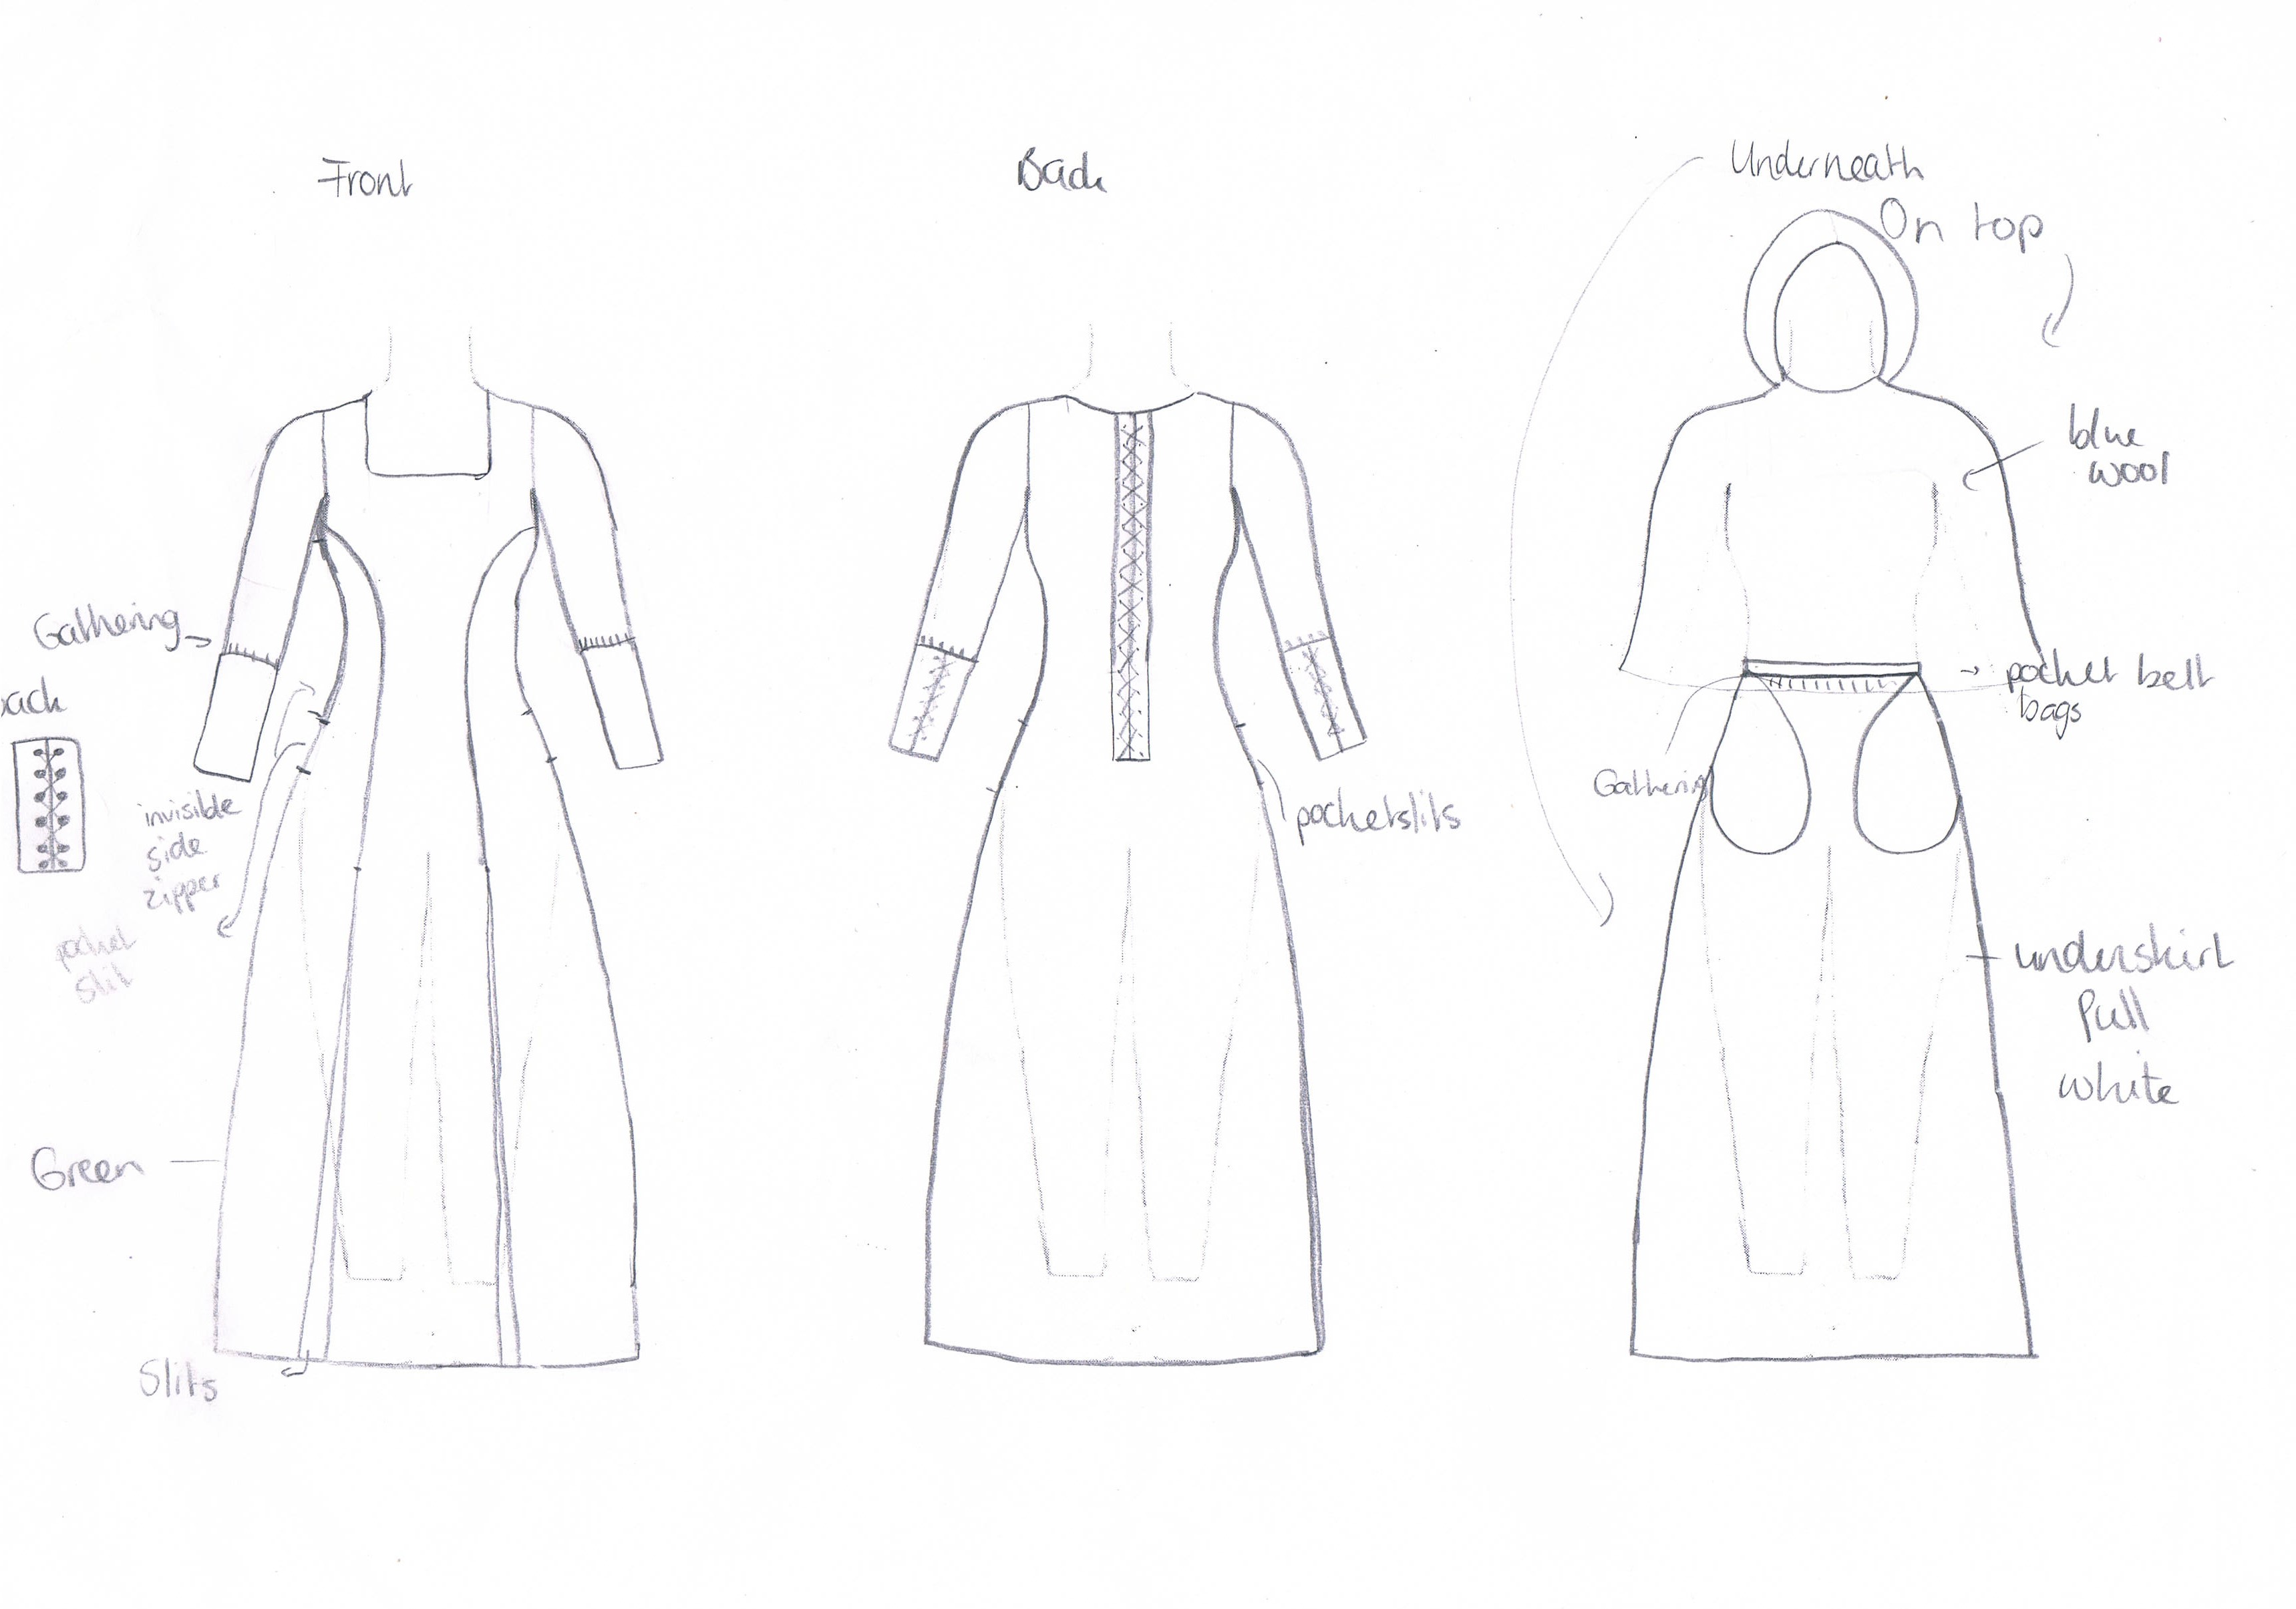
Next, I needed a new costume (of course) so I drew one out:

Fighterdress

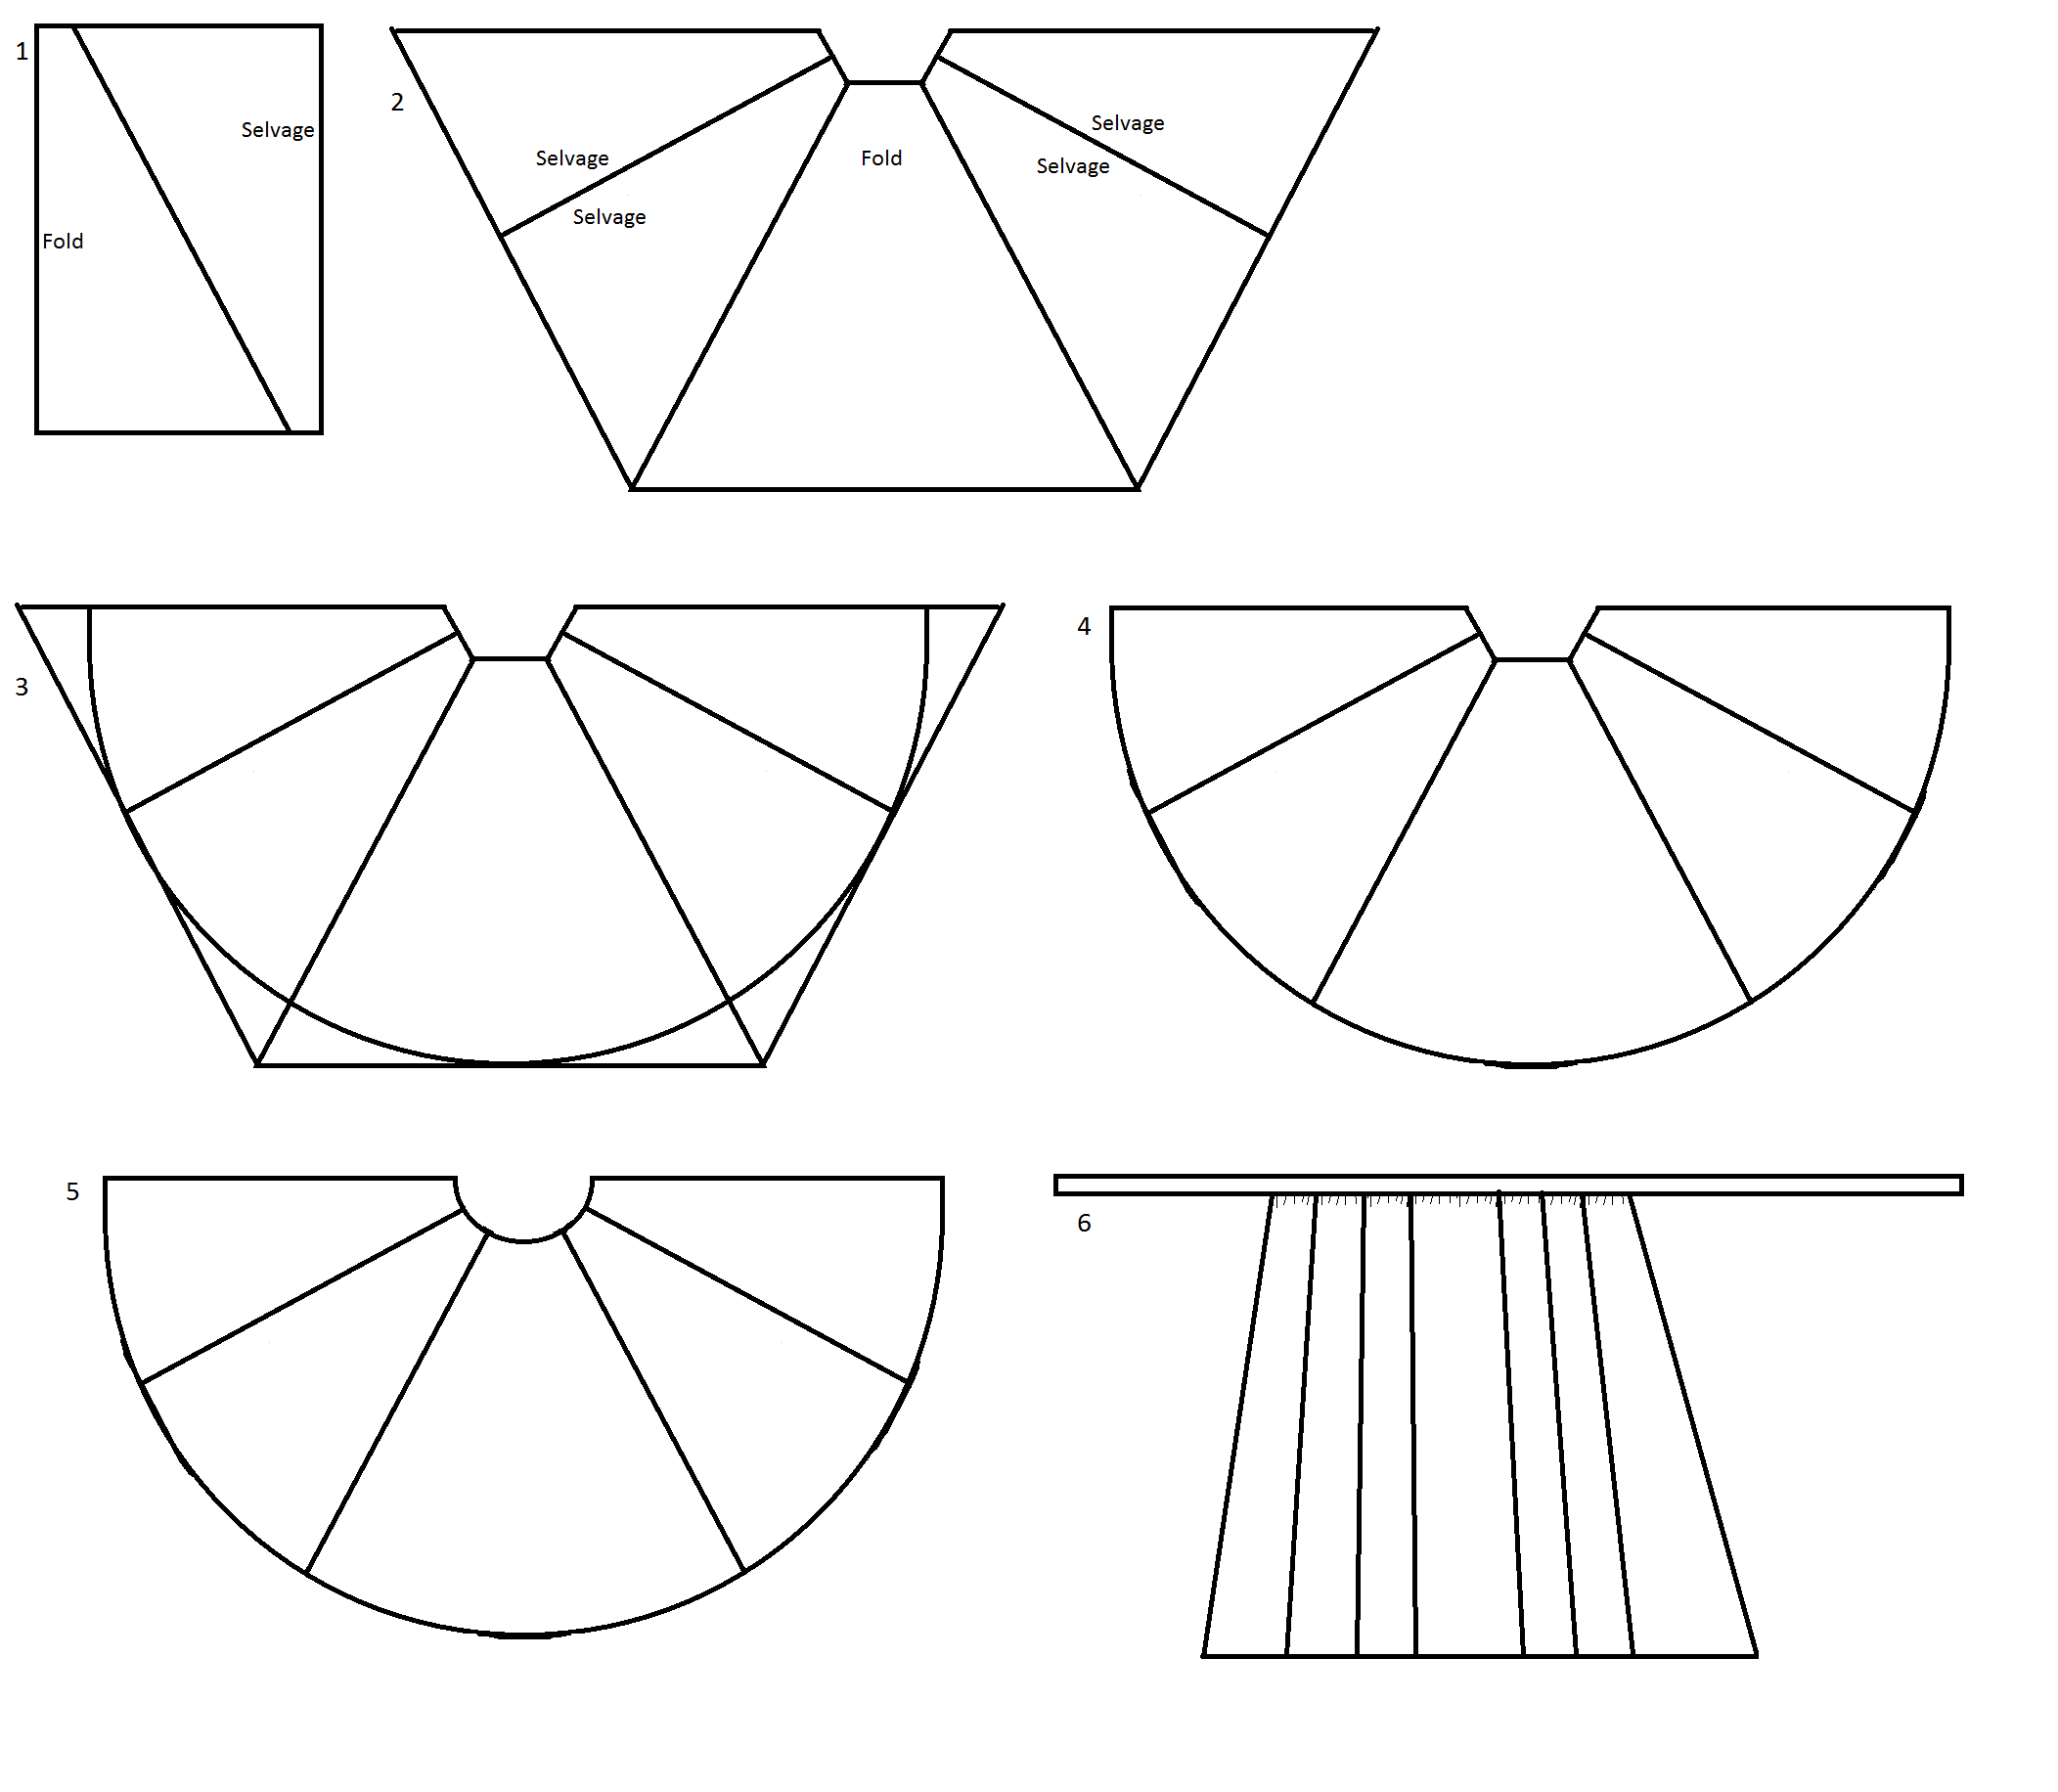
On Saturday I started with the first layer: the white underskirt. I decided to do it simple. I made a little “tutorial” to show what I did. Step 1 consisted of cutting 3 lengths, slightly over one meter (the length from floor to my waist) and then cut them across diagonally. The selvage edges were then sewn together (to end up with 3 pieces with a  selvage seam in the middle). The selvage and fold pieces were then alternately attached to each other using French seams. Number 2 shows half the skirt. The other half would look the same only there would be two fold pieces on both sides and a selvage piece in the middle. At step 3 and 4 I marked and cut the bottom of in more of a circle shape. In step 5 I cut the waist section in a circle shape. Then I cut a very long rectangular piece to be the waistband. I then gathered all the panels onto the waistband (6; yes this drawing makes little sense). All in all there is a lot of fabric at the bottom, the hem is going to be several meters long.

Tutorial

I have not actually hemmed it, which is why it is not finished yet. I felt I should let it hang for a while before hemming it, since the fabric is somewhat stretchy. I attached a little extra waistband to be able to tie it into a bow at the front. It’s actually really comfortable (if much too long). This is what it looks like, without the hem finished.

OLYMPUS DIGITAL CAMERA OLYMPUS DIGITAL CAMERA

As you can see, it’s very wide at the bottom, and much too long. Still I feel it looks nice. It’s also finished on the insides and the ‘getting in’ opening.

OLYMPUS DIGITAL CAMERA OLYMPUS DIGITAL CAMERA

Just hemming to do on these and I will really have been productive!