Deadline Work (3) – Wedding Present

Last time was the Tuesday made shirt, well that Friday it was time for the wedding of the person I’m still in (sporadic, but still) contact with that I’ve known the longest (i.e. since I was 10 years old). I was there the day she came back to school with the biggest grin on her face, she’d just gotten together with her boyfriend, now husband. It’s nice to see how people grow and evolve even if you aren’t going that fast yourself. I knew I’d be too exhausted from the week before to make something to wear, so I settled on a party dress I wore for a 25 year-wedding anniversary of my parent’s friends, I think. However, the present, that was a different matter…

On Thursday, which luckily is the day shops open till late, I was scouring pinterest for fun origami money presents when I found the bill-butterflies. I combined those with the ‘Jar of Luck’-idea I’d come across some time ago. I found a nice jar at a store and got two cups to go along with it, I found some nice bills and started the project.

Side I folded three bills into the bottom part of the wings. The top parts were quotes I found appropriate on pictures, with a hand-written wish on heart themed paper on the back.

“The future belongs to those who believe in the beauty of their dreams” ~Eleanor Roosevelt
“Happiness lies in the joy of achievement and the thrill of creative effort.” ~Franklin Delano Roosevelt
“Keep your eyes on the stars, and your feet on the ground.” ~Theodore Roosevelt

I also cut some colourful feathers and made a bunch of confetti for in the bottom. I then attached the butterflies to the top of the jar with bouquet wire, this made them seem suspended in air. I personally was a big fan of this.

Front

Last I attached the cups and wrote the card. The idea of the Jar of Luck is that whenever you break something, you keep the shards in the jar, and when you need luck the most, you turn to the jar. In Dutch there is a saying that ‘scherven brengen geluk’, shards bring you luck [bad literal translation]. So this jar is for the times when it isn’t going to plan. And if you need some instant luck, there are two cups you can break easily. I hope they liked it, they did enjoy their party enormously so that was a good start to a hopefully fantastic marriage!

OLYMPUS DIGITAL CAMERA

Pouches and Globes

Yes, pouches and globes are an odd combination. In this case they do not even remotely belong together, apart from the fact that they were made in (approximately) the same month. The pouch is boring, the globe maybe less? So read on below the pouch pics if you want to know about a home assembled globe.

I made an additional little pouch for those necessities that you want in your bag at all times, but you’d rather have together than floating around separately. This involved cutting a square, serging the edges where the zipper would go, sewing in said zipper and serging the remaining edges. This was a 15 minute project at best, but it saved my sanity. This is the, super sexy of course, since I used a scrap of my Mondriaan fabric, result:

Pouch back Pouch front

So, on to the cool stuff. Globes. I love them, especially old yellow ones. I don’t own any really old ones, or really any fancy ones, but I plan on having a nice wooden library room with a book-case with a ladder and my (to be assembled) collection of yellow globes. This is of course a long-term plan. My current collection is a sky globe that turns in all directions, a yellow normal globe which also turns in many directions, a magnetic puzzle globe, a glass etched little globe ball an a globe key chain. It’s not much but I like it. I have, however, managed to add some additional elements. Two new/old paper globes.

The other day I discovered this website, which houses a collection of paper automata and more. It also had the makings of several globes which you can assemble and construct at home. My first attempt was difficult since I didn’t have the right glue, so it’s wonky. This is it from three angles:

Original ball 1 Original ball 2 Original ball 3 Globe collection

Today, I tried again, using a stickier glue. However, it still gaps where the hemispheres are stuck together, I will find a solution soon. The bottom right picture is the entire collection, hanging left is my most recent ball, while the first attempt is at the right. I will make more paper ones, once I figure out how to make them look nicer and find the right paper and glue (Paper Pino also has bigger versions!! E.g. here, here and here).

I shall collect more!

Christmas Cards

Every year it is the same question, will I send out Christmas cards this year? Real ones, with paper and that (if I don’t hand them over to the recipient directly) go through the mail and stuff. This year, the choice was easy. I was in a shop, I saw a kit for making paper Christmas balls and decided I could use the idea for my cards this year.

The shop sold craft paper blocks which I got one of, bags of buttons in different sizes (120 in a pack), metal loops for ornaments and gardening wire. I had my card almost ready!

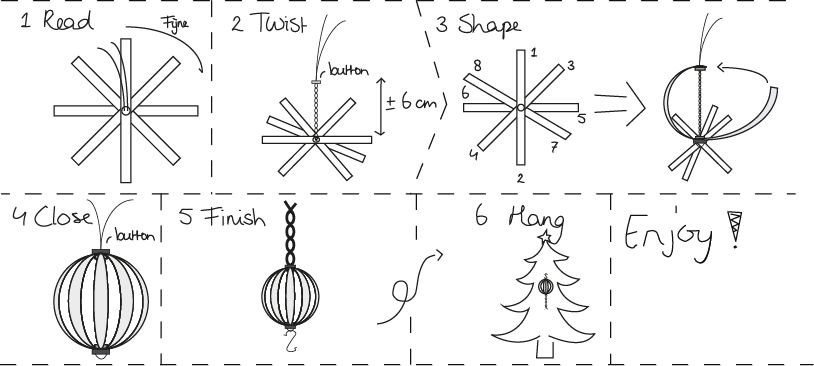
I’ll explain what I did, there are more pictures below. First, I’ll show you the ‘instructions’, I drew them and then created them in Photoshop (not very well, but still), I copied my own handwriting and printed 3 of them on 1 red A4 piece of paper. I then signed my name in the bottom right corner and added some metallic fireworks. The back was used for a personal message and the address.

Instructions

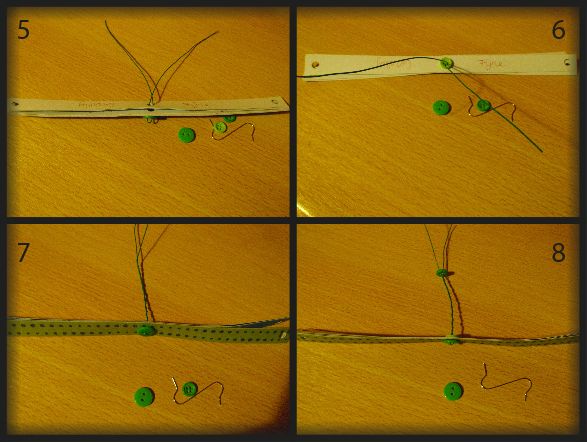
To put the kit together I cut strips of the paper using my paper-cutter machine thing. It can do straight lines, dashed lines or curved lines. I used the first and the last. Then I made holes in the ends of the strips using a hole punch. I noted the middle of the strips and punched a hole there (1). I wrote the text I wanted on the strips (2), the text is (translated) Happy Holidays and a Healthy, Cosy (untranslatable) and Happy 2014. It was written (mostly) on different coloured strips (3). I cut a bit of wire and added the first button (4).

Cards 1

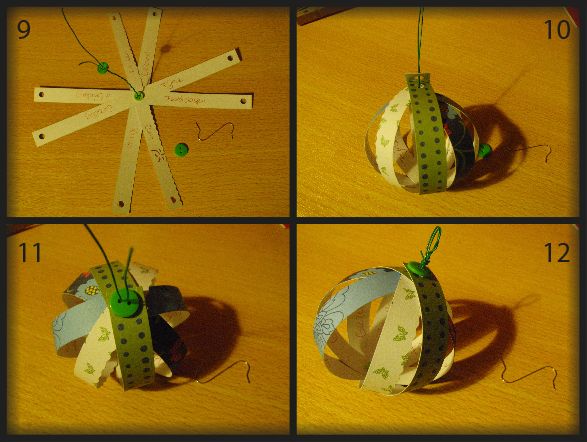
I put the strips on the buttoned wire (5) and added a button on top to keep it in place (6). This was placed with 2 other buttons, a hanger and the instruction in an envelope and sent. To make the ball, you twist the wire (7) and add another button (8).

Cards 2

You can read the entire text in now if you turn the strips out (9). Then the ends of the strips are put on the wire (10) and the last button is added (11). Twist the wire a bit and add the hanging loop (12).

Cards 3

That’s it! Then you enjoy the pictures people send you of their balls in their trees. I enjoyed that the most. I had fun making them. Next year, I’m going for a new idea. I got some inspiration from a card we received during the holidays, so who knows…

Papercrafts

For some reason, three months from now is a really nice time to fornicate. At least that’s what I assume. I had a massive 5 known birthdays in the last week alone. i.e. 5 people who I knew celebrated one year further in their lives. While I did not go or organise any parties (It was my birthday too, the), I did make some cards for some of those people. I had found some animal print origami paper in my box of craftstuff. Including instructions on how to fold a giraffe. Ok, while I’m not sure it really classifies as origami, as the giraffe is made up of two pieces and requires glue, it still looks nice. I took pictures of 2 out of 3 cards,because I had already posted one of them. The text on the front means congratulations (with your birthday), it’s in Dutch on these cards. You might also wonder why my giraffe, elephant and bird don’t have their own print. Well.. I wanted to change it up a little, and still had some zebra paper left. The bird and the elephant I’ve known for years, out of an origami book I got from my aunt for my birthday several million years ago. I know the bird and elephant by heart, which always impresses people. I’m going to make a giant elephant once I can find large enough paper. Anyways, here are those cards. I did enjoy myself making them, and see more of this in the future.

Card Card

Present

A friend of mine is born on the first of January, which is a terrible day to be born if you ask me, or him. This has just passed but he wanted to celebrate his birthday at some point. I talk to him practically every day, so I figured he would need a present. Even if he wasn’t going to officially celebrate his birthday. So I started on quite a personal project: a pack of cards.

He finally celebrated his birthday yesterday, so although I finished the present a month ago or so, I’m only now allowed to post about it. Anyway, on to regular programming!

Now, you might think, cards, that’s quite boring.. no?

But over the past year he has been telling me what he wants for his birthday, this has included a baby jaguar, panda’s, a weird-looking spider thing, Afghan hedgehogs, a fox etc. I don’t think I can ever really ‘get’ those things for him, since some are endangered or illegal and more stuff like that.

He’s also a big fan of magic, card tricks and the like. He quite likes to play games and is always in need of a new deck of cards. I connected those two things and decided to come up with a deck of cards that had cute animals on them. Admittedly I didn’t check for copyright on all those images, but I figured, it’s for personal use and they will not really be used.

Anyways, I opened up Powerpoint and made 52 cards. In the left top corner I put the value of the card Ace to King, beneath that the category of animal and in the top right corner I put one of the four suits that cards have. The cards were coloured according to their category and a picture was put in the middle. Then the writing on top of the card was mirrored on the bottom, like so:

OLYMPUS DIGITAL CAMERA

The four categories are: Cats & Dogs (with the cheetah, fox and a variety of other cute catty and doggy pictures) these are also diamonds. The hearts are (Under)water, with a variety of water based creates (turtles, frogs, octopi, dolphins etc.). Spades are Wild (bears, giraffes, hippos, sloths etc.) and lastly clubs are Garden (with spiders, deer, hedgehogs, owls etc.). There are 13 cards in each suit, 2 additional jokers (with little children in respectively a dragon and a frog costume) and a name card.

I then got it all printed on matte photo paper, I have since figured out that this might not have been the best idea, but it’s done now. They are not very easy to shuffle, so card tricks may be problematic, but it’s the idea that counts right?

After I printed and cut all the cards (see the corners of the cards in the picture? I had to cut all of those out), I made the box. There was a leftover bit of photo paper and I printed a name card for the front. I measured the size of the cards and gave it a bit more space and tadaa, the present was born. This was a fun and easy way to create a personalised present. I might do it again some time!

Box

Clearing up

When it was holiday and all, I was trying to avoid doing my homework (I know this doesn’t work, since I have to do it at some point anyway, why not get it over and done with??). My room has seen a lot of clearing up and even my drawers have had a couple of attempts at them. I should now be able to find things in there. However, what I found wandering around those drawers were a lot of business cards that did not have a collection point. I decided with my new found box-making skills, for a present that you will hear about shortly, to make a box for them. The first time I failed because I didn’t take into account that the bottom should be as wide as the side (idiot me), but the second time went fine, and my box now has a proud place in my top drawer. It has quite a lot of space on all sides, to accommodate larger cards and more importantly: more cards, since I’m sure I’ll accumulate some more in the future.

Cards Cards