Sewing for Someone Else

Sometimes ones mistakes can be put to good use for someone else.

Somewhere in the midst of lockdown, I impulse purchased a few lengths of fabric from the internet. When they arrived, I found that one of them had quite a lot of pink in it. I’m not a pink person, I hate pink with a passion, so I wasn’t going to use much of that fabric for me. However, my mother is a colour person. Bright colours are definitely her preference, so I decided to suggest making her a thing from that fabric. She was a bit scared because choosing patterns is not something she does regularly.

When she dropped by at one point, we started looking through pattern magazines and settled on the pattern. We chose Pattern 14 from Simplicity Naaimode 31, also known as New Look 6298. Measured her and decided on the size. I sewed it up and brought it back to her and it was.. very large. Not very appealing although the fabric looked good on her. So off for a second try I went, unpicking the raglan sleeves and neckline and took it all in. Upon return it looked much better. We’ll see if she ever picks it to wear, but even if she doesn’t, I had fun making it.

Now on that first visit, I also showed her the trial version I made for the party pantsuit. It looked absolutely horrible on me, but it was made of a stretchy fabric. She found it quite nice and put it on. It looked a whole lot better on her. So we decided that I would finish it and put a band of ribbing in for a waistband. That way my trial version would actually end up being worn (potentially). It’s nice to see someone else enjoy your failures by getting use of them.

Graduation Dress Summer 2018

For the last graduation ceremony, I of course needed another outfit. This time I had just received some fabrics from a friend of mine who was not going to use them any more, and I chose those. Since the fabric has a interesting colourful pattern, I did not want to distract from that will all kinds of difficult pattern pieces or circular skirts. So I sought a dress pattern that had a skirt with a straight bottom. This did meant that I needed to gathering, which I usually hate, but the fabrics were quite thin so it worked out.

I chose pattern 41 from Simplicity Naaimode 16. I made a few small changes: added a lining, put the zipper in upside down, took in the shoulders a little (should have taken those in a little more), shortened the skirt a little, did not pay attention to the  instructions for the pockets at all and I added some elastic to the sleeve hems. I probably need to just shorten those sleeves to balance this dress as it is not truly nice looking. The neckline is also way too deep so I need to wear a top underneath, which I luckily already always do. Still, it feels borderline uncomfortable being such a deep v.

It’s lined in a yellow stuff and I tried to have as few exposed edges as possible. Only the pocket will now fray, hopefully.

I think it was fitting for the occasion, but it requires some alterations before I would wear it regularly. The sleeves need adjusting, the shoulders should be taken in more.

Triangle Scarf – Maimu

Scarf

A triangular scarf is what I have also been working on the past couple of weeks. I started it on April 1st and dumped it in a corner on April 6th when I wanted/needed/craved knitting the Octopus. After finishing the Octopus, which still needs a name and has not yet gotten a blog post because of that, and going on public transport for a trip in the weekend, I knew I needed a project. So I grabbed the 2/3 finished project from the corner and put it in the bag.

Scarf

I found the pattern on Ravelry, it was free and created by E. Pauwels and you can find it here and my ‘notes’ here. It’s a really quick and easy knit, and you only have to think at the beginning and end of a row. Which is pretty nice when you are knitting on public transport. The pattern did state that it would curl, and it really does curl. This is why I’ve been attempting to block it, which seems to have worked out fairly well. It does not curl up nearly as bad anymore. The pictures above and below are taken with the thing spread out and pinned to a spare bed-chair.

Scarf Scarf

It’s clearly not symmetric in colour stripes, and I’m not sure how I feel about this yet. This is why this may become a present at some point..

Colour Scarf

At some point in the past I found some Wibra Fenna yarn that had all kinds of different colours that slowly changed into each other. I really liked the combination and I figured I knew someone else who would really like it, my very colourful mom. Since it was a couple of months before her birthday, I figured I would have enough time to make something from that yarn I found. That made me convince myself that buying the yarn was a good idea.

Scarf

So I browsed Ravelry in search for a pattern. I wanted to experiment more with knitting lace, so I chose a nice easy lace-y pattern. It’s called the Wakefield Scarf from Knitting Daily and you can see my project details here, including the link to the pattern itself. It’s actually quite easy knitting, the repeat is *k2tog, yo, k2tog, yo, k2* on even rows and purl on the odd row and then shifted over one stitch every knit row. This creates a diagonal lace pattern, which is very interesting with a horizontally striping yarn.

Scarf

I told my mother I had a present for her, but sadly I only managed to finish it in the week after her birthday. Due to the wish to work on another knit project (see the next installment of Hopefully Creative for that project). She was worried that it wouldn’t be warm enough, due to the holey nature of the fabric. However, she does love the colours and they go with everything, so she has worn it, voluntarily, and received many compliments. Especially the texture in combination with the colours seems to be interesting.

Scarf

This is it, it curls up on itself, but that’s also part of the charm. You can also barely see the areas where I had to switch to the second ball of yarn and where I made another connection. Scarf knitting takes quite a while for me, with a lace pattern especially, but I still enjoyed the process over long periods of sitting in the train and listening to audiobooks.

Attempt at a Blanket

Quite a long time ago, I wanted to knit a blanked with different coloured yarn squares. I bought eight different colours and white and started knitting the white border. Then I started squares bordered by white. It was horrendous to knit..

It took forever to get as far as I got and I just gave up.

I stopped and started numerous times, but it didn’t really work, I wasn’t into it enough. So eventually, I knit a white border and started trying to get rid of all the yarn ends, there were two ends per colour and two ends for all white separators. It again, took forever to weave in all the ends.

Scarflet Scarflet

This is the result! I do think that it looks nice, but there is just too much work involved to continue to create a full blanket. For now, I might add some buttons and create a little scarflet or something out of it. Or maybe just decorative trim on my chair? Any other bright ideas?

Colours!

This will be a double feature involving two projects with a lot of colour! Let us start with the obligatory Easter eggs. As you may know, I have this ‘tradition’  of painting hard-boiled eggs for Easter, proof can be found here, here and here.

This year was a little different though. I was not at my parents house for Easter and I therefore couldn’t force my mum to hide eggs in the yard. I was also alone and would not be able (or willing) to eat an enormous amount of eggs to facility my painting habits. Moreover, I didn’t have time (or energy) on the Saturday to paint my eggs. So Sunday morning, when I woke up, I put my laundry in the machine and boiled two eggs. I let them cool in a pan with cold water and after 15 minutes or so, I took them out to paint.

What to paint on my two glorious eggs. I googled a bit and decided on the classics, polka dots and stripes. I used my (new-ish) watercolour paints and dotted the first egg with some nice colours. The second egg was made with different colour stripes. Tadaaa!

OLYMPUS DIGITAL CAMERA

I also ate them approximately 3 minutes after taking the picture.. Egg salad on pita bread (empty cupboard and shops closed for Easter), it was nice though!

—- Part 2! —-

The second project was based on a suggestion by my mother. She said that I should make a poppy (more information here and here) from my left over pyjama fabric. So I did. As the fabric is so differently coloured, the poppy is red on the from and blue on the back. I chose to make the little hat in green/yellow. I like it.

OLYMPUS DIGITAL CAMERA OLYMPUS DIGITAL CAMERA

Here it is sitting up.

OLYMPUS DIGITAL CAMERA

So these were my two colourful projects. I liked them, and I hope to keep the eggs tradition alive. Someone needs to paint for the Easter bunny, right?!

Entire Bedtime Jester Suit

When one finishes a Night Clown Jacket, they also need Evening Harlequin Pants to complete the Bedtime Jester Suit (BJS). That is exactly what I did last night. After work, I decided that it was high time to complete the BJS. I used the same pattern that I’ve used for all my other pairs of pyjamas (Burdastyle 7-2010, pattern 132). I did have to trace a little bit from the original pattern as I’ve managed to lose a pattern piece in its entirety.

I wanted to have the front be the same colour in the middle, probably just because I thought it would look nice. I actually managed to cut it out according to plan and I have half a meter left over, so I’m really quite happy with that. It could be enough to make something fun like a colourful poppy or so.

These are the pants. No real surprises there I guess. Construction was done on the serger for leg and crotch seams. I used the regular sewing machine for the top bit, that folds over to encase some elastic.

OLYMPUS DIGITAL CAMERA OLYMPUS DIGITAL CAMERA

The length keeps me warm, even if it looks like I’ve got bow legs, which I don’t, but I’m actually very happy with how that turned out. Apparently this fabric creases like no one’s business, but it is for in bed, so who cares. I would also like to present the completed Bedtime Jester Suit for all of you to peruse.

OLYMPUS DIGITAL CAMERA OLYMPUS DIGITAL CAMERA

I like the fact that the top and bottom do not match. I think it would look weird if they did. I could always wear the pants the wrong way round and see if that would indeed look odd, but for now, I’ll leave it as is. I did already sleep in it, and apart from having to open the button when removing the top, it’s fantastic. I might decide to never do up the top button, but we’ll have to wait and see.

Night Clown

I have just finished the most colourful object I have ever created. It makes me look like a clown and it will serve as pyjamas. This also means that I now have part of a permanent carnaval costume that is multifunctional!

The story goes as follows: At some point in time, I figured out that pyjamas without standing collars leave your neck cold. I made the owl pyjamas without collar and while they are wonderful, that bit of me stays cold. So I wanted to get some more 1 euro/meter flannel-esque fabric with some fancy pattern on it, like the owls from before.

So one morning, I woke up my father and convinced him that he wanted to go with me to the fabric market. We had a fun morning out and I found the most wonderful flannel I’ve ever seen. It’s striped with the following extremely bright colours: yellow, orange, green, blue, red and purple. It had to become pyjamas!

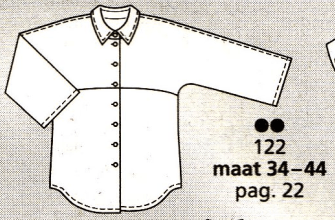
I just bought 18 second hand pattern magazines in a shop around here (for 20 cents a piece), and thus had enough choice for a fresh pyjama top pattern. I chose a pattern from the 7-2010 issue of Burda Style, nr 122, a three quarter length sleeve blouse with attached sleeves.

February 2015 2 pattern

I started a few days ago and it actually went really fast to trace and assemble. I did add some additional length to the sleeves because I believe three quarter length sleeves are evil. They leave the wrists cold. I finished all the insides with serging so it’s really nice on the insides too.

OLYMPUS DIGITAL CAMERA

I did think about the collar, but I accidentally put it in the wrong way round, I wanted the yellow/green side to show. However, it’s usually the red side now. I also chose to do different coloured buttons. Mainly because I couldn’t find enough fancy coloured ones in my stash.

OLYMPUS DIGITAL CAMERA OLYMPUS DIGITAL CAMERA

And this is the completed thing.

OLYMPUS DIGITAL CAMERA OLYMPUS DIGITAL CAMERA

On to the pants! I’m going to be a full clown at night!