Frankenpatterned Leaves

Remember those green plaid pants I made recently? I’ve worn them quite a lot since finishing them and I really like them. There was only one problem.. all my sweaters seem to be red or contain red, not green. So, I did the obvious thing, I knit myself a matching sweater. I’d had the perfect green yarn in my stash for a while, which I’d knitted up into a hideous sweater before that I’d frogged. Yarn sorted, I needed a pattern.

The obvious place to look for patterns is Ravelry, so off I went on a quest for the perfect pattern. I found the Waiting for Spring pattern, and I liked the idea of a stripe of leaves along one side. However, the leaves on that pattern weren’t very nice, so off I went again looking for other leaves. Those were found in the Provence Baby Cardigan. I also didn’t like the neckline, so I substituted the Ginny shawl collar with some modifications. At the end of the knit, there was yarn left over and I like a warm butt, so I added the flap-bit of the Eyelet Yoke Sweater. I also changed the shaping of the sweater completely, so there’s nothing left over from the original pattern apart from the number of stitches I cast on. You might get the name frankenpattern now..

Detail

This is a close up of the leaves and below you can find the complete sweater. Please ignore the very interesting pose I made. The sun was out the morning after I’d finished it, but only if I squatted in a certain way did it show. You can sort of see the flap at the back and the neckline at the front. I made monkey length sleeves such that they had the space to shrink, which they did. I like it, it’s nice to wear, the holes from the leaves are not cold, so it’s even good in winter. This was an entertaining and useful project.

Green Front Back

If you feel like knitting this entire thing, you can do so! I kept track of every stitch I did and noted down the entire pattern here. Next up will be owls…

Green Plaid Pants

More everyday pants have definitely been on the list for a while now. Currently, I tend to wear pants on a daily basis, but I only have a few pairs that I’ve made myself. I seem to gravitate to the three pairs of bought (old) jeans that I own. I want to change that by giving myself more options. Important aspects for pants to me are belt loops for my keys, back pockets for the access card to work and that they stay up and don’t sag too much.

This plan started one day, when, after about the 5th time I saw some plaid fabrics, I decided that I just needed to have a cut in green and in red. The green was destined to become these pants, while I’m hoping I’ll be able to make a nice jacket with the red stuff (which may or may not have green plaid elbow patches in the future). The cuts are probably less than 2 meters long, so I knew I didn’t have much wiggle room.

I also knew that in the pants I wanted to have the plaids matched horizontally for sure, and vertically as much as possible. The plaid is not balanced in that one of the white stripes is lighter than the other. I knew symmetry was not going to be possible. The pattern I chose was the Helena Culottes pattern by Ralph Pink which I made before here. I did decrease the height at the top, such that it is more at my natural waist now. The waistband pattern from another pair of pants was fetched and added to the top, which worked out better than expected.

Front Back

The pants have front pockets, a front zipper opening and double welt back pockets. I wore it to work today and it stayed up for the entire day. I think this is the first pair of pants that, while not being too tight, fit at the top and stay in the correct place. This may also be because there is no stretch in this fabric.

Inside front Inside back

Left the front and right the back of the pants on the inside. I matched plaids all along the legs too and they turned out really well. The fabric is fairly thick, with one side that is fuzzy and one size that is not. I chose to have the fuzzy side on the inside because I thought it would feel better on the skin. I also thought that because it is so thick, it would be better if I would use a different fabric for parts of the pocket lining and waistband. Some man’s button down shirt in a green/blue/yellow plaid seemed thin enough to work. I cut the hidden bits of the pockets from them. The backs of the pockets needed to be the original fabric (mostly) because I wanted to match the plaids where possible. It worked, also in the welt pockets.

Front pants Back pants

I like them, I wore them the entire day and I felt really comfortable, and warm! Now to see if they will survive my living and laundry schedule!

On to the next pair…

T.M.A.K.P.E or The Dragon!

The Most Awesome Knitting Project Ever.

I have accomplished my life’s dream and made a Dragon. Some time ago I found, I don’t even know how, a free knit pattern for a dragon by writer Kim Harrison. After I’d convinced myself that I would be able to knit on multiple tiny (2 mm) double-pointed needles, I decided to go for it and buy all the supplies. I spent hours and hours knitting on what felt like something we in the Netherlands call a satéprikker, it’s loosely translated as skewer in English. Very thin sticks that you would ordinarily stick through meat to put on the barbecue. I was actually excited to come home and continue knitting..!

I followed the pattern almost to the letter, but I have no idea of what my actual gauge turned out to be. I have the feeling my Dragon is a little bit smaller than others, but I don’t mind. I think he doesn’t mind either, as he’s happily sitting on my window sill.

After knitting the entire thing, I had to decide on his finishing. This mainly concerned the eyes. I followed the instructions and initially had the treads come out next to his nose, like a sort of Oriental Dragon. However, he’s more Western in appearance, and I decided to give him a moustache trim. I think I prefer it, but here’s the comparison.

Dragon Dragon

Dragon Dragon

And the wings open and closed. For the next one (and I think that there will be a next one, maybe rainbow coloured wings?) I want to put the wings on with the purl side down, such that he can be displayed with spread open wings.

Dragon Dragon

Anyway, this was one of my most favourite projects of the year. It’s a dragon after all. For notes from Ravelry, check here, and this is where the knit-along is posted. Thanks again Kim Harrison for providing us with the nicest dragon pattern I’ve seen so far!

Baby Dinosaurs

Some time ago, we did a one day table-top session in our larp. At some point I got the knitted Allosaur I was (am, it’s been thrown in a corner) working on out to show. I also had the book, Knitting Dinosaurs, with me. I then got a request for a Triceratops. Now, I didn’t feel like knitting the full size Triceratops, as that one is large! However, the book also has a pattern for Troodons, very small dinosaurs. I figured I could improv the additional features around a Troodon base and have them done quickly. That’s exactly what I did.

First, a Triceratops (purple and red). The defining elements were its four equally long legs, its collar and the horns. The legs were created by simply making four back legs and attaching those. The collar was improvised from the Triceratops pattern in the book, but smaller. It’s a little big, but who cares! The horns were short icords attached to the head, because a Triceratops without horns would just be a Cera, right!

Triceratops Triceratops

Triceratops

The second was a Parasaurolophus (white and red), which completely the normal Troodon with the addition of one horn on its head. There was some shaping involved and the person who received this Dinosaur thought it was a duck at first, when it was upside down.

Parasaurolophus Parasaurolophus

Parasaurolophus

The last was a Tyrannosaur Rex (green). It’s a Troodon body, Troodon back legs and shortened Troodon front legs. I made a little ridge along its back to make it stand out a little. I also added the teeth to make it more intimidating and T-Rex-y. I don’t know if that worked.

T-Rex T-Rex

T-Rex

All dinosaurs have safety eyes with white felt behind them to mimic real-ish eyes, see the last picture for all the dinosaurs for a close-up of their faces. Their legs are attached in such a way that they can still move. That’s why the dinosaurs can both sit and stand. This was a successful project and I still have two Troodon bodies lying around that can still become dinosaurs!

All

Knitted Plesiosaur!

Last Christmas I got the book “Gebreide Dino’s” by Tina Barrett (“Knitted Dinosaurs”).
The patterns are quite fun, although they do not always resemble the original dinosaur that much. For some reason I decided I wanted to knit something fun last Saturday, so I decided to grab the book from my shelf and choose the one I liked the most. That turned out to be the plesiosaur. Now, I like the idea of the book, but either my version is crappily translated, or the patterns don’t match the pictures that well. I documented my problems on ravelry, here. But I’ll also state somethings here.

My dinosaur is 50 cm long from head to tail, the pattern indicated that it should be about 27 cm. However, I did make some changes that influenced its length and I think my translation caused some problems. From other people’s versions, I’m fairly certain that some part of the in- and decreases for the back are supposed to be in every row, but my pattern didn’t say that. I also wanted it’s head to be a little longer, so I added twenty rows to the neck. I also wanted it to have a more pointed tail, so I added some rows between the decreases there. Below a picture of me with Plessy, for scale.

Scale

Some of the bits have been in contact with sand. On Sunday I decided I wanted to knit the light green back fins in another location. So I put on my rollerskates and skated to the beach, where I proceeded to get some weird looks, but finished the back fins. I did modify the back fins a little. The picture with the pattern shows that the back fins are much smaller than the front fins. However, following the pattern the back fins would just be 2 rows shorter, without any other changes. I decided that would not do and knit the back fins until (non-existing in my pattern) row 13.

Back Belly

The instructions wanted me to add sequins to the back, but sequins and I are not friends. I decided so cross stitch some spots on his back with the belly yarn. I like this effect.

View a Front

So while the instructions also state to sew the body first and attach the flippers afterwards after they’d been stuffed. This seemed like a stupid idea to me, so I attached the flippers to the body first and then sewed all around the outside. This worked really well, and I think it looks a little better.

Looking up

I chose to stitch the eye-whites on as my fabric glue wouldn’t stick very well. I also used safety eyes, not buttons. I think it has the cutest face. I did want it to have a slightly more upward pointing neck, so I added some stitches in the neck to pull it together. If I put a glass under it as I did above, it almost looks like Nessy. As I’ve now finished my first dinosaur, it’s on to the second. The friend who gifted me the book is in love with the pterodactyl, and I just happen to have the perfect yarn already! But last and most certainly not least, that face!

That face!


Kiwi Presents

So what do you do when you seen an invite for a colourful party on your colleagues desk? You probably don’t offer to make a kiwi necktie. Well, I did, quite a while ago, but only recently did I manage to get my butt of the chair and get to work!

OLYMPUS DIGITAL CAMERA

Remember when I made my green pants? If you don’t, or have never seen it before, check the goodness out here! These pants have a belt/sash type thing made from a kiwi fabric, on the bias. While cutting out the sash,  I didn’t pay enough attention to how many pieces I needed. This meant that I have had the fabric for another sash in my stash, cut out and all, since August 2013. I’d just found the bit back again when I made the offer.

Then I postponed, and postponed and postponed.. Then I couldn’t find the fabric anymore. Then I found it again, and, vaguely remembering something about the party being in May, set out to create it.

You may know that we Dutchies celebrate the birth of our reigning monarch each year. This year this was on April 27 and I’d made arrangements to be with my parents that weekend. I brought along my sewing stuff and got to work. I started by finding a tutorial (this one) and simply cutting the sash ends to be straight angles. I fused interfacing to the thing and followed the tutorial by adding lining bits and sewing those on. Then I folded the sides to the middle, it turned out that the ‘thin’ end was too thick, so I thinned it somewhat. I sewed it all by hand and once the tie was tie shaped, I added a label that said handmade for you.

OLYMPUS DIGITAL CAMERA


Cute, right! It also holds the tie end, when the tie is knotted. The bottom lining piece is another kiwi, which I find a nice touch!

OLYMPUS DIGITAL CAMERA

My colleague was really quite happy with it, or so it seemed. He also got a lot of compliments from random people, which he found very interesting. He’s head of the financial department, so he’s a real permanent suit and tie kinda guy. Anyway, here is his smiley face!

Kiwi tie

Another Hat

What do normal people do when their ears are cold? They find something to cover their ears, something from their cupboard maybe? Not me, oh no, not me. I decide to turn the scarf I’m knitting into a hat, that was much faster  than walking to the closet, not …

However, the hat making exercise had good results, if you ask me. I was knitting a scarf from a thick acrylic yarn (100 m per 200 gram), 15 stitches or 17.5 cm wide, in seed stitch, I think. I had finished about 40 cm of scarf before I transformed it into a hat. The method I chose was simple, measure the head and knit that much in seed stitch. Then I picked up stitches along one of the longer ends and knit 4 rows of 1×1 rib and bound off in a stretchy bind off. I seamed the back together and ‘gathered’ the top edge with the leftovers of the seaming yarn. I then made a nice little pompom because I still had yarn left over. I attached the pompom to the yarn and had a nice, warm, slouchy, green hat.

OLYMPUS DIGITAL CAMERA OLYMPUS DIGITAL CAMERA

My forehead and nose are still extremely interesting. I get it. Anyways, it’s a much richer deeper green in real life. However, the light in the winter is crap and the flash didn’t make it much better. So trust me that the colour is actually pretty wonderful.

OLYMPUS DIGITAL CAMERA

And this is the back seam (somewhat to the left of the centre in this picture) and the cute pompom on top. It actually dangles on a bit of yarn so it can bounce around and everything.

I still have a top hat that I need to update in some way. It’s really old and quite dusty and dirty, so you may get another hat post in the future. But don’t keep your fingers crossed. I’m slow in starting daunting projects.. I do have another knitted project that I need to show, but because I’m celebrating the holidays soon I might not get around to it.

In the spirit of Christmas or whatever holiday you prefer to celebrate, I wish you some very nice days and a fantastic new year. Enjoy crafting and being hopefully creative!


Those Slippers

So, ever bought a knitting book, found a fabulous pair of knitted house slippers in them and proceeded to knit them up and make them hideous in the process? I have. See the wonderful example below for the gorgeousness I managed to ruin completely. The book is called ‘Breien’ written by Jaroslava Dovcova, and I bought it for approx. 4 euros at the Action.

July 2014 slippers      July 2014 slippers 2

The reason they are now hideous is because I chose the worst shade of old people beige to knit them with. After I’d finished the first, I decided that the  as done in the example was much nicer, so I decided to purchase some fluorescent green. The plan was to frog the first one and knit it again, but I’ve decided I’m lazy.

I’m so lazy that I haven’t actually weaved in the ends and have still worn them plenty of times. There are some redeeming qualities of this project though; 1. they are warm, 2. they are easy to knit (it’s a one-nighter) and 3. they match my new second-hand grandma chair perfectly!

Here is the finished product. You can see the threads still dangling inside them. I will wear them until they fall apart because I failed to finish them properly. I might then finish them properly, who knows..

OLYMPUS DIGITAL CAMERA OLYMPUS DIGITAL CAMERA

Pyjamas again (Part 1)

I like pyjamas. I like sleeping in them, I like walking about the house in them and I sometimes even venture outside in them (though rarely). I also find that I like sewing pyjamas because I can make them as large and long as I want, with pants that is the case anyway. So the last time I went to the fabric market, I also got 3 meters of owly flannely stuff. I have since finished both pants and the jacket, but the pants were done first so they will be blogged first.

Here we go!

I like my pyjama bottoms long and wide, I used the same pattern as for the previous iterations (here and here). I laid my pattern such that there would be two owls on the front of the pants and one on the back, while attempting to keep an owl intact that was printed further down and I wanted to keep whole. It took days for the cutting to occur. I wasn’t really feeling it, then the switch was flicked and it was all done and dusted within a couple of hours.

I serged all the seams, as I managed to figure out the correct tension! This was an achievement only accomplished after an hour of fiddling, I finally succeeded after replacing the needle… Why did I not think of that sooner.. After the needle change it was only 2 more tries to get something decent enough to serge the entire thing with. I serged the bottom and folded it over as hem. Inserted elastic in the casing before sewing the casing and Tada! Pants! With Owls!

Proof is here:

Owl front Owl back

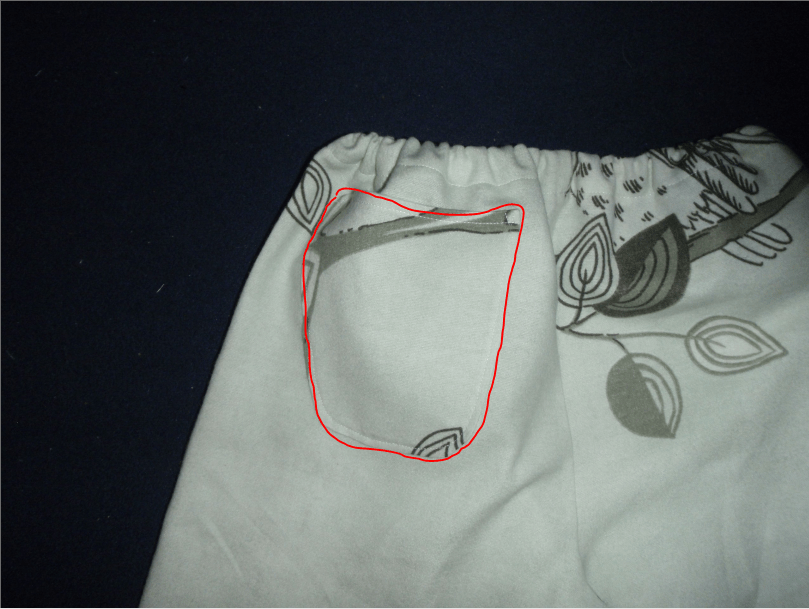
Again, not the most flattering of pants, but they are nice and warm and if everything else fails I can point at the owl! One thing I did change from the previous versions was adding a back pocket (just one). The second picture shows the outline of said pocket because it’s camouflaged (sort of). I wanted a pocket because I often wander around the house and not having pockets is not very nice, to say the least.

Owl pocket Pocketses

Here is a close up of the owls that are on my new pants. Aren’t they cute?!

Owls

The next installment of Pyjamas again will cover the jacket and total owliness of my new PJs.

Kiwi!

So, my mother’s birthday was a while ago and we had a party!
The theme was colours, so everyone was expected to wear something in a fun colour. I assigned myself green, so I could wear my green pants, with a kiwi sash (see below for kiwi sash).

Kiwi sash

I was planning on wearing a black top with a cowl/drape front bit. So, I figured I had to make something nice to go over the top of it. Otherwise black is black and that is, apparently, boring. I started thinking and made the choice to make a green bead necklace. However, it wouldn’t only be green beads, I also wanted to make kiwi beads. I got out my fimo clay and started the work.

Green beads were easy, just roll green clay into beads and stick a pin through it to form the hole. (Admittedly they sat on the living room table for about 3 days before I punched the holes, since I was distracted at some point.)
For the kiwi beads I looked at the matching sash for the green pants (and clearly missed the light middle part). I started with a small green roll, then added really thin alternating green and black rolls to the outside. Another layer of green and black tiny rolls was added. Then a layer of green and a layer of darker green was added to the outside. I mixed some random bits I had left over and they made brown (which leftovers always seem to do). I rolled out the brown very thinly and added it around the roll. I rolled out the now quite fat roll to tighten the cane and make it a bit smaller.

Kiwi bead

I made green-ish beads as a base bead that I could stick three kiwi slices on. I did that a couple of times, until I thought I had enough of the kiwi sliced beads. I still had about 15 cm of kiwi-cane left. So I decided to chop of about 1 cm bits and round out one of the sides. This would form half a kiwi (like the one above). I poked holes through those too, and chucked all of it in the oven. They cooled down and I got extremely frustrated with the wire I chose. It is metal ish and quite thin, but it holds knots very well. I also likes to tangle and fall of the ‘wireholder(?)’. So I yelled at it, but in the end it cooperated and I made myself a necklace. This is it.

Necklace Necklace

The shorted wire holds green beads, the longest the half kiwis and the middle is the sliced kiwis. I like it, and have worn it since the party!