Short Sleeves for Larp

The weather forecast predicted degrees hovering just below 30 Celsius with no let up in sight. So on Wednesday evening, I went through the pattern magazines stash and found Simplicity 16 – Model 49-52, a blouse with a drawstring top. Traced the pieces, cut out the fabric (leftovers from the long sleeve top) and sewed the thing together.

I used French seams throughout most of it. The fabric frays so badly that this is needed. However, at some points doing that would have made seams so thick that it would not have been comfortable. The sleeve hems are not sown double and the facing is some black bias tape. All in all, the shirt worked quite well which is why there is now a second iteration.. Come back later to check that out.

Grey Scale Sweater

This project got started with the yarn. I saw three shades of grey that I thought would complement each other, so I bought them. In my library of Ravelry, I found a sweater that I liked the look of, the EazySqueezy Sweater. Well, I liked the interpretation of the lady in pink, not the original which was a type of ribbing all the way through. So I decided to attempt to copy her version.

Took a bit of trial and error but eventually settled on 22 stitches and a 1×1 ribbing. Knit to the armhole divide while increasing two stitches every 11 rows. I may have overestimated the length of my arms (or I thought I was a monkey, also possible), the sleeves are very long. However, this is fine as they can be rolled up and now have space to shrink. I may also decide to remove some length if it bothers me too much. Divided for armhole, then divided for the neck hole, all sort of trail and error. Made the front of the neck hole deeper than the back and kept on knitting the top. It took about 2.5 ball of the darkest grey. Then I picked up and knit the medium-grey along the chest hole. I quickly decided to take it in by 10 stitches or so because it was quite wide and continued decreasing for some shaping. Once the one ball of medium grey had been knit, I switched to the light grey. Then increasing again for more shaping and I ended with a high-low ish back, which also helps in identifying the front vs. the back.

I still need to wear it out for a full day, also to test the monkey arms. But I like the colours and the fact that I finally finished a pattern that had been in my library for years now. I also picked up another knit project that had been cornered for a bit again, in hopes that I can continue without straining my wrists/arms too much. Knitting with thicker yarn is easier for some reason.

Hook Those Dragons Scarf

So after finishing the dragon shirt, I still had about 25 cm of dragons left over. I’d also been browsing Pinterest for the past few days for those super cool looking triangular scarves. There seem to be two camps: either the large triangle clipped by the corners, or a large rectangle clipped by its corners. In the end, I decided to go for the large rectangle with dragons and a slight nautical feel. All websites with instructions indicate that you need 1.5 meter wide fabric. I ended up having to cut of some bits for it to fit nicely so my scarf is only 1 meter long.

In the end I used:

  • about 30 x 100 cm of teal fleece (back)
  • two times 13 x 100 cm of dragon fabric
  • about 6 x 100 cm of other striped fabric
  • about 105 cm of dark blue nautical looking rope
  • about 80 cm of white with a black running stitch ribbon
  • a closure hook & loop – it’s not really a loop.

I did not want a full dragon scarf, since I’m technically supposed to be an adult (I think?). So I decided to cut the bit of dragon in half lengthwise and use the back of one of the pieces. I wanted an accent in the middle (and didn’t have enough dragon), so I found some striped stretch fabric (also used for shirts before) to put in the centre. I also wanted to emulate this so I cut 4 cm lengths of ribbon and attached those at 5 cm intervals to the dragon that would be backwards. I sewed it all together, adding stitching along the centre stripes and edges to help it keep its shape. Then I affixed the closure with the sewing machine and done!

I’ll test drive it in the next few days, I may melt since I think it could be extremely warm, but we’ll see!

Dragon Shirt

For my birthday this year, I got a meter of stretch dragon fabric from my friend. It languished in the stash until the day before yesterday when I pulled it out to make a shirt. It was always destined to be a shirt because, one: dragons, two: limited fabric and three: stretch. I had located a new to me sewing pattern called the Supersnel Shirt (here). Only two (or three depending on how you count) pattern pieces and 8 pages.

It fit together well and I cut the size S from my dragons. The first attempt at binding was a disaster since the binding was way to short (and/or my shirt did not have enough stretch). Even after lengthening, the centre front still pulls slightly. However, the binding attachment method is very nice. I broke the twin needle I was finishing all the hems with so I had to wait until morning to finish all the hems and the neckline. It was still a fairly quick make. Next to the lengthening of the binding, I also added a small pocket to break up the dragons a little. Not sure if it works, but I liked adding the detail.

I need to wear it for a day before I can decide whether I need to grade to an M on the hips for the next iteration, it does feel fairly tight over there. Again that may be that the fabric has slightly less stretch than the pattern would like. I do think the dragons are totally cute.

Foxy!

Sometimes when you browse Pinterest for some other free pattern, something catches your eye. For me, that happened a while ago, with this one to be precise. It was a super cute, free, adorable pattern of a fox made by Misty’s Whimsies. You can find the pattern here. So I printed the pattern, and it sat around in an envelope for a few months. You see, I couldn’t decide what fabric to make it out off. In the end, I followed the cues from the designer and picked a red quilting type fabric with white polkadots as the main fabric, and a grey fabric with white stars as the contrast. The black nose was eventually made out of a bit of bias tape.. none of the fabrics in my stash were a black quilting type cotton, for some reason.

It sewed up pretty quickly over 3 evenings, the instructions were good, the notches matched and I was extremely happy with the pattern. So far, the only issue I’ve found is that mine doesn’t ‘sit & stay’ very well. Perhaps it needs some heavier butt-stuffing or something. Who knows.. All in all, it’s cute and the pattern worked really well!

Gear Baaahg

I used to have all kinds of useful things floating around willy-nilly in my bag. It would take hours to find the pen, or the nail clippers or the charger for my phone in the depths of my bag. Then one day, I put all those little things in a zippered bag. I did not learn from this experience, since I have been having the same problem in my sports bag. For derby, I have a number of tools, pens and whistles floating around that I could never find when I needed them.

Then I got the luminous idea to make a bag for that gear. I still had some of the sheep fabric left from which I cut the black sheep. So I pinterested around the place and found this tutorial for a zippered pouch from Peggy Sew. My printer doesn’t work, so I measured the dimensions from the screen and drew it out. Two bits of fabric and a zipper, a bit of sewing and done!

It even has a handle so I can quickly pull it out of my gear bag.

After finishing the sheep one, I also made another one, a little smaller, for things like plasters and painkillers. This one is in green, and doesn’t have a bottom seam and was a quick fix. We will see if it holds up.

Warm and Cosy Bunnies Hat

This year I went on an organized five day sailing holiday in September. Since I don’t particularly like travelling, find food scary and am not necessarily a fan of meeting new people that I cannot escape, this was a huge personal accomplishment. The water and the boat were very enjoyable but after a while, I really wanted to knit. Now, I hadn’t brought any knitting, because I probably shouldn’t knit with a crappy arm. However, I decided against being smart and bought a ball of yarn and a set of needles and started knitting a hat.

Now, a simple hat would also be boring, so I decided to add a feature. The feature would be two cable bunnies that I found on the Studio Knit website. I wanted them to mirror each other, so I figured out how to do that. Now, the project wasn’t finished on the boat, but I did finish it. There wasn’t really a hat pattern that I used since I just started knitting. At the end the back needed some pleating, so I pulled the bottom together at the back to create some pleating.

A friend of mine had her birthday, but I couldn’t make it to the party. She has two bunnies, so I figured the hat would be a good fit. It was sent via the post and it did arrive (always a bit scary). She said she liked it, but even if she doesn’t I had a good time knitting it.

Round Up

So.. It’s been a while, but I’ve actually been doing some small things. I felt too lazy to post them before, but now I feel I should, so here goes.

May! I participated in me-made-may and wore at least one piece of self-made clothing every day in May. I also took pictures for the first half.

Fish! I saw a fish pattern on the internets here and decided to make one. So now there is a fish living in my house.

Scarf! I made a another circle scarf, now without any blue to be able to wear it with my other clothes. This one is grey-white and black-white polkadots.

Hood! So part of May was the annual LARP event that I frequent. On the Friday it was due to start, my central heater thing gave an error, so I spent the afternoon calling and waiting for a plumber-type guy to fix it. While waiting, I decided to make a hood based on this pin. I fudged the measurements a bit because I had a pieces of fabric left over from the graduation dress/blue coat that I decided should fit, even if they weren’t exactly correct. I made the thing in about.. 2 hours? I wore it for the weekend and it was nice.

Others! I’ve been working quite hard on two large projects, a graduation dress and a big plushie that have taken up a lot of time. However, they aren’t finished yet (just hems on the graduation dress though), so I won’t post them yet…


Knitting Tiger, Hidden Dinosaur

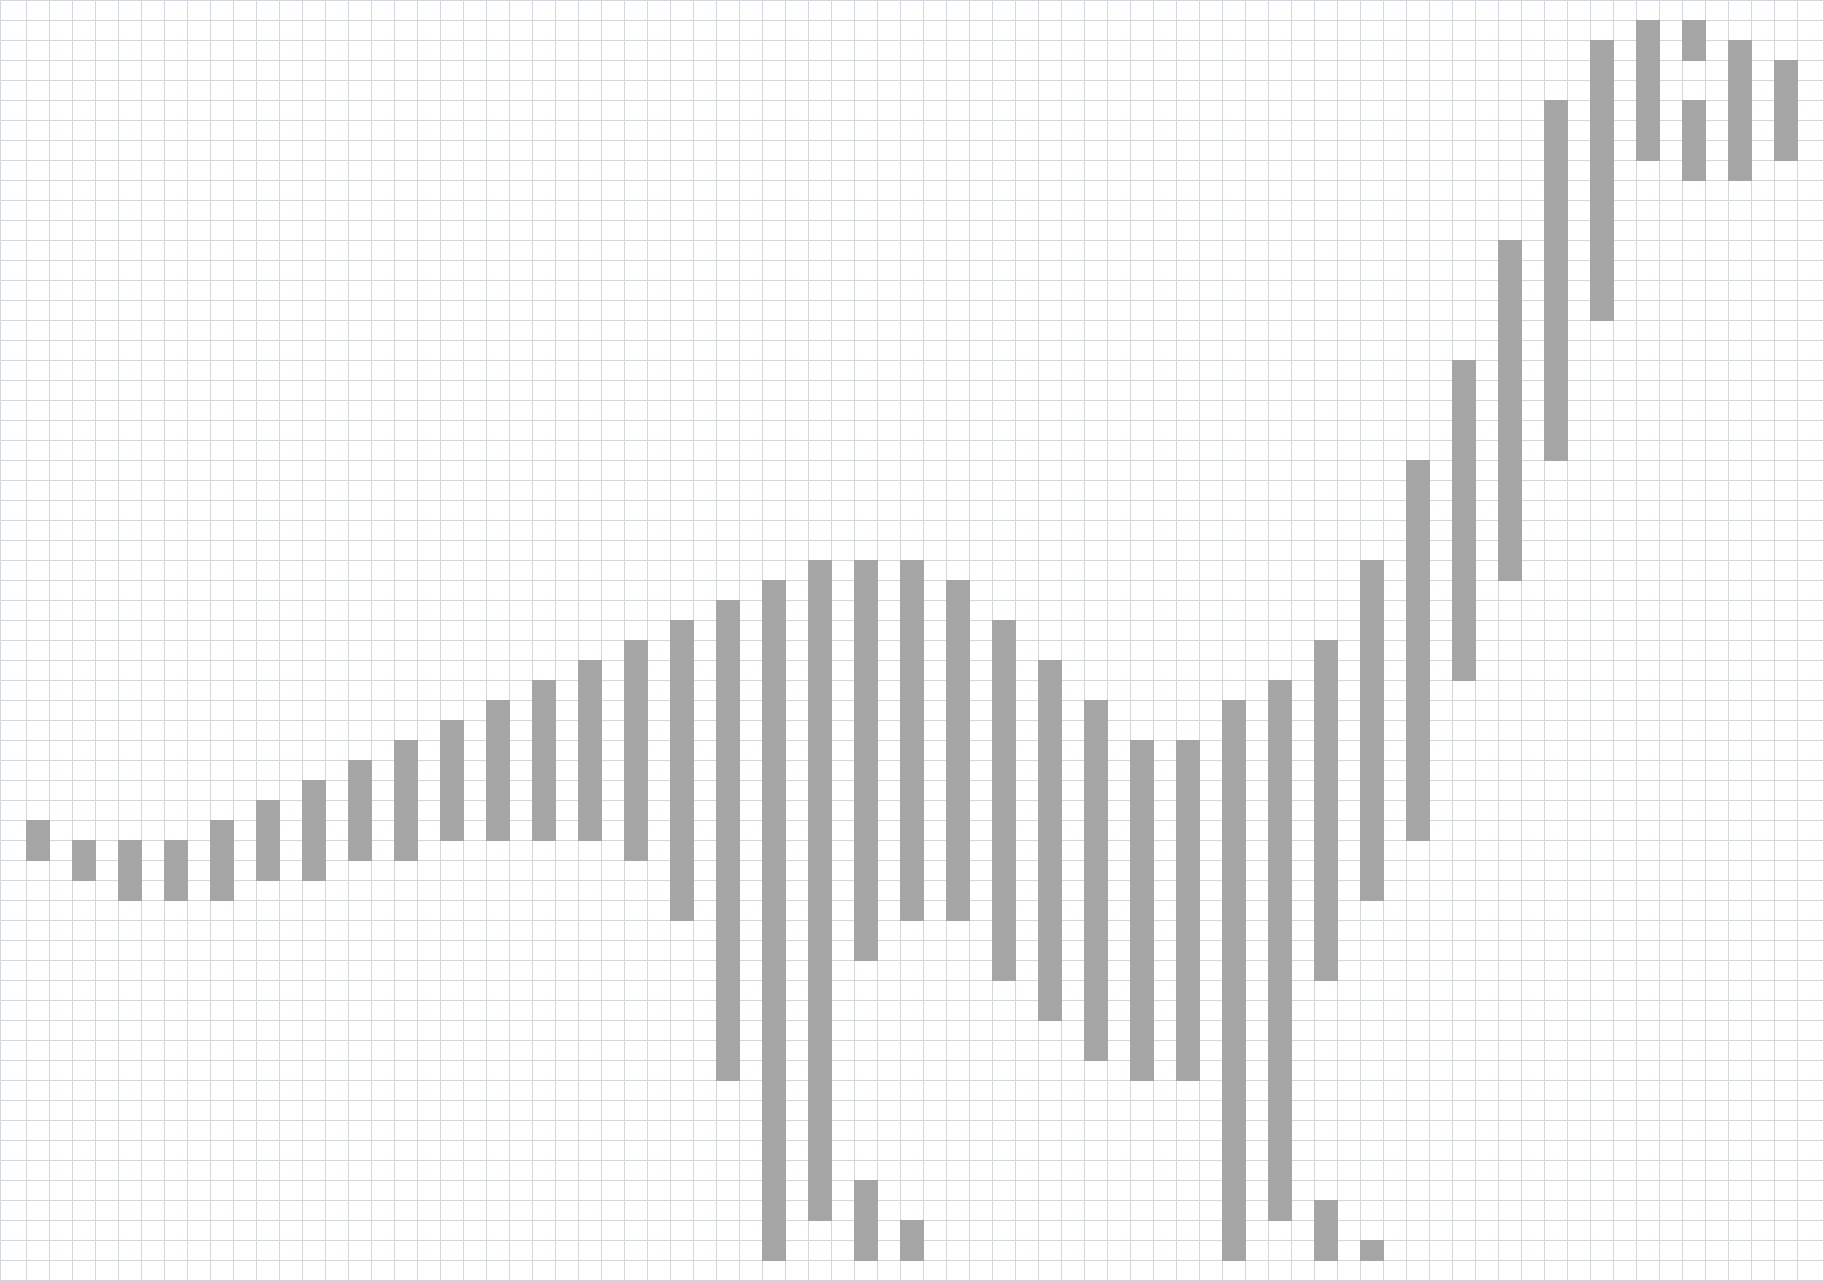
Some people experience the growing up stages in a different manner than would seem regular. I have not yet exited the ‘why’-phase that toddlers usually go through. I also entered the dinosaurs phase a lot later in life that one would deem appropriate, i.e. last year or so. It all started with that ‘knitting dinosaurs’ book. I knit a dinosaur, knit another dinosaur, and another, and some more.. I took some courses on dinosaurs on Coursera (an online platform with Massive Open Online Courses (MOOCs) on different topics). Collected the local supermarket ‘dinosaur stickers’ (still missing 89 by the way) and browsed ravelry on ‘dinosaur’.

Now, I never figured I would be able to wear something with a dinosaur to the office. So when I found the Dinosaur Illusion Sweater, I was both ecstatic and scared. Ecstatic because I’d found a way to wear a dinosaur, legitimately! Scared because it’s for kids age or sized 4 (I’m not sure), now, I can wear children’s sizes sometimes, but even I’m not that small. I’d have to resize it and since it is knitted from side to side you have to do it right immediately. Moreover, sticking to gauge seems to be difficult for me. However, I knit a test swatch and got to work with the calculator. This was my pattern eventually.

Dinosaur

The technique is called illusion knitting. What this means, is that ridges and troughs are knit in the main and contrast colour. To create the picture, the main colour ridge becomes a trough and the contrast colour trough becomes a ridge, such that from the side, the picture appears. From the front it just looks like strips, but from the side, the above dinosaur appears.

The original sweater has sleeves with footprints on it, but after finishing the body, I wasn’t interested in sleeves anymore. After a couple of weeks of resting, I decided that it would be a spencer. I three needle bound of the sleeves on the outside with blue yarn. I quite like that detail. It was knit from one ball of blue and one ball of grey yarn, below you can see what was left over. 

Left overs Side

Above is the side view too. What you may notice is that under certain angles you can see the dinosaur in the stripes, if you look at the back picture, you can see that the tail appears more clearly when it curves around my body. The same in the side view and when you look at the front view, you can sort of see the outline of the dinosaur. It’s impossible to take pictures of this by yourself, so this is what you get.

Front Back

I’ve worn it twice now, and it’s been enjoyable. Up to many more wears!

Blazer

I had a plan, ages ago, to make a suit from some grey fabric. Part of the plan got completed, in the form of Fancy Grey Pants. I have now finally completed the other part of the project, the Blazer part. I’ve been wanting a new blazer for ages now, but always was a little to scared to actually start it or was unable to find a nice pattern.

Eventually I found a nice pattern in a rather odd place. As you may know, Male Pattern Boldness is the blog of a guy who sews and he regularly writes about things he doesn’t get. One of the things was ‘Annie, too’ patterns. Somewhere halfway down the page, I found this fantastic pattern and I wanted to have it. I found a size 8 copy, but when I got it in the mail it looked like it would never ever fit. So I also bought a size 12 copy, which is pretty accurate and what I based this Blazer on.
Pattern

I made some changes, I changed out the sleeves for a two piece sleeve, reduced quite a lot in the bust area and in the back, added two non-functional buttons to the sleeves, worked two buttonholes by hand in the front, instead of one, added some piping to the neckline (below) and added a lining. The general shape still is similar to what it was supposed to be.

Lining Piping

It took time, a lot of time, especially to get the sleeves in right, about 2 days before those were fixed. When I came to the almost end, I couldn’t really decide on the buttonholes I would choose, bound would be nice, but the buttons  I wanted to use are not so large, so that would be mega fiddly.  Eventually I found I really nice tutorial on Williams Clothiers.com for hand worked button holes, so I tried it out, on the left my practices and on the right the final buttonholes. I’m quite happy with them.

Button hole practice Button holes

This is the final project!

Front Back

For the sleeves, I also added a little bit of piping and two non-functional buttons to the bottom. Getting the sleeves in was terrible. I chose the two piece sleeves from another pattern and it was fairly annoying to get those in. It took me over a day of constant fiddling, but right now, I’m really happy with the limited amount of pulling that I managed to achieve.

Side Sleeve detail

The pattern came with a front pocket which I made happen with a contrast welt in black. This way the blazer also sort of matches the pockets on the original pants. I don’t know if the pants and the blazer go together, and at this point I’m not interested enough to try it out. When putting on the front buttons and buttonholes, I figured it would be handy to also be able to close the front pocket, so I put a button on it too and this one is functional!

Buttons Front pocket

Last but not least, I added the lining because getting a thing on is easier when it’s slippery on the inside. The loop is for hanging it up which may be very handy in the future too.

Lusje Lining

I’m going to have to start wearing it to see if it works satisfactorily. Who knows, there may be a MMM update in the future.