Penguin Bag

Tiny penguin companion for storage.

As mentioned in the Whale Bag post, I also purchased the  Penguin – Pinguïn pattern from Waffle Patterns. Since it’s of course imperative to make that penguin bag as soon as possible, I set out to gather my materials. I wanted the bag to look like a real-life penguin, so I bought a white felt-backed curtain fabric for the belly. For the body, I used the same kind of fabric as for the whale, just in black. While the penguin closest in markings might be an Adélie penguin, I didn’t have appropriate orange fabric for the feet, so I chose the whale grey curtain again.

I looked over the instructions and the pattern pieces and decided that I did want to make one major change to the pattern. To increase the size of the inner pocket, I wanted to use all available space to store stuff in. So I measured the body pieces and made an estimation of how big I thought the inside could be. To make the biggest possible pocket, I added circular end sections so that the inside pocket would be shaped like a cylinder. The other addition is to add a zipper to the bottom seam, so I could stuff it after finishing all the sewing.

As usual, the instructions for a Waffle Patterns pattern are very thorough and clearly laid out. In the end, I did almost all the steps but in a very different order. I added some extra d-rings, one to the belly pocket as an embellishment, similar to the snap in one of the original examples. All the way at the end, I undid a little bit of the tail seam to add the other extra d-ring as an attachment point. I had just recalled this pin and this pin and thought I could combine the animal fanny pack and thigh bag thing together.

It all came down to the straps to get those ideas working. So I set out to build the those straps. I wanted two separate ones with side release buckles for easy on-off. A long one that could transform from waist to cross body/over the shoulder strap and a shorter one for thigh or hand strap. I didn’t have enough of the webbing to make the shorter one, so I used the same strap that I used to attach the d-rings for that one.

The long straps comes in two parts, a short part that just has the swivel clip and one side of the side release buckle. The long section has a swivel clip, a slide buckle and the other side release buckle. The length is such that when it’s fully doubled, it fits my waist, but it’s also extendable enough that it fits as cross body. The thigh strap measured to be somewhat too long for my leg, so I could also wear it with wide pants and stuff. I added a snap to the end so that the excess length could be doubled up and snapped away when it was used as a hand strap. I think this will work really well. I can use any of the three top d-rings for whatever configuration of strap I want.

I really like this penguin too. I’ve found that I’ve taken the whale bag out a few times the last couple of weeks. It’s really fun and super nice to pet. I hope that will be the same for the penguin. I cut him in such a way that the nap would run down his body, and forward on his beak, so he would be super pettable too.

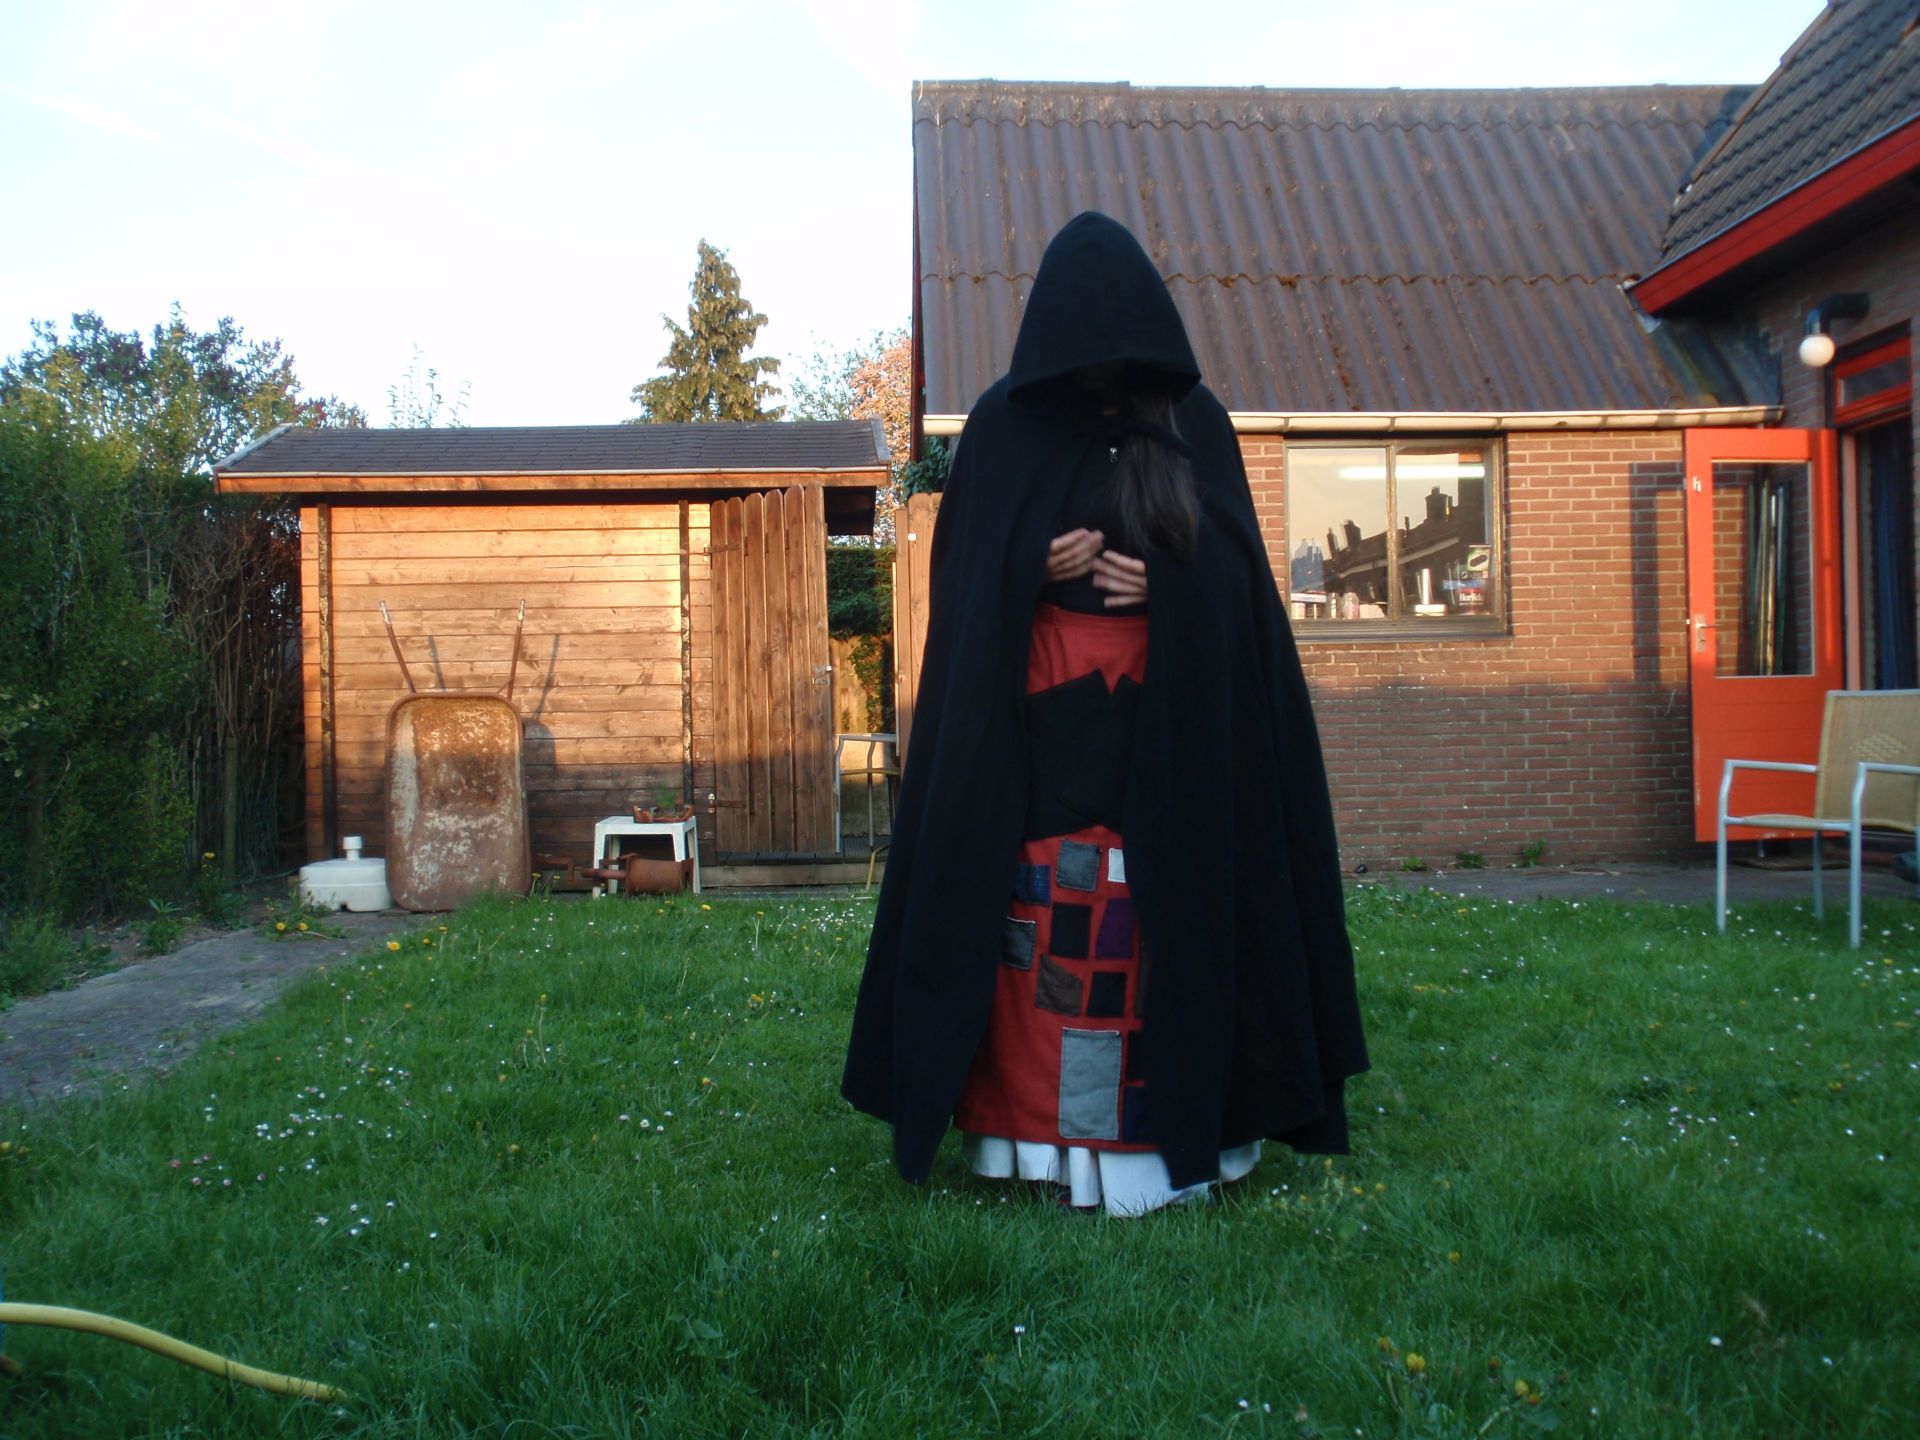
Curtain Cape

Who needs sleeves when you can have pockets in a cape?

Some months ago, I was sent a picture of a comic by abbycomics/Paige Walshe about a girl being asked about her cloak. With the reveal being that cloaks are cool especially lined with pockets. You can find the whole thing here. This sparked the beginning of an idea in my head. It was percolating for a while, but after repeatedly grabbing for my boiled wool cape to feed a cat half a block over, I figured I wanted another cape/cloak thing. This time one that closes and has pockets.

I was looking through all my pattern magazines and taking photos of the line drawings when I stumbled upon a cool cape pattern. Burdastyle 10/2011 Model 101 A/B. It’s a hooded cape with arm slits and a zipper down the front. It had cool style lines and there were a few reviews and blog posts that made it look decent. So I traced that pattern and started looking through my stash. Nothing really caught my eye though.

So, after hibernating in my house for the full week of Christmas, I decided to go on an excursion on the Saturday. I accidentally woke up early and travelled half the country to go buy fabric. I wandered the market and found a stall that sold curtain fabric for only 2 euro per meter. It’s a napped fabric with an almost fleece like black backing. I got 2.5 meters of the grey and 1 meter of black, since I was planning on making the front zipper placket a different colour.

Once I got home and washed the fabric, I was amazed by how quickly it dried and I could get to work swiftly. There was perfectly matching thread in my stash, so that was great. I cut a size 36 with 1.5 cm seam allowances and got going on the cape. Since the fabric is really thick, but doesn’t fray at all, I didn’t overlock anything. I did want to flatten the seam allowances a little, especially in the shoulder corner pieces. So I trimmed the inside seam, stitched the allowances down, and cut the outside seam close to the stitching. I like the decorative nature of this too.

I did make a few alterations, as usual. The pattern calls for lining the hood, which I didn’t think it needed although I did cut a facing for the opening. I skipped the zipper placket all together but included plackets over the arm openings. I’ve added an ‘unzipped’ hook and eye as closure and a hanging loop. The most important change was to add pockets to the inside. Since the cape isn’t lined, I took special care to make everything as symmetrical as possible, and follow the lines of the cape, since the stitching would show on the outside.

There are four pockets in total, two hand warmer pockets that open vertically; the ones closest to the zipper. The other two are content pockets that are on the side front pieces. These open at the top but I can still get to them when the cape is on. The pockets were all made out of fleece, since I thought the cape fabric was a bit too thick.

I quite like how it turned out and it’s so soft! I can just pet this cape forever.

Turquoise Sweater

Machine knitting a self-dyed sweater with big sleeves.

I’ve been wanting to make a wide sleeve, long narrow cuff sweater for a while. But the search on Ravelry didn’t want to provide me with sweater options that I liked, so I continued looking. Eventually I stumbled on a 30s sweater pattern from Etsy that looked promising. I purchased it and promptly found out that it wasn’t as helpful as I’d hoped. The instructions don’t say anything about the ribbing that’s used in the pattern images, for example.

In the end I settled on dyeing four skeins of crazy eight dk yarn with spruce and teal, plus some black speckles. The original patterns requires you to knit the bottom hem first, and then increase to the front and back panel, same with sleeves, cuff first and then increase. However, when I started this sweater I didn’t have a ribber attachment for my knitting machine yet, so I started with the back panel above the hem. I’d figure out how to do the hem later.

The front, back and sleeve panels are basically the same. With the only difference being that the the front panel needed to be cast off sooner than the others. Presumably for a lower neckline in the front. After having knit those four giant panels, I only had about 40 grams of yarn leftover. That didn’t seem like it would ever be enough, so I dyed another skein. This one turned out a little lighter, so it was good that I was only supposed to use it for the hems and cuffs.

I have since also acquired a ribbing attachment for the knitting machine and set about learning how to do the cuffs. It took a few tries, but it’s definitely quicker and more even than hand knitting. I kitchenered the ribbed sections to the corresponding body parts and left sections open for buttons. The overlapping edge gets stitches picked up in a regular interval, where some stitches are not picked up on purpose for the button holes. Then a garter edge is knit for some stability. Buttons are attached on the other edge and that allows all buttons to be functional.

I decided to increase the neckline height at the front to the same level als the sleeves and back piece. I still don’t know how they expected things to line up with them not being the same height. But fine. It’s now done, and I really love the colour – it doesn’t show up on camera accurately at all, but in person it’s great! It wears well, even if the sleeves are somehow just a little bit too short.

Batwing Knit

A vintage knitting machine pattern in some muted fall colours.

The booklet that came with my knitting machine also had a pattern for a striped ladies pullover with V-neck, DP 2219. This seemed like a fun thing to do with the knitting machine that wasn’t a rectangle of some sort, so I set out on a quest to complete the pullover. This started with dyeing yarn. I chose upcycled quarter round yarn, a sock weight with 425 m/100 g and tried to dye it in the colour scheme of a picture I found on the internet.

It didn’t turn out the way I hoped, although I’m not sure exactly what I was hoping for. However, once I started knitting it up, I knew it didn’t really fall within the colours I would love to wear. Still determined to see if the pattern would work, I continued. I made one major change, by decreasing the depth of the v-neck, but apart from that followed the instructions. I finished knitting the front and back, and blocked them. Then I lost motivation and it sat in a bag for a while until I met up with a friend. These colours suit her much better, and I knew I needed some sort of external motivation if I were to ever finish it, so I asked if she might be interested. She was.

So I knit the neckband and after some cursing and annoyance managed to get that installed in a way I liked. It’s probably not the way the pattern intended, but it’s on there now, so it’ll do! The sleeves and bottom still rolled quite badly, so I decided that it needed cuffs. I first knit some in a mock rib on the knitting machine and had them attached before deciding that the join was too awful. So I ripped it all back, cast on ribbing and knit it by hand, both around the cuffs and the bottom.

I think I probably asked before summer whether my friend was interested (providing no guarantees on when it would be completed) and it still took me until September to get it finished, but it is done! She enjoys it, I’m happy to have made something out of the yarn that I wouldn’t use for myself, I liked testing the pattern and doing something different on the machine. A bit delayed, but still a win in the end!

Red, White & Blue

Everyone needs a ceremony dress with happy ribbons.

I’d only vaguely been thinking about the Convocation ceremony this year when I ran into a fabric that would be perfect. The pattern is fun, but still appropriate for work things. It’s a dark blue with little white bars topped with red blocks. The contrast wide stripes on one end of the fabric would work really well as a hem, I thought. The fabric itself is a thick knit, so easy to work with.

I used a pattern from Simplicity Naaimode 41, model 4, also known as Simplicity 8751, version 2. I made some changes to the original though. I left off the sleeves, as the slight extension on the shoulders looked like it would be plenty. I don’t like drop sleeves. To make sure it would cover enough, I did raise the underarm edge a little. However, the neckline was quite wide so I added some afterthought strips to narrow the neckline. I moved the waistband from the inside to the outside and used the dark contrast stripe from the edge of the fabric. Finally, I had to include some decent pockets!

I finished this thing almost a month before the event actually happened! I don’t think I’ve ever been this in time. I didn’t even dally with the hem, which was done sooner than some of the other details. The dress doesn’t have closures, but you make it fit with ribbons in the waistband tunnel. Since I put the tunnel on the outside, I could use those functional ribbons for some extra pizzazz. It worked well and we had a great ceremony!

Portia Shawl

Three triangles together for a geometric scarf.

When trawling Ravelry for more patterns to diminish my stash of yarn, I found this interesting shaped shawl: Portia Shawl by Corrie Purdum. It’s basically three triangles together to form three quarters of square. The claim is that because of those points at the front, it stays over the shoulders well. With the summer happening, I haven’t been able to fully test this, but I expect it to be true.

For the yarn, I chose Krypton sock yarn (100% merino), dyed unsaturated black with dark green in March of 2023. I actually have another ball of this, and this shawl didn’t finish a full ball, so if anyone has suggestions for a project that uses 100 g + a little bit extra, let me know!

The pattern is straight forward and once you get the hang of it, it’s fairly easy to memorize. For fun, I added one extra repeat in the big central diamond shape. The pattern indicates that this scarf needs to be blocked to within an inch of its life. I didn’t manage to stretch it as far as I should’ve. I’m unsure how anyone would manage. I did enjoy playing with my new blocking wires, it does make it easier when you have a meter wire instead of 30-40 cm.

I made a choice with the blocking that the back edge would be blocked to little points, while the ‘sides’ would be blocked straight. This results in different kinds of edges which I think is interesting. I also like that the green randomly appears every now and again. I’m now just waiting for fall for some better shawl wearing times!

Dye Fun!

Some more dye experiments – olive does weird things..

I recently got to spend a lovely afternoon with a colleague, playing with dye and bleach and trying some new things.

We mostly used Alpaca 4 ply yarn, and dye in three shades of blue (brilliant, royal and sky), periwinkle and gunmetal grey.

Turns out that if you put too much blue in, the variation gets lost. To get some variation back, we put some bleach over it, but it didn’t do all that much. Maybe my bleach was too old or it just doesn’t work. We decided to tried again with only brilliant blue, the periwinkle and some gunmetal speckles. A much more defined result.

As a contrast to the blues with periwinkle, we also did a silver grey one. It’s always amazing to see how you end up with clear water after dumping in a bunch of dye.

For some variety, we dumped some dye labeled ‘olive’ in the pan, and added two skeins of kid silk, and one alpaca 4ply. The yarn turned entirely green first before becoming orange-ish? It was as if it entirely split; super interesting to watch and I should’ve time-lapsed it, somehow.

One of the blue ones and the olive yarn stayed in my house while the rest went home with my colleague. It was a good afternoon and I do really love experimenting!

Ginkgo Jumpsuit

Short little ginkgo leaf jumpsuit

The Christmas gift from the office is always a gift card to spend at a local bookshop. This shop also sells sewing magazines, so I regularly check out the selection. The Burda Style 07/2024 version had some interesting patterns so it came home with me. I saw model 124 – Jumpsuit in it (also available online) and thought it looked very cute. So I searched through my stash and found this lovely ginkgo leaf fabric that has a bit of stretch. Then I dove in the deep end without making a mockup.

There were some small changes, I added belt loops, lengthened the pockets and added an extra security hook and eye at the top of the zipper. The pattern calls for buckles with a pin, but I didn’t understand how that would help, so I removed the pin. The straps are supposed to be scrunched through the buckles anyway, so where would you even make a hole for the pin? The instructions also seemed to miss a few little steps, but it worked out in the end.

If I were to make it again, I would shorten the body length a smidge, because it’s a little low (short people problems), and I’d place the straps further inwards. Apart from that, I think it’s super cute even if I don’t know how much wear I will get out of it. Summer is fickle at best in the Netherlands and even more so this year.

Split Skirt

Historically inspired pants that can turn into a skirt with an added panel.

I was thinking about secret pants, also known as split skirts, for a while. It probably started some time during covid lockdowns when I got into the historical sewing. It took a bit longer to commit, but in June of 2022, I purchased the Laughing Moon Mercantile #150 Split Skirt pattern. Printed it, cut it out, took all the relevant steps and then.. left it. The pattern was in the corner of my living room, waiting for me to decide which fabric I wanted to use.

It took two years and a bit to actually get myself in gear to make this thing. I chose a bottom weight brown fabric that I do not remember purchasing. Maybe a de-stash gift too? I made some minor changes to the pattern. The pockets seemed very shallow, so I added more length and the legs were very long so they were shortened. I added back pockets and belt loops. The fall front pieces were cut partially out of lining because they would not fit on the fabric anymore and they are hidden anyway.

All the panels were serged and then sewn together on the Pfaff. I had to remove about three centimeters from the top of the split skirt to make them fit near my waist. The front panel was supposed to be lined with lining fabric, but that didn’t seem smart, so I chose to use the main fabric too. The buttons came from my stash, one of the few options that looked old-ish and that I had enough of. All the buttonholes were made with the Greist buttonholer on the 1901 machine. It took a while, but the results are so satisfying. One of the back pockets was absolutely perfect flat, but my butt isn’t flat so it does gape a little when worn – very disappointing.

The first pass of the buttons through the buttonholes was a struggle, but it’s much easier after a few goes. I like the fall front method of closure on these pants. It gives a little extra security. Since the legs are quite wide, I do have to pay attention to not get stuck on the pedals of my bike, but it’s not been a problem yet. All in all, this thing is fun to wear, with or without the front flap buttoned on. I do now also have an incentive to make a top that fits with this. There isn’t as much brown in my cupboard as I thought.

Octopus Award

Making a plush to celebrate a fellow skater

Our new tradition of making an award for the end of roller derby season took place again. I got to make an award for one of our newest skaters. My inspiration came very late, but when it did, it hit hard. My skater is someone who does all kinds of things; in her daily life she’s a hairdresser and a barber, is getting married soon, moving into her house etc. I wanted to reference all of that, and include her way of turning around on roller skates, which is more of a ‘disco turn’ than a step transition. So I decided to make an octopus plush with a disco ball for helmet.

I already had the Octopus plush pattern from Choly Knight, so I decided to reference that. Since the normal round arms from the pattern wouldn’t be conducive to give a ‘holding something’ impression, I wanted some longer arms. Reddit came to the rescue with this post by CynamonoweKrzeslo, where the sewist also helpfully shared the pattern for their tentacles. I enlarged the pattern a little until it was the size that I wanted and cut some out in a grey fleece and yellow bobble minky. The test-tentacle looked great! So I cut out eight more before heading to bed.

The next morning, I assembled all tentacles and needed to decide on the size of the head. In the end, the original Octopus plush pattern head shape, the eyes and laughing mouth were all enlarged 150% and printed out. This looked great, so I embroidered the eyes and mouth on and assembled the plush together. One of its arms is put into the disco fever pose with a little hook that you can hang a tiny loop on. The helmet is made from foam and an overlay of sequin fabric (for a disco ball effect) – I am still finding sequins in my house. The pattern was based on the normal head shape of the octopus plush with a little extra space. Some ribbon is used for the straps.

To reference all the items, which I wanted to keep removable, I chose word icons (to keep a similar style) and printed them on cardstock. I put two together with a loop of sticky tape to get them to stay around the tentacles. There are two roller skates, a ring, a donut, a cupcake, a comb, scissors and keys. I also wrote a rhyming poem to explain what I did. The helmet is also removable, so it can also be a ‘naked’ octopus.

I think he’s adorable and I hope she’ll enjoy having him around!