Penguin Bag

Tiny penguin companion for storage.

As mentioned in the Whale Bag post, I also purchased the  Penguin – Pinguïn pattern from Waffle Patterns. Since it’s of course imperative to make that penguin bag as soon as possible, I set out to gather my materials. I wanted the bag to look like a real-life penguin, so I bought a white felt-backed curtain fabric for the belly. For the body, I used the same kind of fabric as for the whale, just in black. While the penguin closest in markings might be an Adélie penguin, I didn’t have appropriate orange fabric for the feet, so I chose the whale grey curtain again.

I looked over the instructions and the pattern pieces and decided that I did want to make one major change to the pattern. To increase the size of the inner pocket, I wanted to use all available space to store stuff in. So I measured the body pieces and made an estimation of how big I thought the inside could be. To make the biggest possible pocket, I added circular end sections so that the inside pocket would be shaped like a cylinder. The other addition is to add a zipper to the bottom seam, so I could stuff it after finishing all the sewing.

As usual, the instructions for a Waffle Patterns pattern are very thorough and clearly laid out. In the end, I did almost all the steps but in a very different order. I added some extra d-rings, one to the belly pocket as an embellishment, similar to the snap in one of the original examples. All the way at the end, I undid a little bit of the tail seam to add the other extra d-ring as an attachment point. I had just recalled this pin and this pin and thought I could combine the animal fanny pack and thigh bag thing together.

It all came down to the straps to get those ideas working. So I set out to build the those straps. I wanted two separate ones with side release buckles for easy on-off. A long one that could transform from waist to cross body/over the shoulder strap and a shorter one for thigh or hand strap. I didn’t have enough of the webbing to make the shorter one, so I used the same strap that I used to attach the d-rings for that one.

The long straps comes in two parts, a short part that just has the swivel clip and one side of the side release buckle. The long section has a swivel clip, a slide buckle and the other side release buckle. The length is such that when it’s fully doubled, it fits my waist, but it’s also extendable enough that it fits as cross body. The thigh strap measured to be somewhat too long for my leg, so I could also wear it with wide pants and stuff. I added a snap to the end so that the excess length could be doubled up and snapped away when it was used as a hand strap. I think this will work really well. I can use any of the three top d-rings for whatever configuration of strap I want.

I really like this penguin too. I’ve found that I’ve taken the whale bag out a few times the last couple of weeks. It’s really fun and super nice to pet. I hope that will be the same for the penguin. I cut him in such a way that the nap would run down his body, and forward on his beak, so he would be super pettable too.

Impromptu Sweater Dress

From flat fabric to dress in less than a day.

This morning after slowly rolling out of bed at 10:20, I wasn’t sure what I was going to do with my day. So I did some hula hooping as a form of exercise and decided that I wanted to wear a sweater dress. Small problem, I don’t have one of those. However, I do have the Lekala Tunic Pattern nr. 4742, the Pattydoo Nelly sweater pattern and a large fabric stash.

I pulled out this sweatshirt type fabric with a soft grey fuzzy backing and got to work. First, I brought the Lekala pattern back to its original state without the shortening required for the flamingo sweater. I grabbed the hood pieces from the Nelly pattern and pinned it all to my fabric. I added a little length to the bottom of the dress pieces and cut it all out. Sewing it went smoothly, only one unpick where I put the center front hood facing bit in the wrong way round.

Around 16:00, I had a full dress together and was trying to decide what to do with the sleeve ends. I didn’t really feel like hemming them and then I remembered that thumbhole cuffs *exist*. So I made some of those, following some tutorials on YouTube. The bottom of the dress was hemmed and then I had to mend a tiny hole on the front. 17:15 and the whole thing was done! Less than a working day to finish this thing. It’s nice and warm, just in time for summer (not), and I am yet again certain that I will never participate in a speedy sewing competition…

Whale Bag

Having a whale of a time making a plush bag.

When I got a notification that one of my favourite pattern companies (Waffle Patterns) had just released two new bag patterns, I couldn’t resist. Off to the sale section of the website I went and before I knew it, I’d hit ‘add to cart’ on novelty bag patterns shaped like a Whale – Walvis and a Penguin – Pinguïn. While no longer on sale, I do think these are particularly adorable.

I’d been looking to make a whale bag for a while, ever since coming across the whale shark bags on Pinterest. I spent a decently long time clicking around the internet at that point to find something I liked, but decided I could probably draft it myself if I really wanted to. But then the pattern was released and that plan was out the window and a new one was quickly formed.

The pattern has 10 pattern pieces, of which three are shapes for stabilizer. There are two rectangles for the different pockets and the main body is really only 5 (doubled) pieces. This meant that I could cut it out from the leftovers of the fabric I used for the curtain cape. Since it’s a curtain fabric, it has some stability of itself and it’s very pettable which I figured would be great for a bag.

Since some whales have baleens, I thought it would be really cool to give him some baleens with the fabric I also used for the reversible dragon egg. This meant that I cut two layers for the body base section. Bottom layer was the curtain for stability and then the soft, fuzzy, white fabric for the overlay. That was sewn down along a few ‘stripes’ and cut to size. This front section also doubles as a pocket and I used the egg fabric for the lining and the pocket piece.

The pattern is great! The markings line up and the instructions are detailed and easy to follow. I made my own life a little harder by doing that overlay for the body base, which meant a lot of layers in one go. I also think it would’ve been better if I had found 12mm tape for the d-loops that hold the strap. It was a bit fiddly now with the wider tape.

I only changed a few things from the pattern; the side pocket is on the wrong side (my bad), the mouth doesn’t have visible topstitching but it is tacked down nearly invisibly, I added some fun extra d-rings on the side as in one of the examples and I put a zipper in the bottom of the large pocket. Since I am unsure if I’ve put enough stuffing in, I wanted to still have it be accessible. This afterthought zipper actually works great, so I can stuff mr. Whale more or less depending on what turns out to be my preference.

If I make one again, I would make a few small tweaks. I’d make the big pocket bigger, put the side pocket on the left side of the whale and put the zipper in the big pocket bottom a lot sooner. I’d also change the shape of the tail, it’s a little pointy now and I think it would look better if it was more filled in. All in all, I do love this little project. It’s absolutely bonkers but I’m sure I’ll find some place to bring my whale!

Black Skelly Cat

Little skull faced cat plush.

I know someone who really loves skulls and because I wanted to make her a gift, I looked for a plushie that had something skeletal on it. I settled on Choly Knight’s Sugar Skull Kitty Plush, a free pattern from 2016. As usual, the instructions and the pattern were great and I quickly got going with embroidering the face and stitching down the felt pieces. I just needed to put the pieces under the sewing machine to finish it, but for some reason I couldn’t get myself to do it, so it stayed in bits for several weeks.

Once I finally got going again, it was very quick to finish. Just stitch the body/head piece together, fill it and then stuff the little arms, legs and tail. The tail is attached in the one place and cannot move. The fun thing about this pattern, though, is that it calls for decorative buttons to attach the legs and arms. I wanted to make those movable, so I used some instructions from another pattern to make sure that the limbs weren’t solidly attached. I think it gives the thing some extra charm.

Now it gets to live in a house filled with other skulls. I’m sure it’ll appreciate that!

Meadow Jumpsuit

Wrapping up for ceremonies.

End of January(ish), so yet again time for a new outfit for a ceremony. This time I was very indecisive. I made several plans and didn’t execute them. I originally thought that I would make this dress in a teal-ish fabric. But I never got excited enough and decided that it would probably be too cold. I then looked through all my pattern stash to see if something sparked joy and it did not. So on to the Pinterest journey where I finally ended up on this: Vogue 1645. It’s a wrap jumpsuit and it did give me some brain tingles.

I couldn’t remember where and how, but I thought I’d seen a free pattern like it at one point in time. So more scouring of Pinterest where I found several other expensive patterns and once I’d basically given up, suddenly the Meadow Jumpsuit pattern from Mood appeared. It’s a free multi-size pattern with very limited instructions. I’ve tried some of the Mood patterns before, and I don’t understand their sizing or their fit. However, having a base always helps me to explore options.

The plan was to follow the pattern as is, apart from adding pockets and widening the flap. This is not entirely what ended up happening. First of all, it calls for a stretch fabric and I’d originally found a brown-purply stretch stuff with a shiny and a dull side. Thought it would look fun but it was also thin, and I didn’t trust it in the winter air. Then I found the Redux version of the pattern that specifies you can add a side zip and use a non-stretch fabric. So I grabbed some grey thicker stuff with a woven and a fuzzy side.

I’d already placed all the pattern pieces on the purple, so I just copied the layout from the purple and started cutting. I ended up widening the flap and its facing by a fair bit. To test fit, I basted the pants part together, which fit well enough even if they were a lot long on my short body. For the bodice, I had already sewn the collar and facings in place before truly trying it on. That meant I had to do some alterations after the fact, since I was not ripping all of that out.

This included taking a wedge out of the shoulder seam, cutting at least 2.5 cm off the bottom, reducing the side seams by at least 3 cm and thereby also pulling the armscyes in further. There are pleats on the top of the sleeves for ease, there is a center front zipper in the pants since I didn’t want to deal with side zippers. I did not understand the instructions for the sleeve flounces, so I just .. did something. And I accidentally sewed one of the ties in the wrong side seam, but honestly, I like this better. It now creates a belt effect in the back, so this was a successful design element.

It held up well during the event and the only parts of me that were a little cold were my wrists. I also feel quite fancy when wearing it. It’s a little bland by itself but with a fun scarf, I can almost pretend to be an actual adult.

Curtain Cape

Who needs sleeves when you can have pockets in a cape?

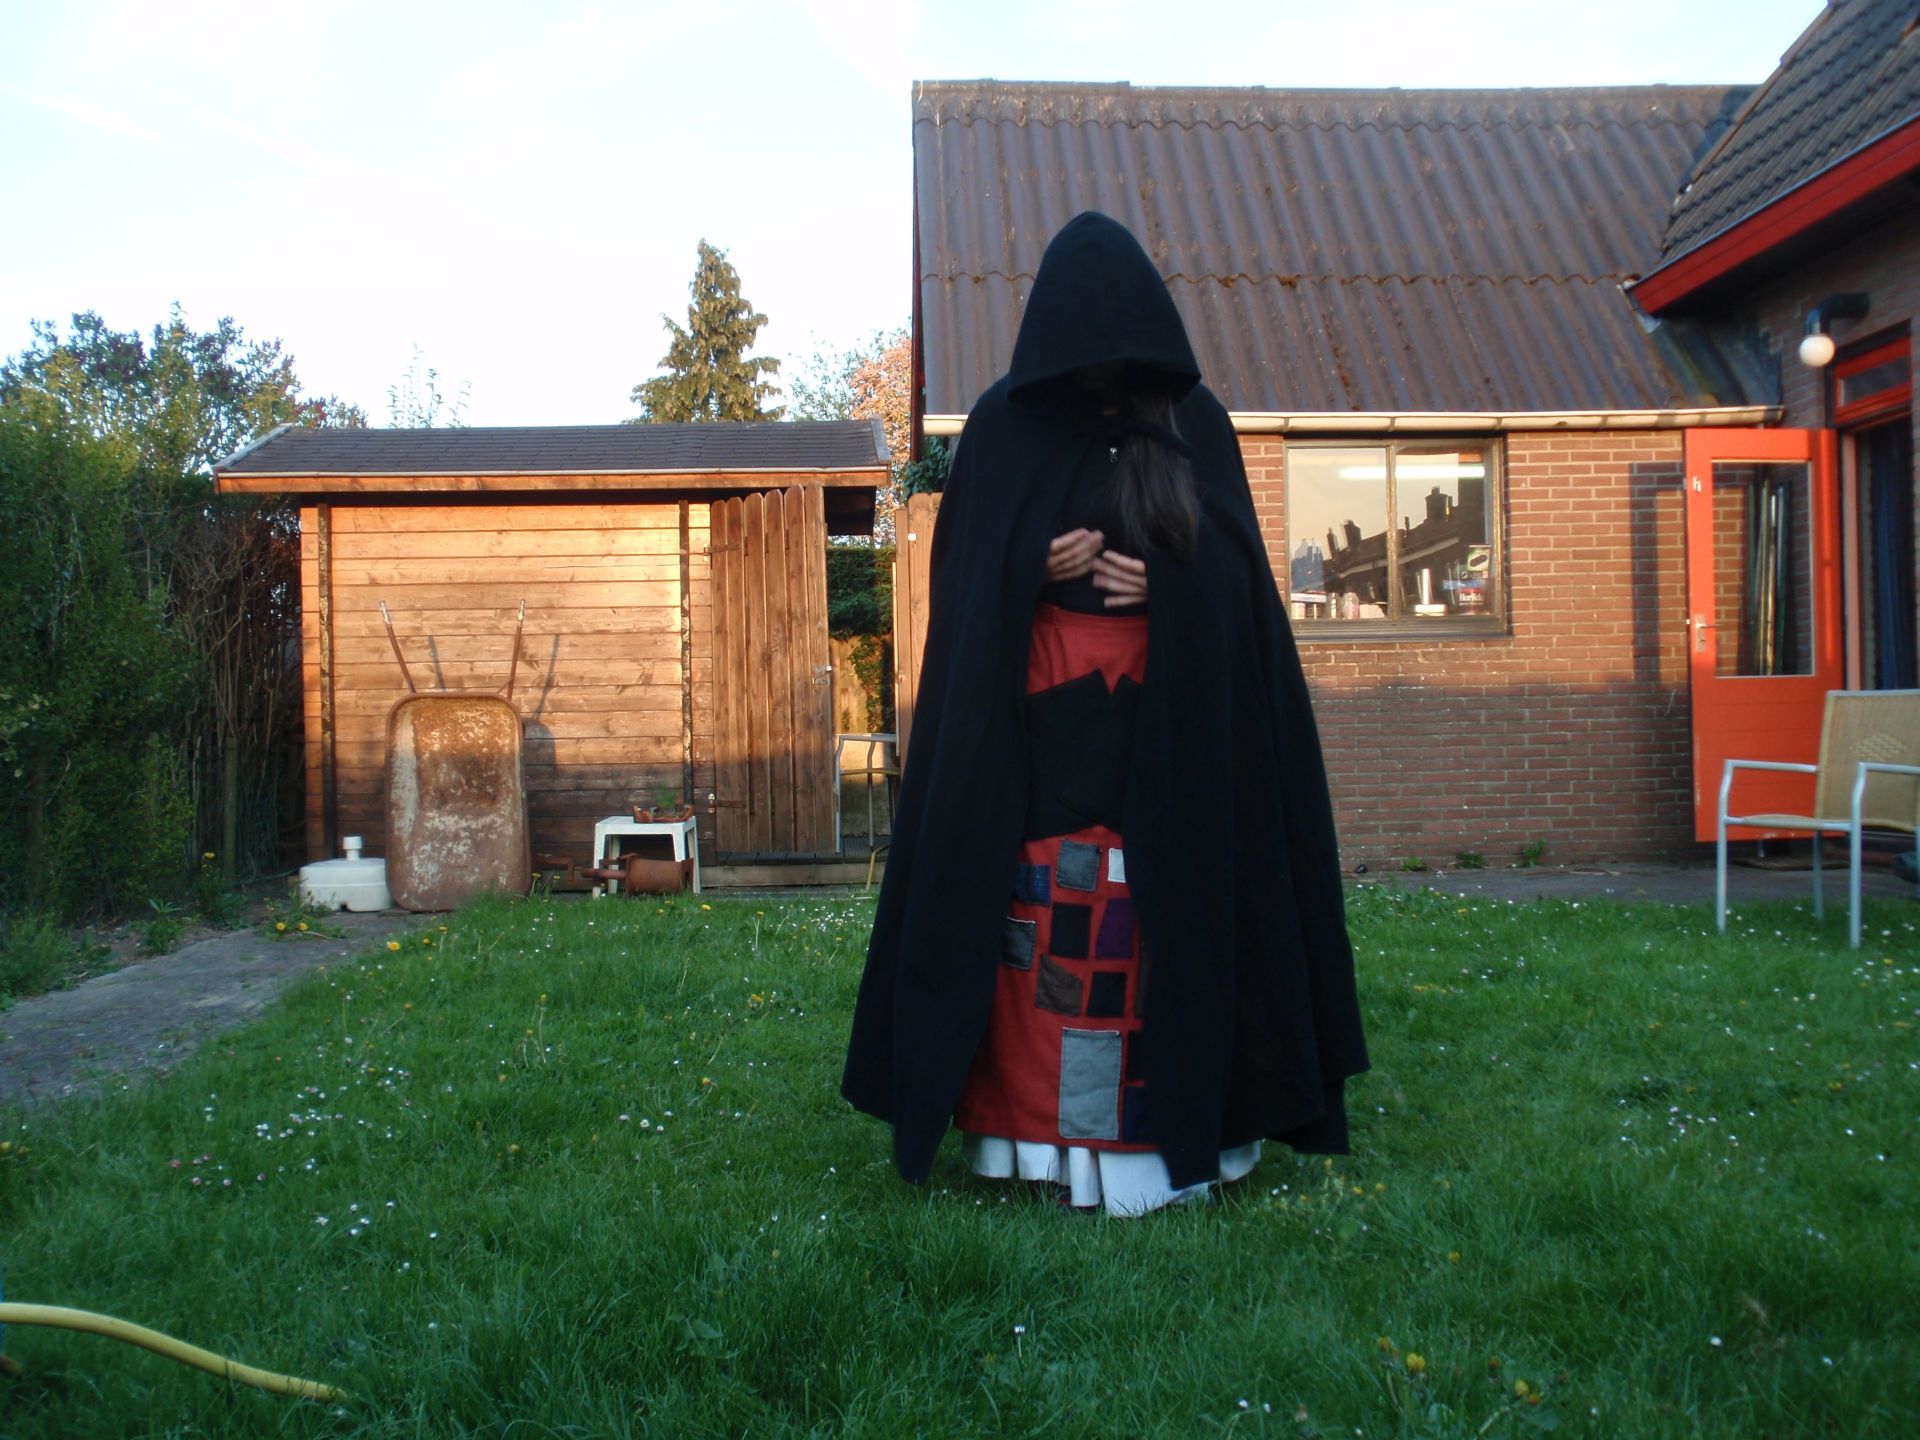
Some months ago, I was sent a picture of a comic by abbycomics/Paige Walshe about a girl being asked about her cloak. With the reveal being that cloaks are cool especially lined with pockets. You can find the whole thing here. This sparked the beginning of an idea in my head. It was percolating for a while, but after repeatedly grabbing for my boiled wool cape to feed a cat half a block over, I figured I wanted another cape/cloak thing. This time one that closes and has pockets.

I was looking through all my pattern magazines and taking photos of the line drawings when I stumbled upon a cool cape pattern. Burdastyle 10/2011 Model 101 A/B. It’s a hooded cape with arm slits and a zipper down the front. It had cool style lines and there were a few reviews and blog posts that made it look decent. So I traced that pattern and started looking through my stash. Nothing really caught my eye though.

So, after hibernating in my house for the full week of Christmas, I decided to go on an excursion on the Saturday. I accidentally woke up early and travelled half the country to go buy fabric. I wandered the market and found a stall that sold curtain fabric for only 2 euro per meter. It’s a napped fabric with an almost fleece like black backing. I got 2.5 meters of the grey and 1 meter of black, since I was planning on making the front zipper placket a different colour.

Once I got home and washed the fabric, I was amazed by how quickly it dried and I could get to work swiftly. There was perfectly matching thread in my stash, so that was great. I cut a size 36 with 1.5 cm seam allowances and got going on the cape. Since the fabric is really thick, but doesn’t fray at all, I didn’t overlock anything. I did want to flatten the seam allowances a little, especially in the shoulder corner pieces. So I trimmed the inside seam, stitched the allowances down, and cut the outside seam close to the stitching. I like the decorative nature of this too.

I did make a few alterations, as usual. The pattern calls for lining the hood, which I didn’t think it needed although I did cut a facing for the opening. I skipped the zipper placket all together but included plackets over the arm openings. I’ve added an ‘unzipped’ hook and eye as closure and a hanging loop. The most important change was to add pockets to the inside. Since the cape isn’t lined, I took special care to make everything as symmetrical as possible, and follow the lines of the cape, since the stitching would show on the outside.

There are four pockets in total, two hand warmer pockets that open vertically; the ones closest to the zipper. The other two are content pockets that are on the side front pieces. These open at the top but I can still get to them when the cape is on. The pockets were all made out of fleece, since I thought the cape fabric was a bit too thick.

I quite like how it turned out and it’s so soft! I can just pet this cape forever.

1906 Beach Suit

Making a four piece suit from 1906 that only took 3.5 years to complete.

Back in October of 2022, I talked about finishing the blouse of a 1906 Beach Suit pattern I’d bought on Etsy in July of 2021. The pattern has four elements; a blouse, a belt, a skirt and a jacket. I have now managed to complete one of each element!

The original plan was to make the fun leafy blouse and make the rest of the suit in a dark fabric. However, after cutting out all the pieces from the black fabric, it turned out to be a wrong fabric choice. It was too stiff and there were sun marks all over is, so it looked faded in places. In the end, those pieces ended up in the bin because there was no point in continuing. I’d never be happy with the end result. So I pivoted, and found a red fabric in my stash.

It’s a strange, probably quite synthetic material that’s soft on the outside but almost crunchy (?) on the inside. I can’t really explain it. It’s not very thick, but there was enough of it to cut the other pieces of the suit. Based on a picture from April 2023, I had already cut the skirt, jacket and probably most of the belt some time after finishing the blouse.

The skirt was the piece I believe I finished next. I added pockets, because without pockets a skirt is not useful. They are quite large and can hold some stuff. I also wanted to make it somewhat adjustable. The aim was to make it wearable with or without a corset, so I added some extra thread loops to the back for closure. Since it was supposed to be worn with a belt, I figured that could be hidden effectively enough. I think this skirt was finished sometime in April 2023.

The belt however, took another half a year. I wanted it to be stable enough so there is something that I believe might be horsehair in it for stiffening. It’s also got a few bones and it’s almost entirely handsewn, because I kept messing up. As with the skirt, I wanted this to also be adjustable, so I added lacing. And then I decided to make my life a lot harder and added hooks and eyes to allow it to open without having to undo all the laces. My brain took so long to figure out how to get this to work, and it think it mostly does now. A message to a friend indicates that I finished it in September 2023.

That jacket has been hanging, mostly finished over one or the other mannequin in my living room since at least April 2023, if not longer. I had tried sewing the facing in but it puckered like no tomorrow, so I gave up. Earlier this week, I finally got the courage to try again. In two fell swoops with some help from an iron and simple perseverance, I finally finished all the seams and it’s now done!

So that means that all four parts of the beach suit have been completed! It only took 3.5 years… And with the change in fabric, the blouse and the suit don’t really go together anymore. It’s very Christmassy in colours, not in amount of winter warmth. That’s a problem for another day though. The skirt does need a petticoat for wear, because it’s too thin otherwise and doesn’t fall correctly. I think the belt solution works, even if it’s possibly not the prettiest thing you’ve ever seen. I like the big sleeves of the jacket and how it hits. Now it’s just waiting for decent weather and taking it out to the beach!

In any case, happy holidays if you celebrate!

Letter Sweater

Blank canvas allows for letter options on this sweater.

A few years ago, we got a Christmas card at my work that was a white background, with black letters: kerstkaart. (translates as: Christmas card.)

The most minimalistic Christmas card I’ve ever seen. I love it so much. That caused this idea to float in my head about getting a sweater with ‘trui.’ (sweater.) on it, and adding interchangeable letters to the front. That would allow for the outfit to match my mood/the circumstances.

I finally decided to take some action. I didn’t feel like making a super simple blank canvas sweater, so I bought one. Then I found a font I liked on the internet and settled on ‘Simply Mono‘. It looked nice, and the < part of the k was attached firmly and not just stuck on. I liked the shape of the i too. So I decided on the font size (130), printed it out and cut the letters out of a felt placemat.

I attached the pointy parts of snaps to the front of the sweater and the flatter bits to the back of the letters. Since the letters didn’t all have the same amount of ‘letter’ in the same space, some letters are spaced closer together when they are snapped to the sweater. But I’m embracing that imperfection and actually think it looks more fun.

The trui. letters were sewn down, so they are not interchangeable. For now, I’ve made the letters that you see above and the 5 dots. I might decide to make more if I feel like it or find another brilliant idea that has 5 or fewer letters. Leave your suggestions!

Doggie DPN Roll

Finally a place to store my double pointed knitting needles.

So, at some point in the distant past, I got hold of some DPNs, double pointed knitting needles. DPNs are needles that are used for knitting small things, or things in the round, or i-cord. I used them for the dragon, for example. As I am wont to do, this meant the start of a DPN collection. I never set about to find storage for them though, and that was a problem. They’ve been left in plastic bags, pen-things, stabbed into a cardboard box and I’ve found them in all kinds of places. But no more!

I set out to create a storage for them that was similar to my interchangeable knitting needle storage. Found some fabric in the hoard that had cute dogs on it, some semi-coordinating fabric for the needle pockets and got to work. I first had to sort all the DPNs into size and length to figure out how many and how big the pockets would be. I ended up with 19 different needle size/shape/length combinations from <2.0 mm to 9.0 mm in diameter.

Since the doggy fabric was a specific width, the case would be a maximum of that wide. The height was determined by the longest DPNs I had, so it turned out around 37 cm. I cut out the front and back from the doggies and some batting for the middle. Then cut a long strip of coordinating dotty fabric to into the pockets. Sewed down one end and just started putting the DPNs in and sewed the pocket down so they fit somewhat snuggly.

The interchangeable needle storage has a plastic flap over the top to stop the needles falling out. This works really well, so I decided to implement it in the Doggy case too. Since there is such variation in length, and I didn’t think to split first by length then by width, there are actually two plastic covers, one for the shortish needles and one for the longer ones. To combat the ones on the end falling out, so I made a tiny flap on the side too. I sewed down all the flaps, and bound the edges of the whole thing. Made some spaghetti straps from a coordinating fabric, wrote the sizes with a textile marker and called it a day.

I love this thing and it has already brought so much joy!

Striped Overalls

Silver snap detailed mash-up overalls with grey stripes

I got some interesting grey striped stretchy fabric from one of the fabric markets this summer. It seemed really fun to make overalls/dungarees with it. I’ve been dreaming of having some overalls that have the same top details as the Cat Dungaree Dress. Since that dress was supposed to be dungaree pants before I made terrible fabric choices…

I tweaked the pants pattern I used for the previous corduroy dungarees and pants to make this thing. The main changes were to add some length to the bottom again, and to eliminate the dart in the front. So I redrew the pocket pieces to take those in by a few centimeters. I added pockets to the back, and made the back darts work, in contrast to the Dark pants. I grabbed the cat dress pattern and just directly copied the top onto the fabric.

I made some stupid mistakes that meant that a waistband wouldn’t work, so I just slapped the front and back bib straight on. I don’t trust zippers 100%, so I added an additional closure with a snap to the side seams. It also looks fun, so I’m happy with this choice. With the cat dress, I’ve found that the top strap is helpful to hang things on, like a bag with my yarn if I’m knitting. So it’s both another design detail and useful. I still have some of the fabric remaining and the plan is to make a blouse, similar to some I purchased eons ago from H&M.

Ps. if your screen does weird things with the stripes, The whole thing looks like the side detail image, there are no psychedelic blobs.