I know someone who really loves skulls and because I wanted to make her a gift, I looked for a plushie that had something skeletal on it. I settled on Choly Knight’s Sugar Skull Kitty Plush, a free pattern from 2016. As usual, the instructions and the pattern were great and I quickly got going with embroidering the face and stitching down the felt pieces. I just needed to put the pieces under the sewing machine to finish it, but for some reason I couldn’t get myself to do it, so it stayed in bits for several weeks.
Once I finally got going again, it was very quick to finish. Just stitch the body/head piece together, fill it and then stuff the little arms, legs and tail. The tail is attached in the one place and cannot move. The fun thing about this pattern, though, is that it calls for decorative buttons to attach the legs and arms. I wanted to make those movable, so I used some instructions from another pattern to make sure that the limbs weren’t solidly attached. I think it gives the thing some extra charm.
Now it gets to live in a house filled with other skulls. I’m sure it’ll appreciate that!
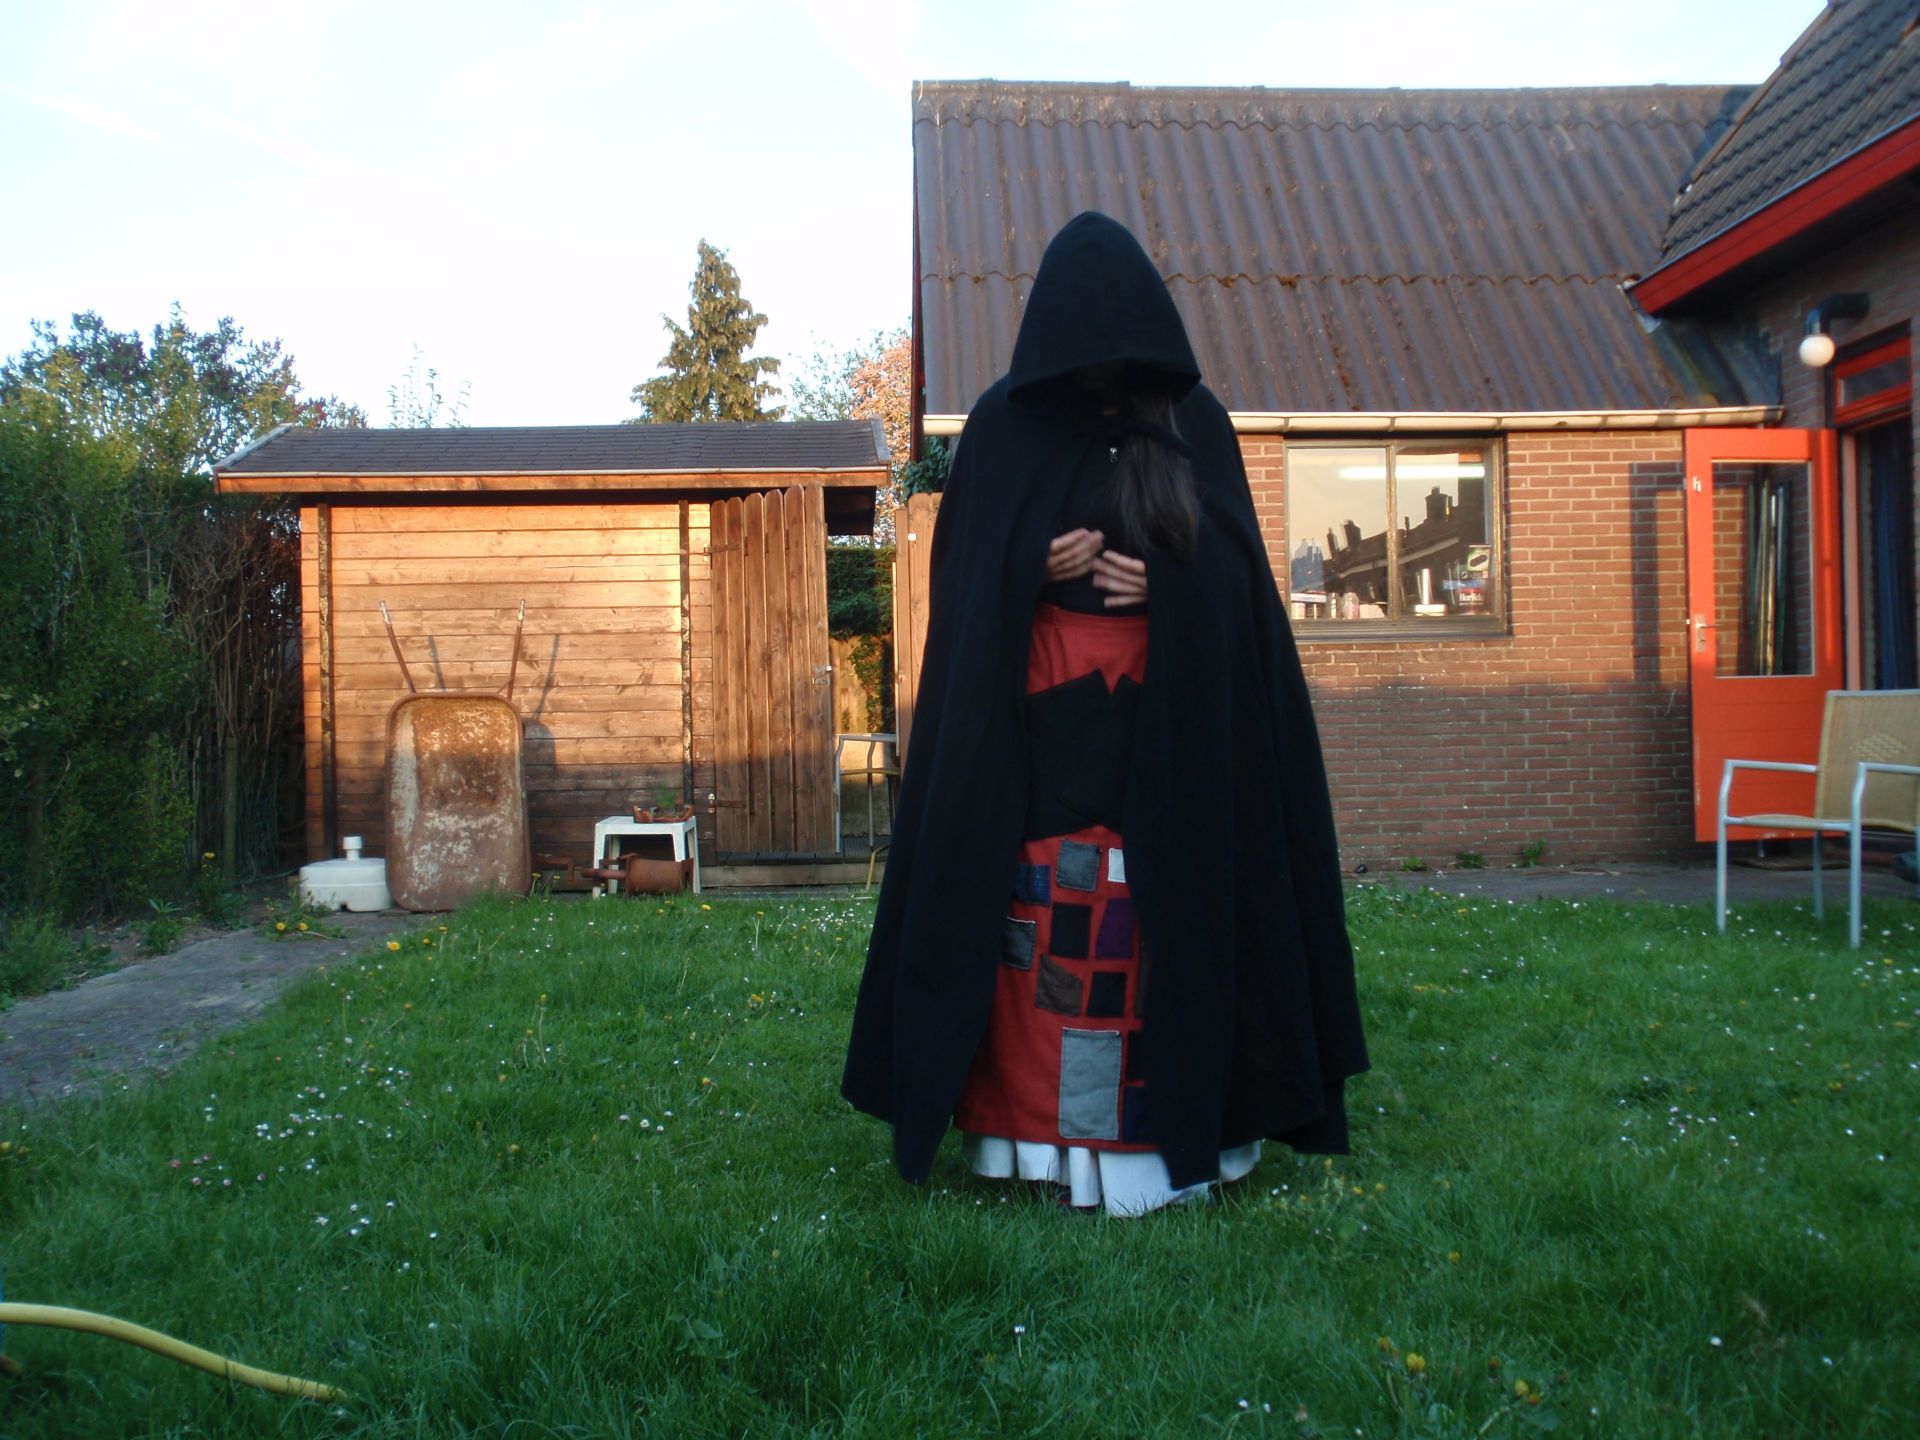
Who needs sleeves when you can have pockets in a cape?
Some months ago, I was sent a picture of a comic by abbycomics/Paige Walshe about a girl being asked about her cloak. With the reveal being that cloaks are cool especially lined with pockets. You can find the whole thing here. This sparked the beginning of an idea in my head. It was percolating for a while, but after repeatedly grabbing for my boiled wool cape to feed a cat half a block over, I figured I wanted another cape/cloak thing. This time one that closes and has pockets.
I was looking through all my pattern magazines and taking photos of the line drawings when I stumbled upon a cool cape pattern. Burdastyle 10/2011 Model 101 A/B. It’s a hooded cape with arm slits and a zipper down the front. It had cool style lines and there were a few reviews and blog posts that made it look decent. So I traced that pattern and started looking through my stash. Nothing really caught my eye though.
So, after hibernating in my house for the full week of Christmas, I decided to go on an excursion on the Saturday. I accidentally woke up early and travelled half the country to go buy fabric. I wandered the market and found a stall that sold curtain fabric for only 2 euro per meter. It’s a napped fabric with an almost fleece like black backing. I got 2.5 meters of the grey and 1 meter of black, since I was planning on making the front zipper placket a different colour.
Once I got home and washed the fabric, I was amazed by how quickly it dried and I could get to work swiftly. There was perfectly matching thread in my stash, so that was great. I cut a size 36 with 1.5 cm seam allowances and got going on the cape. Since the fabric is really thick, but doesn’t fray at all, I didn’t overlock anything. I did want to flatten the seam allowances a little, especially in the shoulder corner pieces. So I trimmed the inside seam, stitched the allowances down, and cut the outside seam close to the stitching. I like the decorative nature of this too.
I did make a few alterations, as usual. The pattern calls for lining the hood, which I didn’t think it needed although I did cut a facing for the opening. I skipped the zipper placket all together but included plackets over the arm openings. I’ve added an ‘unzipped’ hook and eye as closure and a hanging loop. The most important change was to add pockets to the inside. Since the cape isn’t lined, I took special care to make everything as symmetrical as possible, and follow the lines of the cape, since the stitching would show on the outside.
There are four pockets in total, two hand warmer pockets that open vertically; the ones closest to the zipper. The other two are content pockets that are on the side front pieces. These open at the top but I can still get to them when the cape is on. The pockets were all made out of fleece, since I thought the cape fabric was a bit too thick.
I quite like how it turned out and it’s so soft! I can just pet this cape forever.
Blank canvas allows for letter options on this sweater.
A few years ago, we got a Christmas card at my work that was a white background, with black letters: kerstkaart. (translates as: Christmas card.)
The most minimalistic Christmas card I’ve ever seen. I love it so much. That caused this idea to float in my head about getting a sweater with ‘trui.’ (sweater.) on it, and adding interchangeable letters to the front. That would allow for the outfit to match my mood/the circumstances.
I finally decided to take some action. I didn’t feel like making a super simple blank canvas sweater, so I bought one. Then I found a font I liked on the internet and settled on ‘Simply Mono‘. It looked nice, and the < part of the k was attached firmly and not just stuck on. I liked the shape of the i too. So I decided on the font size (130), printed it out and cut the letters out of a felt placemat.
I attached the pointy parts of snaps to the front of the sweater and the flatter bits to the back of the letters. Since the letters didn’t all have the same amount of ‘letter’ in the same space, some letters are spaced closer together when they are snapped to the sweater. But I’m embracing that imperfection and actually think it looks more fun.
The trui. letters were sewn down, so they are not interchangeable. For now, I’ve made the letters that you see above and the 5 dots. I might decide to make more if I feel like it or find another brilliant idea that has 5 or fewer letters. Leave your suggestions!
When trawling Ravelry for more patterns to diminish my stash of yarn, I found this interesting shaped shawl: Portia Shawl by Corrie Purdum. It’s basically three triangles together to form three quarters of square. The claim is that because of those points at the front, it stays over the shoulders well. With the summer happening, I haven’t been able to fully test this, but I expect it to be true.
For the yarn, I chose Krypton sock yarn (100% merino), dyed unsaturated black with dark green in March of 2023. I actually have another ball of this, and this shawl didn’t finish a full ball, so if anyone has suggestions for a project that uses 100 g + a little bit extra, let me know!
The pattern is straight forward and once you get the hang of it, it’s fairly easy to memorize. For fun, I added one extra repeat in the big central diamond shape. The pattern indicates that this scarf needs to be blocked to within an inch of its life. I didn’t manage to stretch it as far as I should’ve. I’m unsure how anyone would manage. I did enjoy playing with my new blocking wires, it does make it easier when you have a meter wire instead of 30-40 cm.
I made a choice with the blocking that the back edge would be blocked to little points, while the ‘sides’ would be blocked straight. This results in different kinds of edges which I think is interesting. I also like that the green randomly appears every now and again. I’m now just waiting for fall for some better shawl wearing times!
I am not a warm-blooded person. I’m more a lizard in disguise and since that blue coat that I’ve been dreaming about hasn’t materialized yet, I’ve been wearing my dinosaur coat most winter. Sadly, the weather has been quite miserable and my office is also a cold, cold place. To catch two birds with stone, I decided to make a vest to wear over my clothes and under my coat.
I settled on the fur vest from Model 28 in Simplicity Naaimode 31, also known as view D of Simplicity 8218. I went through my stash and decided that I wanted neutral colours, black and grey maybe? So I pulled a number of options and started putting the pattern pieces on. In the end, I chose a thick grey fabric that had some bits cut out already and a thick black fabric that also had some parts cut out before. I think I inherited these when a friend tried to de-stash.
For the outside, I chose the black and I cut the two fronts, the back and the collar. The grey was the inside and since the collar was a folded one, only two fronts and a back were needed. Since everything is enclosed, I thought that it would even be possible to wear the grey on the outside. To achieve this, I added a little elastic loop to one edge. Then two buttons were positioned, one on the inside and one on the outside to keep the little vest closed. I think the buttons are very cute.
I have worn this thing a lot over the course of the past few months, it’s truly been a warmth saver and makes me so much more comfortable. It’s also slightly more elegant than the oversized bodywarmer that I’d been wearing before. All in all, good project!
Adding some details to stave off endless repetition.
To be honest, I don’t remember much about this shawl. I finished it a couple of months ago and from what I can recall, the knitting was very boring. However, it does have good colours, grey, white and black go with everything! And I have worn it out a few times since, so lets try to recap anyway.
My Ravelry notes indicate that I started this new shawl on July 1st, 2023 and finished it on 11 October 2023. Not too bad of a turn around. The pattern is Aranea by Erika Wine and I later incorporated Asscher by Christina Danaee into it because I was so bored. The yarn was the ‘grey-diation‘ yarn dyed in December 2022. The pattern is fairly simple, the only thing to remember is to make the ‘spokes’ by effectively knitting i-cord along the edges and three other spines. In the beginning, a stitch is increased on each side of each spoke every fourth row. Once you pass 40 stitches between two spokes, you start increasing every other row.
This is a lot of knitting stockinette and for some reason, my yarn didn’t want to run out. The shawl is supposed to end when there were 80 stitches between the spokes, but I still had a lot left when I hit those 80 stitches. So at some point, I wanted something, anything else to do but knit-stitches for an eternity. I found the Asscher pattern, which has a pretty cool eyelet pattern on the back and started incorporating those instructions in between the spokes. I deviated at some point and made an extra triangle. I also needed to keep in mind that the i-cord binding still needed to happen, so I kept weighing the yarn to make sure I had enough. Once I reached the end, I followed the bind off instructions and wet blocked it.
Since I wanted the lace design to stand out a little more, I blocked it with straight edges instead of the spiderweb intention from the original pattern. This was probably not the best idea because what I liked most about the Aranea pattern was the spiderweb effect. However, I’m definitely not making this by hand ever again. I had to force myself to finish it. It has turned out a pretty decent size and it’s definitely wearable. I now also know how that gradation effect in yarn will play out when knitting. I have learnt (again) that endless stockinette is not my forte and will try to keep this in mind with future projects.
This year, we had an award ceremony where all of the roller derby team mates got together and presented an award made for one of the others. You basically had free reign to do whatever. We got the names of the person assigned to you very early on but I just procrastinated forever. I’d been half-looking for inspiration for all those months when I suddenly found it. A sheep themed coaster rack. Made out of wood with the coasters pretending to be the sheep’s wool. I figured, I can make this too.
So in my holiday, I set out to the local home goods store and found a placemat in the right type of colour and thickness of felt. Much easier to do that than to try to find something online. I then went on to the local hardware store and bought some sticks. Back home, I got my trusty saw, glue clamps, drill, Dremel and sanding stuff and got to work. Some of the big stick was sawn off for its body, it then got a couple of holes for its legs and I cut off a bit of its head so it would look more like a sheep. Some of the smaller sticks were cut to be the legs.
Then it was time for its coat. I made some templates and cut those out of the placemat. From the leftovers, I made ears and a tail for my lovely sheep. I put it all together and thought “I know what’s missing!”, so I made some roller skates. I found an even smaller stick, cut that into bits and glued it on while sanding a ‘wheel divot’ in and gluing on a tiny bit of placemat as the stopper. To finalize, I printed the statements that fit my person the best and put them in between the placemat circles. It was fun to try and make a thing with wood. It’s not my best crafting material, but I learn a lot every time I try it.
“What happens if you separate out random partial sections of yarn and dye those a different colour?” Was the question that spurred the 28 March round of dyeing yarn. I wanted to try and see if it would 1) be possible to even separate out different parts without making it impossible to ball up later and 2) whether that would then create a more random pattern. I started with two skeins of Krypton 4ply yarn and started pulling out random strands and strand sections. The majority of the skein was dyed with a low percentage of black. It’s more grey in appearance because of that. The strand sections that were left out were dyed a nice dark green.
The second skein was Alpaca 4ply sock and got the same separation treatment. I wanted to dye this a bright light blue/turquoise colour with the contrast being navy. However, part of the skein that wasn’t supposed to be navy fell into the pot so there are some more blue spots than intended. I also had another skein of Alpaca 4ply sock that was dyed in some leftover yellow dye. Later, some orange and brown speckles were put over the top.
The first and second experiment also had some leftover dye in the pot, so I wanted to test out the Tweed Effect DK yarn that’s been hanging out in the cupboard too. I took a full skein and started it on the yarn winder until about half was into a ball. Cut the skein and had two tweed experiments. The ball was unwound gain and dropped dry into some blue dye. It did actually take on the barber pole effect that was indicated on the website. The green experiment was not as successful. The yarn came out very uneven and without much barber-poling.
After these experiments, I’ve been able to answer question 1. Yes, it is possible to separate out without making it impossible. It did take a bit longer than normal because certain bits didn’t want to let go of each other. I’ve not gotten around to question 2 though. I’ll report back once these yarns have reached either the knitting machine or the needles!
At the end of January, we celebrated the graduation of a small class. I was still considering what type of outfit I wanted to wear. Simplicity Naaimode 53, Model 12, cape caught my eye (also known as Simplicity 9185). The idea of wearing pants with a top and the flowy cape cover became really appealing. I searched through my stash for appropriate fabrics and found a plaid for the pants (staying predictable), a white fabric for the top and some black for the cape. Since the venue was not necessarily going to be the warmest ever, so I decided to use the last bit of magicblackfabric for the cover.
The pattern pieces are pretty simple. One partial front with a deeper scooped neckline, one partial back with a shallower scooped neckline and a collar piece. The pattern said to extend the front and back on one side with 90 cm. Since I had very limited fabric, I decided to not entirely comply with the instructions. The pieces were put on the cross grain to make maximum use of the remaining fabric. This did mean that I couldn’t extend them as far as the pattern originally wanted. However, I’m short, so this was actually perfect. If the cape was any longer, I think it would become a trip hazard.
After cutting, the shoulder seams were sewn, the collar attached, the side seam sewn and lastly, it was hemmed. I was afraid it was going to be all stretchy and bubbly, but it pressed out great. It was great fun to wear it, a little bit of extra swoosh, but also nice and warm. I’ve been wearing it a fair number of times even since the event, so that’s pretty good.
Everyone needs a cape, even if you’re only 2 years old.
In the same afternoon as the dinosaur tail, I decided that the little boy also needed a cape. Everyone needs a cape after all. However, capes for two year olds probably could be a choking hazard and we do want to keep him alive for a little while longer. So I set off on a google adventure and found a nice YouTube tutorial about a no-choke superhero cape. While superheroes are fun and all, I’m more of the witch and medieval type cape person, so I modified it.
I folded a black fleece blanket over and cut out a half circle shape. Then a smaller half circle shape for the neckline. With the cutting of this half circle, I automatically had a weird shaped piece leftover. My brain immediately went LIRIPIPE, so I used that to make a hood for the cape. I left part of the bottom seam open to attach to the cape part and sewed the rest shut to make a hood.
The idea of the no-choke thing is that the cape is attached by going under the armpits and around the back and Velcroed to the front again. I liked that idea but since I didn’t have the kid with me, I improvised with some elastic and Velcro on both sides. My theory is that elastics stretch and that if it’s too big you can add a small seam in the back of the elastic. To attach the strap to the front, I chose to make some triangle shaped bits with the other side of the Velcro on the backside. Since it’s fleece, no hemming required. I hope it fits, and otherwise I’m sure it’ll be a nice blanket.
Active filters:
Category
Tag
Post Type
·
No results found. Try a different search.
No results match these filters. Try clearing some, or searching for something else.
No results match these filters. Try clearing some, or searching for something else.