Armour

This time it’s armour without injuries! Some pinpricks don’t count, of course. So I actually finished my armour in time for Friday. If my character would have died, which thankfully it didn’t, I’d have a new outfit. I’m still doubting whether to put on the shoulder pads, any advise?

Front Back

This is what it looks like on. It’s based on the free vest pattern from Burda, the Franzi. I seem to base a lot of my patterns on that thing. It is really heavily modified though, a lot of fabric was removed from the centre, a more pronounced princess seam curve was necessary, since it gaped in the armhole. I think I should probably have added something strong down the back, to keep it from rippling. The fake leather stuff was attached to the black lining by machine apart from the top, bottom and armholes, which were attached by hand, using a blanket stitch.

These are the outside and inside. I had fun hammering in those 22 grommets.

Outside Inside

I have finished the shoulder pieces, but I’m a bit afraid of attaching them. I’m probably going to hammer two grommets in the front and back of the shoulder pieces and the armour itself. Then attach with rope, so I can take them off if necessary.

Shoulders

Injuries and armour

I’m going to try to make myself an armour. A soft leather armour corset thing. I found some skai, took a meter of it home and found some pictures online that would hopefully give me a nice idea. At the place where I got the skai, I also got some stretchy fabrics that I’m planning on using soon.

I was trying to work with some of that fabric (fleece) and my machine kept skipping stitches. I learned a lesson that day.. Make sure you turn your machine off, or at least keep your foot of the pedal when you put your fingers under the needle..

Finger

You probably can’t see it very well on that picture, but the left arrow is pointing to the entry point of my sewing machine needle, and the right to the exit point of said needle. Needless to say.. it HURT! A lot! It happened about 1.5 week ago, and while it doesn’t really hurt anymore, my finger feels weird still. Luckily this was the first time it happened in about.. 10 years? I’m planning on never having it happen again.

So, back to the armour.. I attempted this pinterest thing again (I fail) but at least it saves my pictures. Here you can find my pins (I hope).  I have two now that I’m basing my design on. The left and the right, the middle one, with the straps, I’m not liking as much. The skai has a white back, so I’m using some black denim like stuff as an under layer to stitch the skai on. I made the black body and then cut out the pieces. I only needed a very small amount of skai:

Skai

I have way over half left, so I haven’t got a clue yet what I’m going to do with it. I also purchased some black thread and hope to pursue this project further soon. I’m now also working on finishing that blue coat that you’ve been hearing about for ages. Finishing one sleeve and adding two buttons, that’s all that’s needed. I’d better go back to that now.. Happy creative activities to you all!

Busy

I’ve been busy! The larp event I organise was last weekend, so that was really busy with me running around like a headless chicken. It did actually go a lot better than expected, so that was really really nice. I have actually also been doing crafty things.

My dad wrapped me up in clingfilm and tape and made a body double out of me. So I had a very flimsy plastic mold of me. Apparently I’m crooked as hell. My right hip is higher than the left, which impacts the shoulder and waist as well. Now, I did know that this was the case, sort of, but actually seeing it in plastic, and comparing it to my croquis is a different story. It’s now sunk in, so I can actually try to work with it, instead of against it.

Front double Back double

If you are wondering about the black line on the back of the plastic double, it’s to cut me out of it. I wanted my dad to put it perpendicular to the floor, but he said that if he did that, it would be so incredibly crooked that it wouldn’t really work. The cross stripes are to line up the sides, so it wouldn’t crook there too.

By the way, a quick search of my blog revealed no picture of said croquis, so I’m going to throw it out there, including my crooked shoulders on the body double.

Croquis heightlines

It is really weird though, to see it in lines. I always thought I had more chest than the drawings say I do. Also that I stood straighter, but I don’t. The horizontal lines on the croquis are to determine how in proportion I am. It looks to be quite well, apart from the navel to middle of hips bit, which is probably shorter than it should be. I have noticed it before, as pants are always saggy in the crotch. I’m now going to work on that. I’m now going to continue on with my other project, of which you’ll meet the beginnings tomorrow.

Skirt

The skirt I started here, finally got hemmed on Tuesday. I decided to also redo the top. Gather it a little more. Since last time I messed up my calculations and made it wide enough for my hips and it had to cross over in the back. This made the hem all weird and crooked. So before attempting to actually hem it, I had to unpick the top and do it all again. Luckily it went a little faster than the first time.

Skirt front Skirt back

Front and back respectively. It is a narrow hem, therefore it doesn’t stand out as much as it could do. There is approximately 6 meters of circumference in the hem, so imagine how long it took to hem it.. (pin, iron, sew, iron, iron, cut, iron + pin, sew, iron, iron… I saw each piece way too often).

Skirt

Yes, I pulled my shirt over my sweater, I know, it’s silly, but it keeps up the sweater really quite well. I’m thinking of making button loops at the bottom of the skirt in four places, and 4 buttons on the waistband of this skirt or the potential overdress, so that if I actively plan to go into battle, I can put it up and have less chance of stepping on the hem. I’m not sure yet. I’ll probably just add loops anyway, it won’t harm the hem.

On to the next, the overdress and maybe I’ll make a little light armour out of fake leather, we’ll see.


Sewing for someone else

I got asked if I wanted to help someone. It was going to be an easy alteration to a vest that was too big. I said yes, and he came over for me to pin. I never hit him (yay!). It took 2 centimeters in each side seam, and 1 on the shoulders, but it does look a lot better now. It even looks quite nice on the inside:

Shoulders Side seam

If I do say so myself. It fits a lot better than it did before. Not so very much too big. I don’t know if I’ll do it again, because it’s nicer to make things for me (I follow in the steps of the Selfish Seamstress), unless they are real presents. So we’ll see in the future what happens.

Mending

The floor of the building I used to work on my thesis in got moved to a new floor in another building. This meant that all the items on said floor had to be tagged and labeled and decided to either be kept or thrown out. I had been sitting on the same chair for 5 weeks and really liked it. It however had a hole in the front:

Hole

And it was already quite old. So I asked the ladies of the secretariat whether they were planning on taking it to the new floor, and if not, I would like to take it home. They said I could take it as it was broken already, so I took it home. This involved some rolling around and storing it at a friend and eventually, a week later, I managed to move my chair from Utrecht, by bus, train and car to my home. It still had the hole, so I decided to fix that with a patch. It’s not pretty but it does the job.

OLYMPUS DIGITAL CAMERA

Costume hood

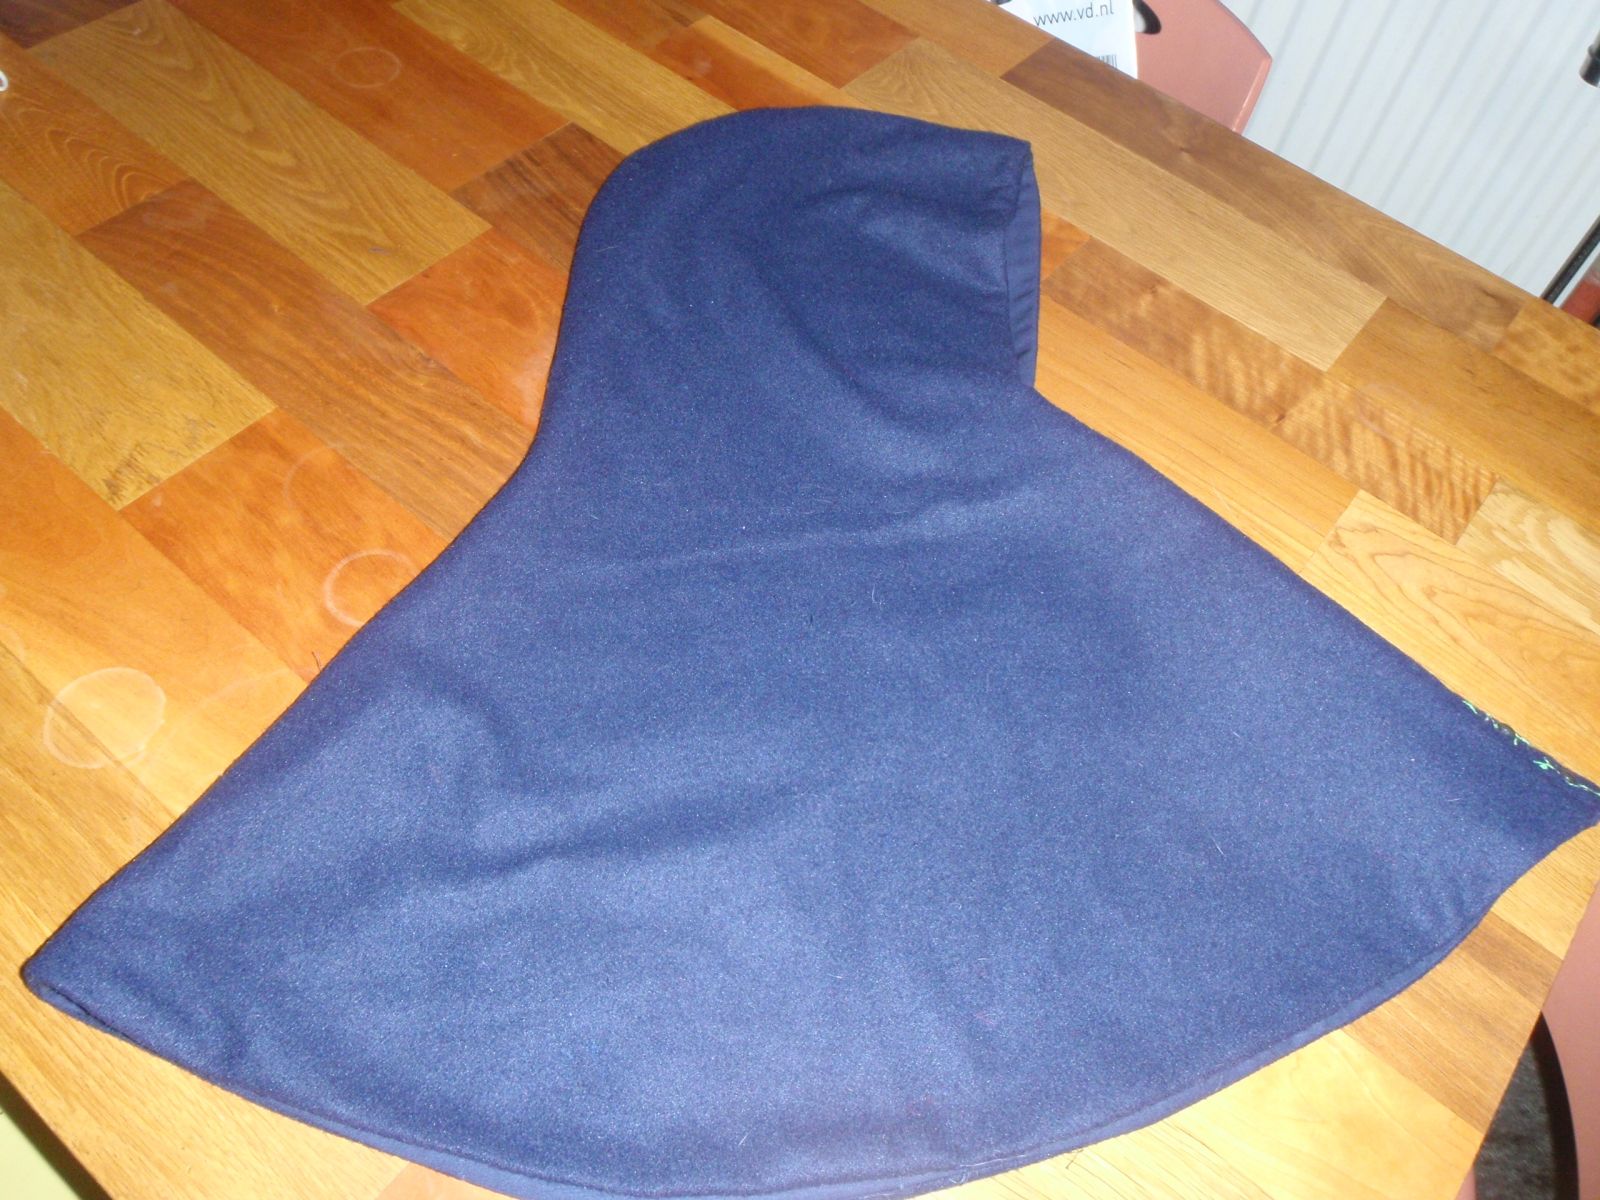
For my new back-up character I wanted to make a costume. I already drew a sketch (here), and started on the skirt (which still does not have a hem by the way). I started the hood the day before yesterday. I had made a hood before out of fleece and drew around it, this made my pattern. I cut it out of the same fabric I used for my coat (which is actually almost finished, just sleeve ends and hems). Found some fabric for lining (the same as I used for the outside of my other costume (here).

Sewed it all up except for the front, since I wanted a button closure. I don’t know if it’s historically correct, and I know my buttons aren’t, but I liked the idea. Then I decided I wanted to add a button band, and wanted some embroidery on it. So I googled and googled and drew and drew and came up with an ivy pattern to connect my buttonholes. It took until late that night to finish it. The next night I sewed on the buttons and the band, and it was finished! Here it is, let me know what you think.

Hood side Hood

The button band is embroidered with ivy leaves. The vines are darker green and the leaves are lighter green. The vines were stem stitched and the leaves back stitched. The buttonholes were done by machine. I’m really happy with it. I like the ivy a lot. I’m starting to wonder if I should embroider it on everything in the costume.

Button band Detail


Productivity, 5.

Lastly, the previous weekend also saw the birth of a refashion. My brother had a pair of pants that he didn’t wear anymore. These jeans are now a skirt for me!

I’ve been working on it for ages, since boy jeans apparently have an angled fly to accommodate the ‘business’. Since I don’t have said business, there was no need to have that extra room there. It took me a couple of nights with the seam ripper, but I eventually figured out how it was put together and how I could put it back together nicely again without the bulge. I have, however, always been scared that I would fail with the sewing. Well Sunday I decided that the time was right (and I wanted to continue the streak) so I took it to the machine. Well both machines, I did some serging on it too. It took a while and frequent running back and forth to the machine and ironing board and pinning stuff together, but it’s finished now.

Skirt front Skirt back

I chose to take in some with in order to accommodate a back vent. I tried slits before, but they tend to break on me and that looks really hideous. So I finished the vent edges with bias tape and created myself a nice vent. I also hand stitched the hem so it would be invisible. Don’t know if that worked but I enjoyed myself while doing it.

OLYMPUS DIGITAL CAMERA OLYMPUS DIGITAL CAMERA

I’m not convinced yet that it will see much wear, me and skirts, not really a fantastic combination. However, I’ll try to wear it this summer. I was planning on wearing it on Monday, but when I looked out my window, it was snowing. Snow and skirts in my opinion don’t go together well.

Productivity, 4.

I didn’t stop being useful after Saturday though. The fabric left over from the shirt I made over the course of the week, was enough for another shirt! I started with tracing a pattern for a button down shirt, but figured out that the fabric I wanted to use for it had not been washed yet. For fear of after-sewing shrinkage in the laundry, I decided to postpone that plan.

I had been planning on making another shirt out of my stripy fabric (here), and decided that that day was as good a day as ever. So I painstakingly cut out the pattern pieces, I used the same ones as the last time, on my desk. The living room table, which is much larger, had been taken over by someone else’s project. Sewed it together, same way as the other one, with the exception of using a zigzag on the hems and creating a different neckline. The back is the same but the front now sports a v-neck. I also like this one:

OLYMPUS DIGITAL CAMERA

I hope to continue this streak, although I don’t know if I will succeed. Wish me luck.

Productivity, 3.

The other thing I made was a skirt. I already spoke about the larp event we are organising. I quite like to have costumes for that sort of thing, even if I’m not playing myself. However, a month later (beginning of May) there is an event where I will be playing. In case my current character decides to die (or just dies) I would like to have a backup character ready to step back in again.

So while I was at school trying to work on my thesis, I decided to take a break and google for a larp-staff. A piece of equipment I have been wanting to own for years, however, the only ones available are.. well.. ugly. I don’t like them at all. Then, a miracle happened, I founded something I liked! Or at least, liked a lot more than all the other ones out there. It can be found here. Now, the only thing I didn’t like were the metal caps around the bottom. I got a custom order and they will make me one without the caps. It all went fairly smoothly and they are very friendly at Skian Mohr.

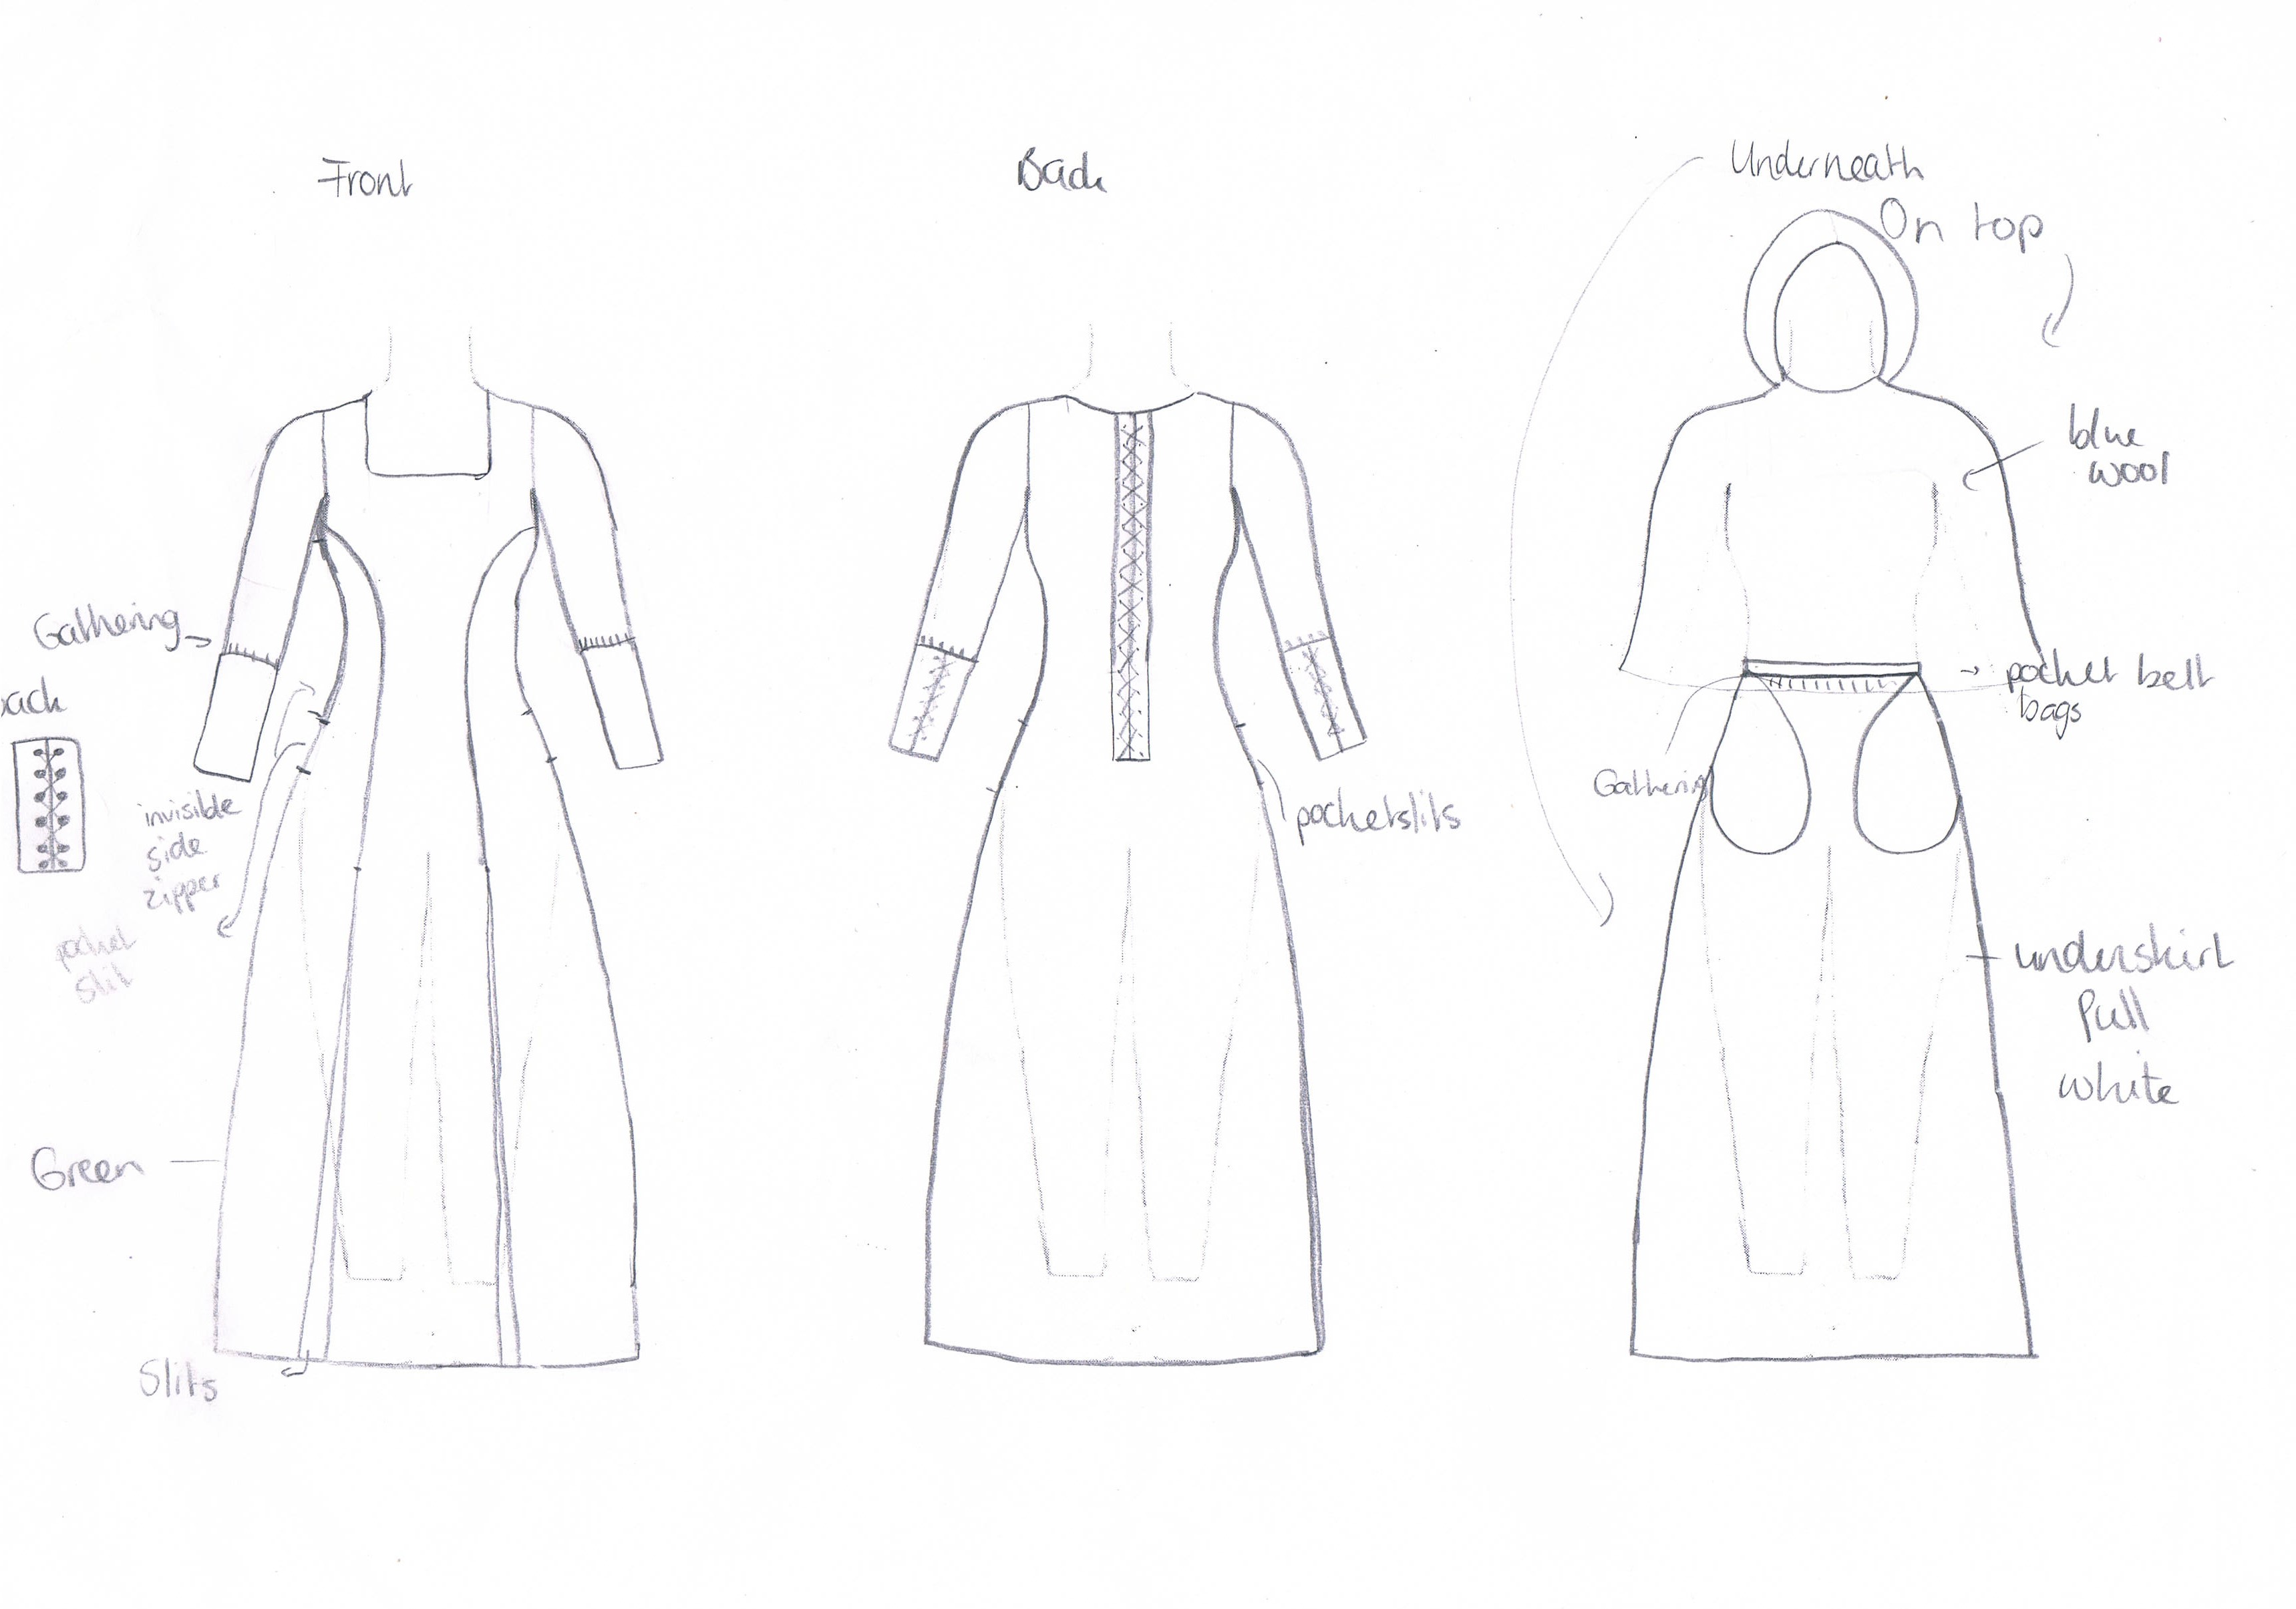
Next, I needed a new costume (of course) so I drew one out:

Fighterdress

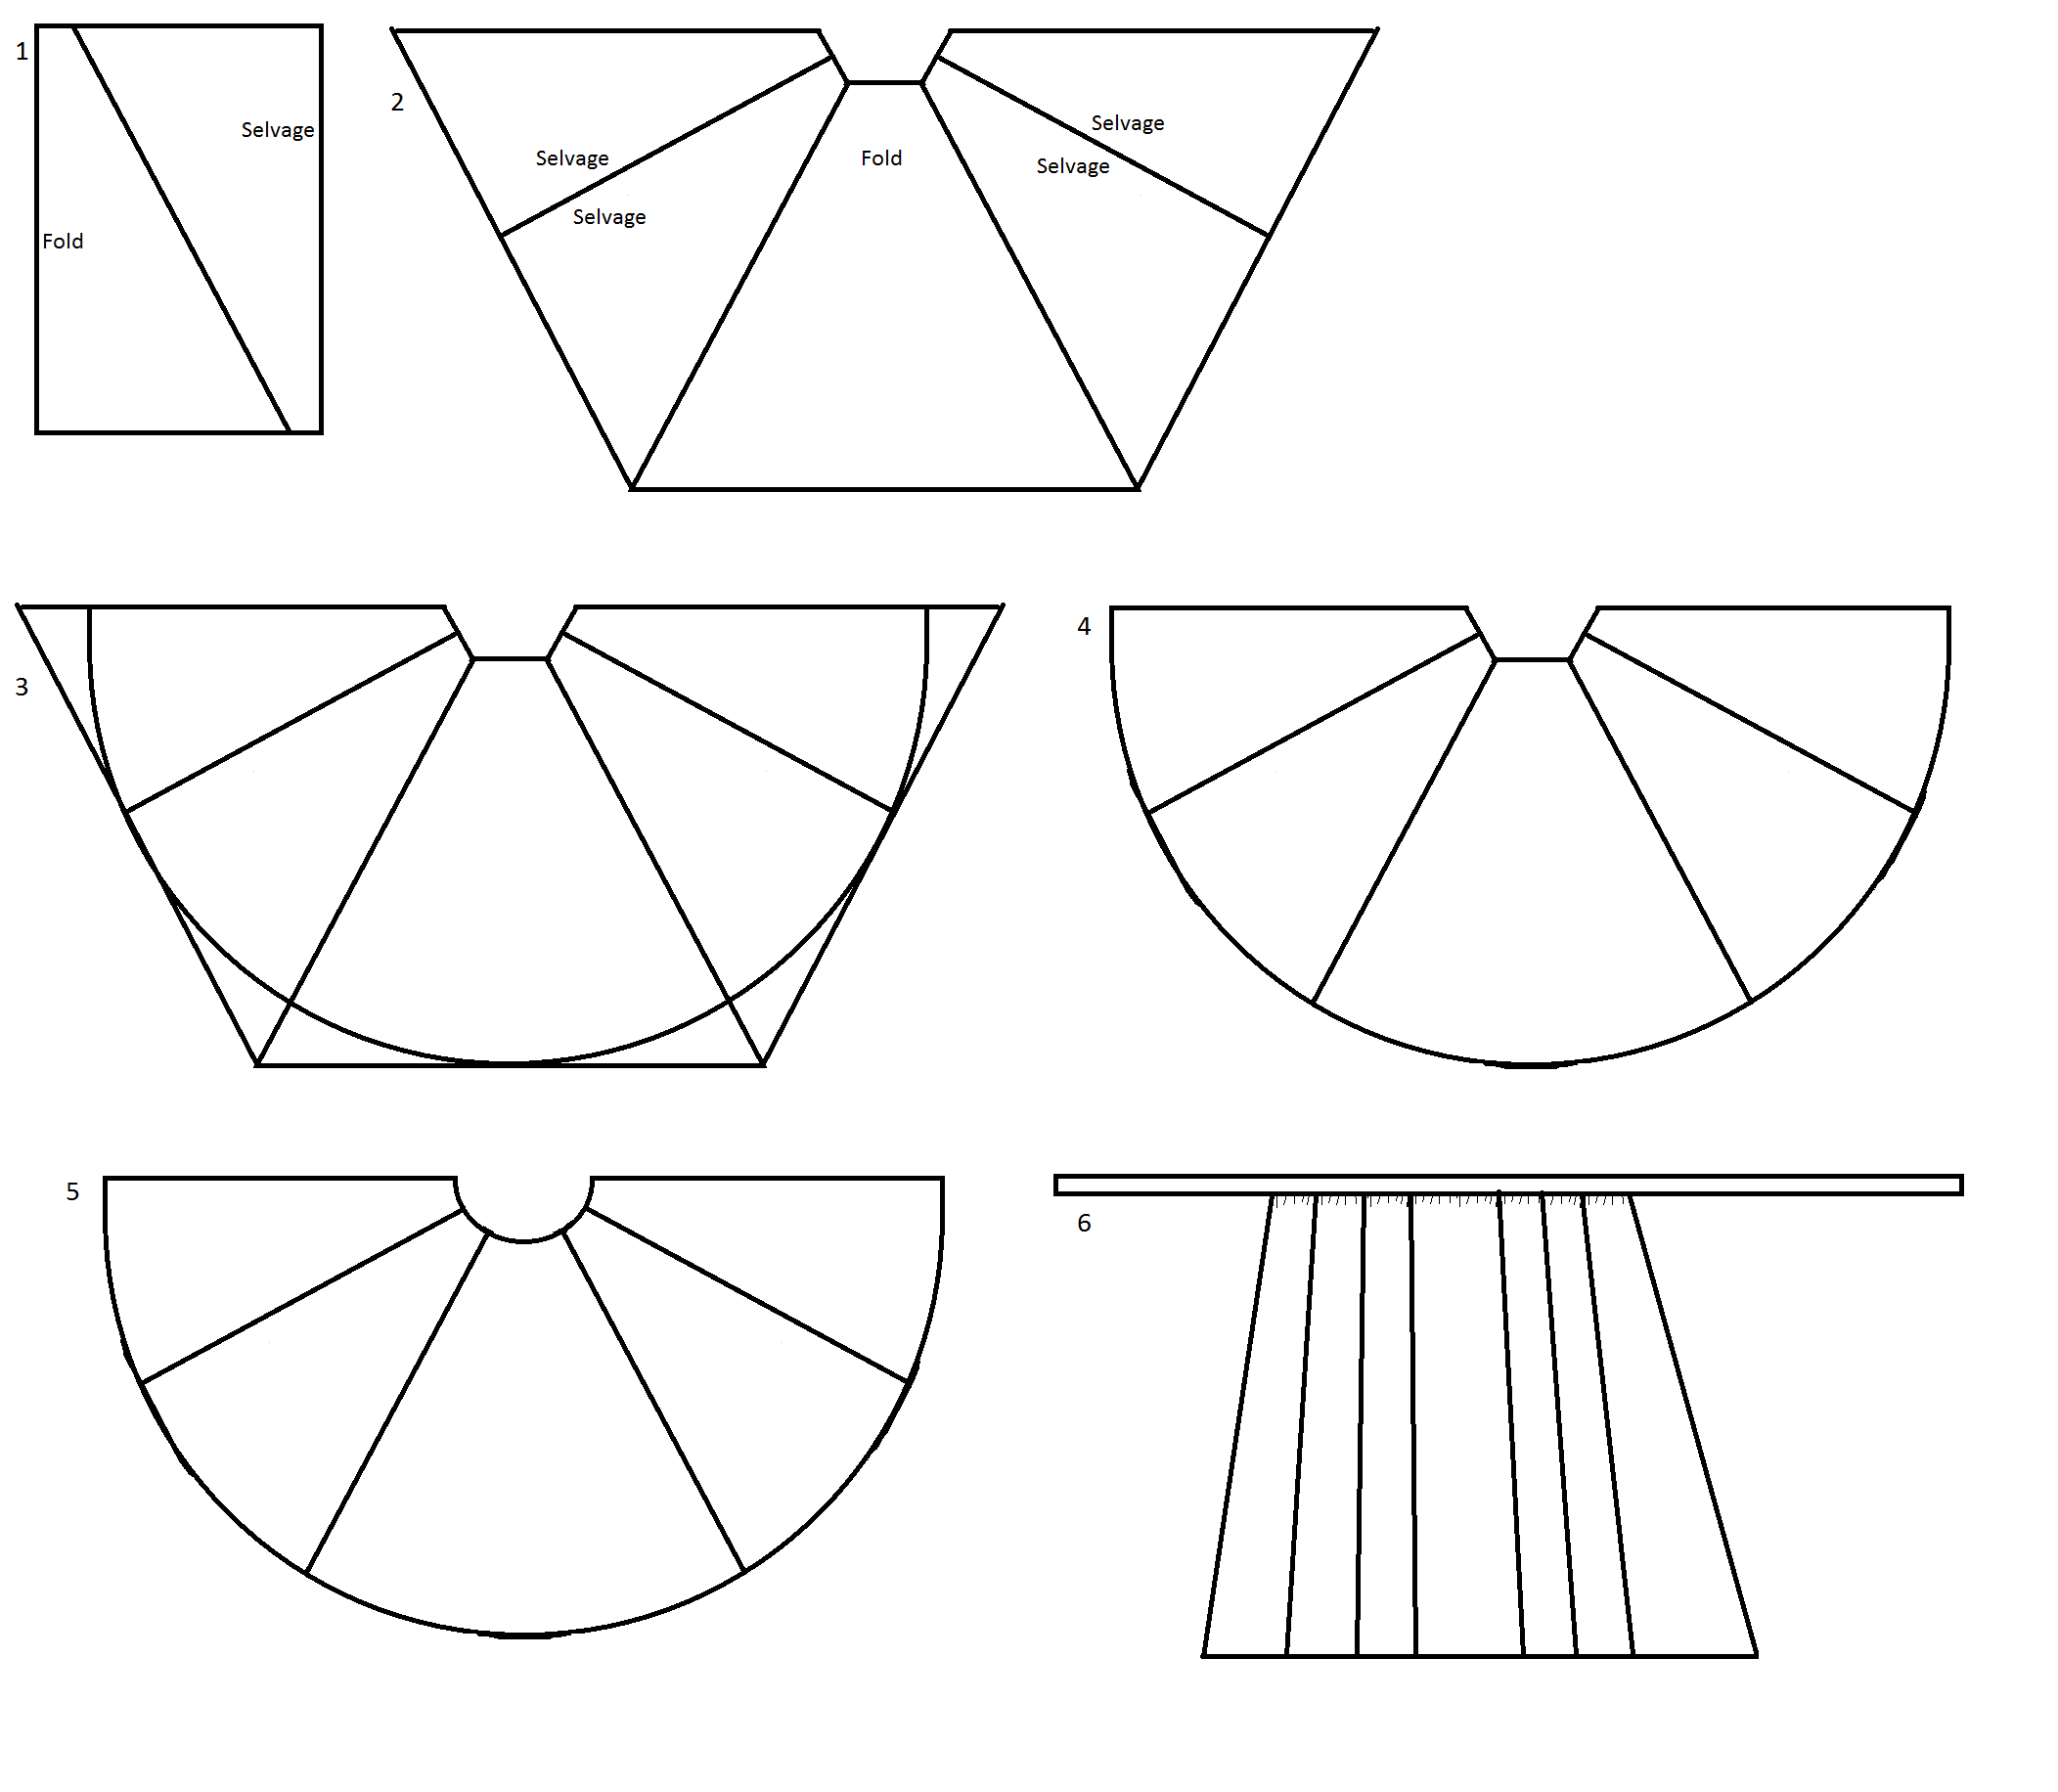
On Saturday I started with the first layer: the white underskirt. I decided to do it simple. I made a little “tutorial” to show what I did. Step 1 consisted of cutting 3 lengths, slightly over one meter (the length from floor to my waist) and then cut them across diagonally. The selvage edges were then sewn together (to end up with 3 pieces with a  selvage seam in the middle). The selvage and fold pieces were then alternately attached to each other using French seams. Number 2 shows half the skirt. The other half would look the same only there would be two fold pieces on both sides and a selvage piece in the middle. At step 3 and 4 I marked and cut the bottom of in more of a circle shape. In step 5 I cut the waist section in a circle shape. Then I cut a very long rectangular piece to be the waistband. I then gathered all the panels onto the waistband (6; yes this drawing makes little sense). All in all there is a lot of fabric at the bottom, the hem is going to be several meters long.

Tutorial

I have not actually hemmed it, which is why it is not finished yet. I felt I should let it hang for a while before hemming it, since the fabric is somewhat stretchy. I attached a little extra waistband to be able to tie it into a bow at the front. It’s actually really comfortable (if much too long). This is what it looks like, without the hem finished.

OLYMPUS DIGITAL CAMERA OLYMPUS DIGITAL CAMERA

As you can see, it’s very wide at the bottom, and much too long. Still I feel it looks nice. It’s also finished on the insides and the ‘getting in’ opening.

OLYMPUS DIGITAL CAMERA OLYMPUS DIGITAL CAMERA

Just hemming to do on these and I will really have been productive!