Rainbow Quilt

A second crib quilt, this one in a sort of abstract rainbow pattern.

After finishing the first quilt, I set out to make a second one quite quickly. At one point, I’d bought a stack of 10x10cm quilt squares online and decided to put them to use. Starting in a corner with dark squares, I worked my way up diagonally to create a rainbow of sorts. While it was still on the floor, I set out to place the squares in such a way that the ‘fun’ ones were not too close together, and that there were enough of them. I filled up other rows with dotted or floral designed squares that had come along too.

After I decided I was happy with the placement, I pinned the squares in a straight row together to form one long snake and then sewed the first to the second square for all the rows. Setting the stitch length to 2 or so on the treadle and just machining along. Once all the rows were completed, I pressed the seams to one side for the entire row, then pressing the seams for the next row to the other side. Pinned the rows together and treadled merrily along. For the border I chose a nice and neutral grey triangles fabric.

To quilt it, I chose to keep it simple. I found a bunch of bobbins with leftover threads in the main colours of my diagonal rainbow design and used those for quilting. Each diagonal is stitched with white in the actual bobbin and a vaguely matching thread in the top. You probably can’t see it in the pictures, but I thought it was a nice touch. The binding is the yellow whale stuff that backed the previous quilt. I still had a little bit leftover and thought it would be a good contrast. Also, whales. I like this one, it’s so fun and colourful!

I just hope it holds up, but we’ll see whether it does in the future I guess.

Blue Pants

I wanted to gift a pair of pajama pants to a family member recently. So I found a free pattern online from Life Sew Savory in size L. Once it was printed out, it was so large that the only fabric I could realistically use was the blue mask fabric. I don’t think I’ve ever seen such a large pattern piece – there are no side seams, so that’s why it’s so enormous. I added a few centimetres to the bottom to increase the length, although I’m not sure if it was needed.

In the end, I put in the elastic at a later point in time based on a different pair of pants of the recipient. I haven’t yet seen if these actually fit, so that’s still a guess. For now, I’m quite happy that I did manage to finish them and I still love the colour.

Compared to me, they are certainly quite large…

Christmas Knit Gifts

This post was written a while ago, but the post has made me wait until one of the gifts arrived in New Zealand, that took a while..

Poinsettia

When I was making and sending my Christmas cards, I wanted to include a little gift for a friend of mine who is currently in New Zealand. She’s bought poinsettias for the past few years and managed to keep them alive through to July or so, so I decided to make one for her to see if the Christmas spirit transfer. Sadly my card hadn’t arrived yet by Christmas, so I don’t know if it worked.

The free pattern for this little flower was found on Ravelry – it’s the knitted poinsettia by June Gilbank. It has you make six large green leaves, six smaller red leaves and some yellow stem bits. I ignored the stem bits and chose to do some french knots instead. This was a very quick knit and quite easy to put together. I liked the way she finished the back with a knot and very limited weaving of ends.

Friend of the Forest hood

The second gift was a hood – the friend of the forest hood by Gretchen Tracy. I’d been wanting to knit a hood like this for a while now and when I found some lovely ‘printed yarn’ (?), I decided to go for it. However, I was also making a very red coat at the time. I wouldn’t be able to wear this hood with it because it would clash something horrible. So I decided to gift the hood to a colleague who enjoys these types of fall colours.

It knit up real easy and quick. I still have the last two colours of the ball left (grey and some more purple) and another ball but I’m not sure what I’m going to do with it yet. So I guess that’ll be a story for another day.

Otter Friend

A friend of mine is a fan of otters and since it’s his birthday soon, I figured I’d get him his own otter. I used the free fluffmonger pattern for Squakers the Otter and hand sewed the small version in an evening while watching the darts. It only requires a little bit of fabric so that was quite handy. I only made two changes to the otter. The first was to make his ears a single layer, since they would be way to fiddly otherwise and the fabric doesn’t ravel anyway. The second was to omit the heart and just have him hold his own hands and an improvised fish.

You can also give him something else to hold, since the fish is not sewn to him. Perhaps an ikea pencil or an even smaller baby baby otter?

I think he’s really cute, and I’ve found that fluffmonger has more free cute animal patterns, so they may become useful in the future too!

All The Ornaments

What do a Sprout, Cat, Dog, Snow Baby, Chicken and Bunny have in common? No clues…? They are all ornaments I crafted for my family when we celebrated Christmas this year. I’ll explain the idea behind them below but first.. They’ve all been put into my tiny tree, so I present the evolution of Christmas Tree!

It all started with an evening browsing Ravelry, as I’m wont to do. There, I found a very cute little sprout. As you may or may not know, sprouts seem to feature heavily in English Christmas dinners. My dad likes them quite a bit. I hate them a lot. Hence, I decided that I would make him a sprout, so that the real deal wouldn’t have to enter my home. So I set out knitting and made the sprout. I added a hanging loop and popped him in the Christmas tree. (Pattern Brussels Sprouts by Amanda Berry).

If you make one gift, you have to make one for everyone, so second came the girlfriend of my youngest brother. She has rabbits; easy choice, therefore, was to make a tiny bunny. So I set out to complete a purple rabbit. Also added a hanging loop and put it in the tree. (Pattern Catnip Bunny by Selina Kyle).

For my mother, I chose to do a snowbaby. It’s got a red hat and purple scarf to symbolize the red hat society and not giving an iota about clashing clothes. The snowbaby also has a hanging loop and no snowball and its hat is a little shorter. (Pattern Snow Baby Ornaments by Mary Beth Koskie)

My eldest brother has a whole range of pets, but I wasn’t going to knit an ant so I decided on a tiny chicken. I did add a tail and a hanging loop. (Pattern Tiny Chickens by Anna Hrachovec)

The partner of my eldest brother has a snowy white cat named after a certain snowy Disney Princess. Therefore I set out to create that little creature. The cat is not allowed to go out, so the chickens don’t get threatened, but in a tree they can be together at last! (Pattern Tiny Parlor Cat by Sara Elizabeth Kellner)

My youngest brother and his girlfriend recently got a dog, and since I could do the rabbit for her, he got the puppy. While their dog is not a Scottie, that was the pattern that I chose since it seemed the right sort of size. I attempted to emulate the colouring of their dog, it failed but I tried? (Pattern Tiny Scottie Dog by Sue Stratford)

I also gave the puppy a ball and the cat a little knit whale to play with. So everyone got a thing! I’m contributing to trees all over the country..

Knit GOGEE

So, since the interchangeable knitting needles arrived, I’ve been longing to knit again. Just looking at other people’s projects in Ravelry is not sufficient to curb my knitting cravings, or so it seems. This meant that I have started knitting again. I’d already started on a rabbit, which is now packed up in the corner of shame since its body is way too large for its head and I’ve not been in the mood to unpick. I’m also knitting a hidden dinosaur scarf that it still waiting on more yarn (I was an idiot and didn’t read the instructions on how much yarn to use). But I recently finished two different knit gifts. Today we’ll discuss the first.

Now, you may have wondered what in the world a GOGEE is, I don’t blame you if you did. GOGEE stands for Guardian of Good Energies Elf, it’s a pattern created by Susan Claudino-Aguilar. The idea is that you knit it with purpose so that it catches all the good will you knit into it. It’s a little creature with arms, legs and a pocket on its front. I thought it was super cute and if I made it, it would be a wonderful opportunity to put in some good energy and a positive message for a friend of mine.

From the pattern page, I’d discovered that this was an updated version of the Voodoo, You Love Me pattern. Since I really like the zombie-esque-ness of the Voodoo pattern, I decided to make some modifications to the GOGEE to get the best of both worlds. I knit up its arms, legs, pocket and body exactly as described in the pattern. I did not knit the ears, since I didn’t really like them and when I came to the last couple of rounds in the head, I decreased quicker without additional knit rounds to create a rounded head shape.

Once the knitting was finished, I sewed a little mouth and added a felt heart on his front. A little message was written and put into his pocket for any bad times. He’s quite cute if you ask me, if a little floppy. For some reason his head is larger than I expected, even though it’s the same size in the pattern pictures. In any case, he now has a new home and I hope that the recipient can look upon him with some fondness!

Wedding Gift

Yesterday’s now married friend and her now husband also deserved a present of course. They preferred to shop for things themselves, but I don’t really like simple envelopes. As such I fabricated something around it, since I couldn’t help myself.

My friend is a fan of bunnies and her go to word was carrots (or cookies), with a bunny themed wedding and bachelor party it had to involve rabbits, clearly. I pinterested some more for cute rabbits and settled on this pin as the ‘inspiration’ for my ‘artwork’ – read, I drew the bunnies, enlarged the ears and coloured them with felt tip pens. Then I arranged a number of coins into a heart shape and drew balloons under them, if the coins are removed, it should still look like a giant balloon heart.

Then, because I couldn’t find a way to really add my name to the picture in the frame, I made a card and wrote something on there. The card was also somewhat symbolic and bunnyish. At the bachelor party, we made bunny art, and I drew the same design. It’s a quarter Miffy head (the only thing I know how to draw without a reference). Based on an old card I had for years. I stuck the card in an envelope and put that over the money heart. The picture was taken before I added all kinds of words around that symbolized their lives to me. I hope they like it, and otherwise I had a good time making it. I hope they Live, Laugh and Love for a long time to come!

Toothless Gift

A friend of mine seemed to fall in love with my Toothless when I finished it last year. She implied or asked (long time ago, I don’t really remember) she would like one for her birthday, and I decided to try and do that. I failed in having it finished on the birthday, but it is done by now. It took slightly less than a year in little increments, but still a substantial project. I made a few changes compared to my own one. This one has a semi functional mouth with a stomach that can house a fish. His eyes are also a little different and the face does not look the same. However, it is still quite cute, I think.


And here he was, hiding on my chair during construction.

Gifts – 5

This might not actually count as a gift. However, I did make it in the past two weeks and decided it was still something I made for someone else.

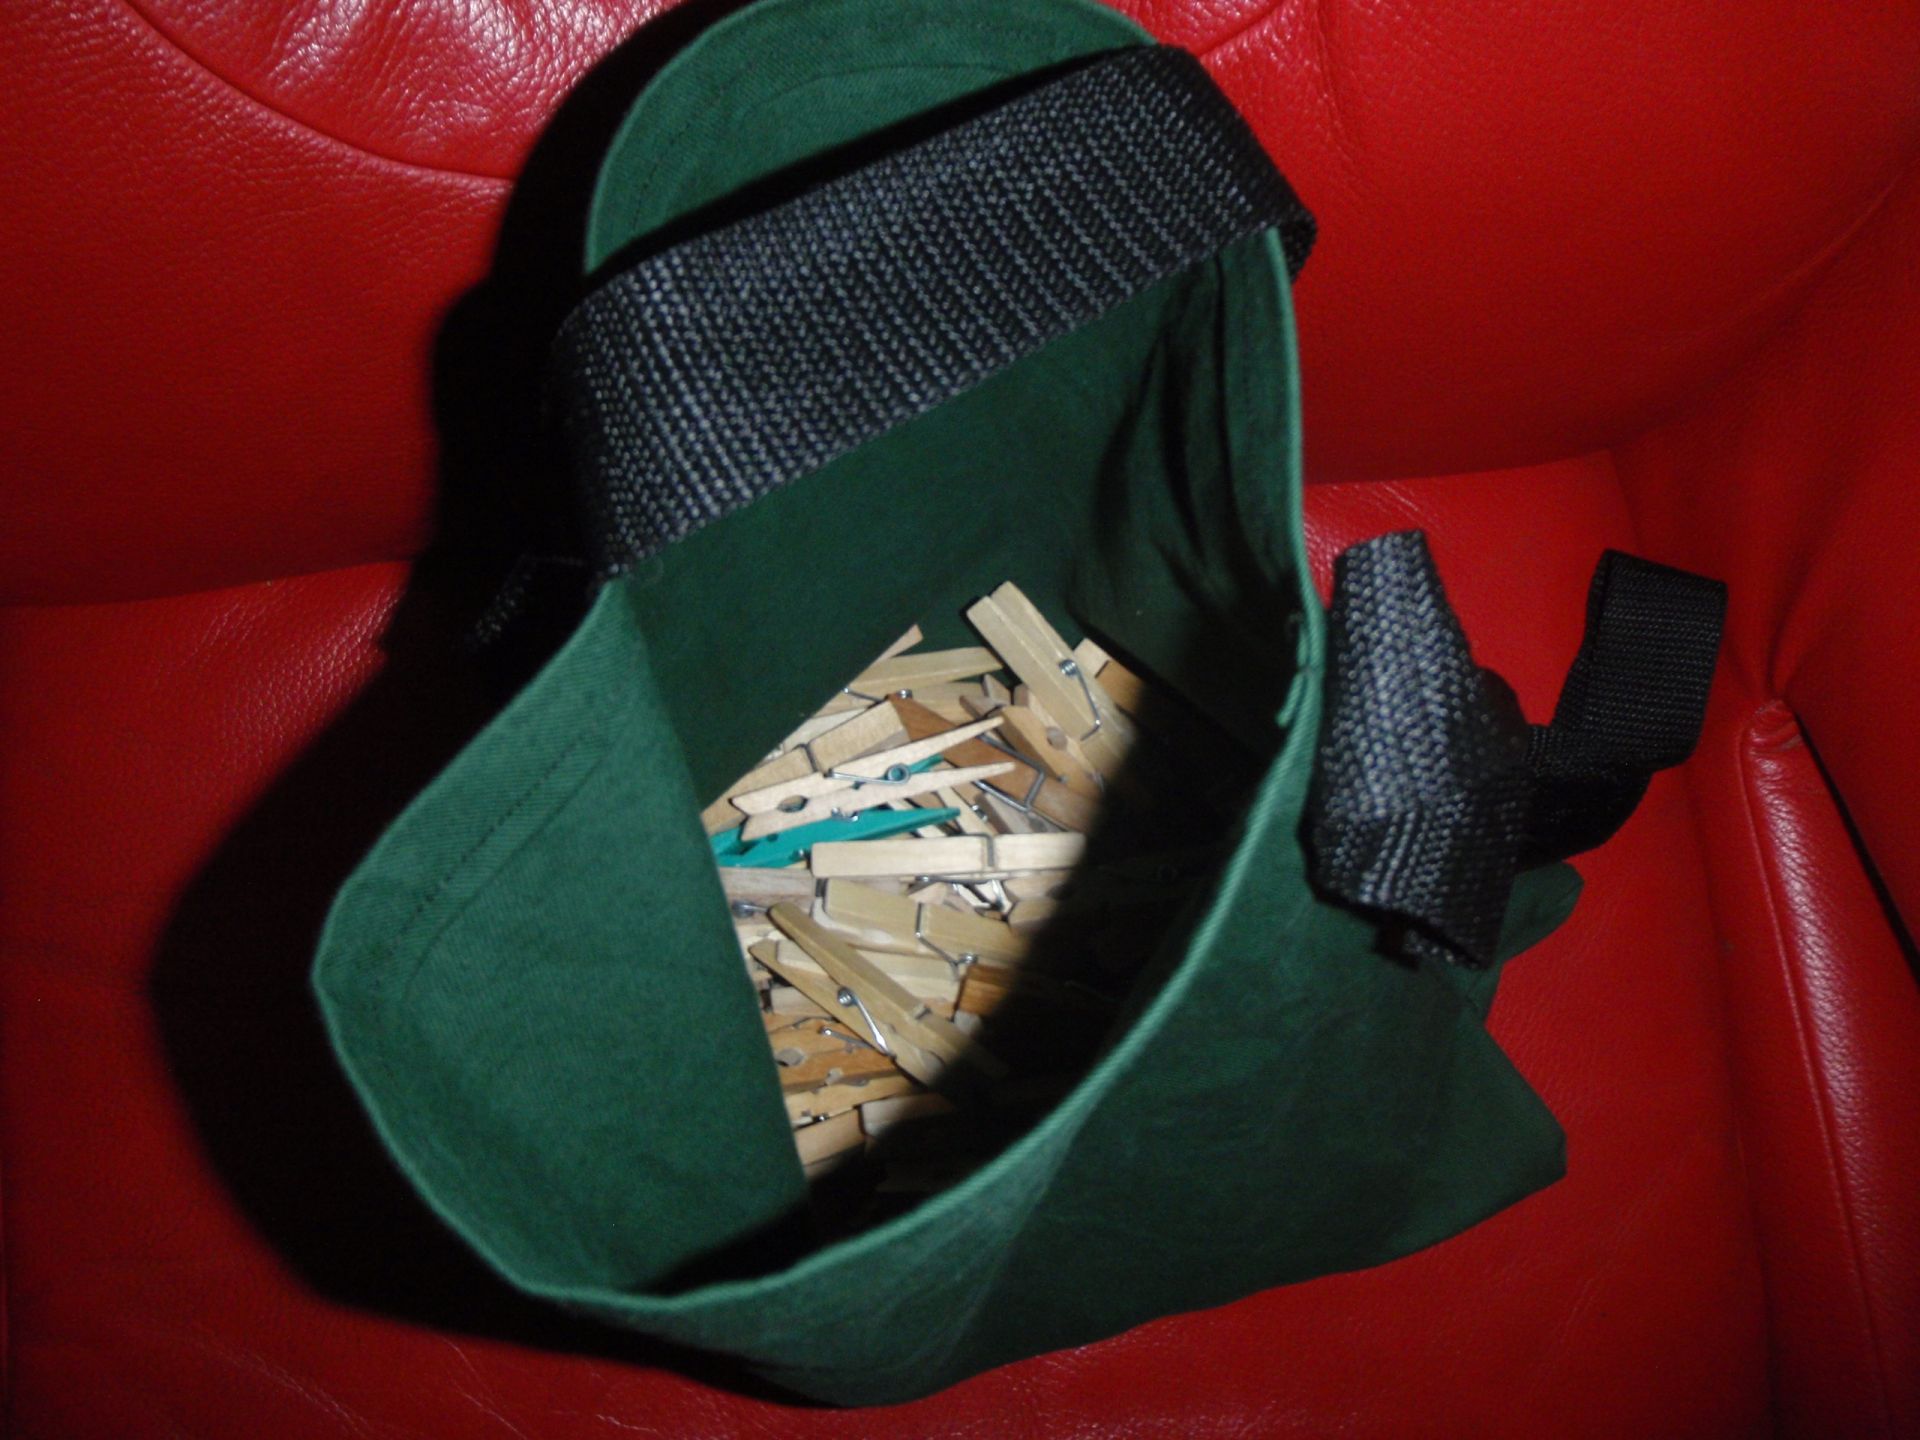
My mother was saying how the laundry pin bag I made last was too deep. You had to reach in quite far to get to the pins. So I decided to make a new one. I still had a scrap of a very sturdy green fabric (cotton, or so the guy said. It feels a bit like cardboard). I didn’t have any strapping on hand, so I decided to murder the old bag and just use that strapping.

This is the fancy new bag.

OLYMPUS DIGITAL CAMERA OLYMPUS DIGITAL CAMERA

Yes, that was sarcasm. This bag is far from fancy, but it’s functional and that’s good enough for me.

This counts as a gift for my mother. There you go mum, have fun with the laundry now!
Hopefully the next post will concern a red patchwork bag that I hope to have finished soon, only the straps need to be attached. I should be able to do that in about 15 minutes..

Gifts – 3

The last series of gifts was for four friends who celebrated their birthdays and moving house. I only knew two of the four, but I thought it was not very nice not to fix presents for all four. So I decided to make a series of zippered animal pouches. I’d seen this blogpost when it first came out, and was immediately in love. I decided to do a cat face pouch. That left me with 3 more animals (since I wanted different ones). I pinterested and found this one. Two down, two to go. I thought some more, googled a bit and thought ‘I want a rabbit’! So that was number three. Lastly I figured I wanted a frog, since frogs are awesome and I still had a green bedsheet that could be used.

I first sketched what I wanted and then used paint to draw all my designs. Yes, I know that paint isn’t the fancy tool to use for this sort of thing, but I happen to love paint and know how to work with it, so that’s what I did.

Drawings Click this image for a bigger version

After I drew all of them, I went upstairs to find all the scraps I could. I managed to eke out all my design in those scraps (and the green sheet I’d already allocated to the frog). I’m going to post a tutorial of how I made the frog tomorrow. Even if you guys don’t find it interesting at all, I want to practice with tutorials and it’s my blog so I can do what I want, right?

Anyway, I proceeded to put together a frog, a cat with fish, a whale and a rabbit with carrot in one evening and one morning. It didn’t take me as much time as I thought it would, so that was nice. Here they are:

Whale open Whale back

This is the whale, made of a couple of scraps of Mondriaan-esque fabric. The scraps were not large enough to accommodate the whole whale, so his back is pieced. His tail is stuffed, because it fell down and just looked sad. All the pouches have a red back lining (only back) to hide most of the seams and to give an impression of an open mouth when they are opened. I also added loops so they can hang somewhere.

Rabbit open Rabbit back

Second was the rabbit. Since it is a rabbit, it required a carrot of course, and big front teeth. I also added a nose to this one. The orange and green was scraps from the scraps of the cat.

Cat open Cat back

This is the cat. The cat has a fish and is made from scraps of my frog dress. Which is why there is a frog and and leg on the front and back respectively. I actually really like this one, it’s my favourite.

Frog open OLYMPUS DIGITAL CAMERA

This is the frog (I forgot to take a picture of the back, but it’s identical to the front but without the zipper and eyes). The frog you’ll see more of in the next post. His birth was fully documented. The closed fronts of all the pouches are seen to the right.

They are a fairly colourful bunch together, and I like them all. Tomorrow the frogorial.